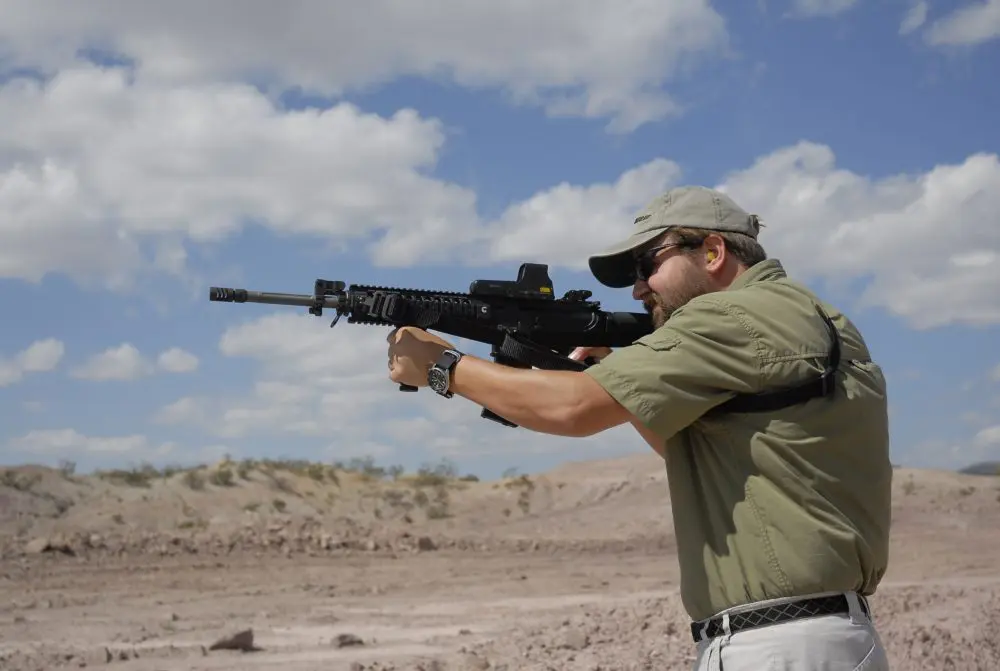
 With the right optics and accessories for your AR/M4 Carbine, your capability to engage threats can be greatly enhanced. In the March issue of S.W.A.T. (Part I: Stocks, Grips and Sights), I covered the importance of a correctly adjusted buttstock, the flaws with the A2 milspec grip, and proper placement of optics on the carbine. In this part, I’d like to focus on the forearm of the carbine, with the selection and placement of foregrips, lights and lasers.
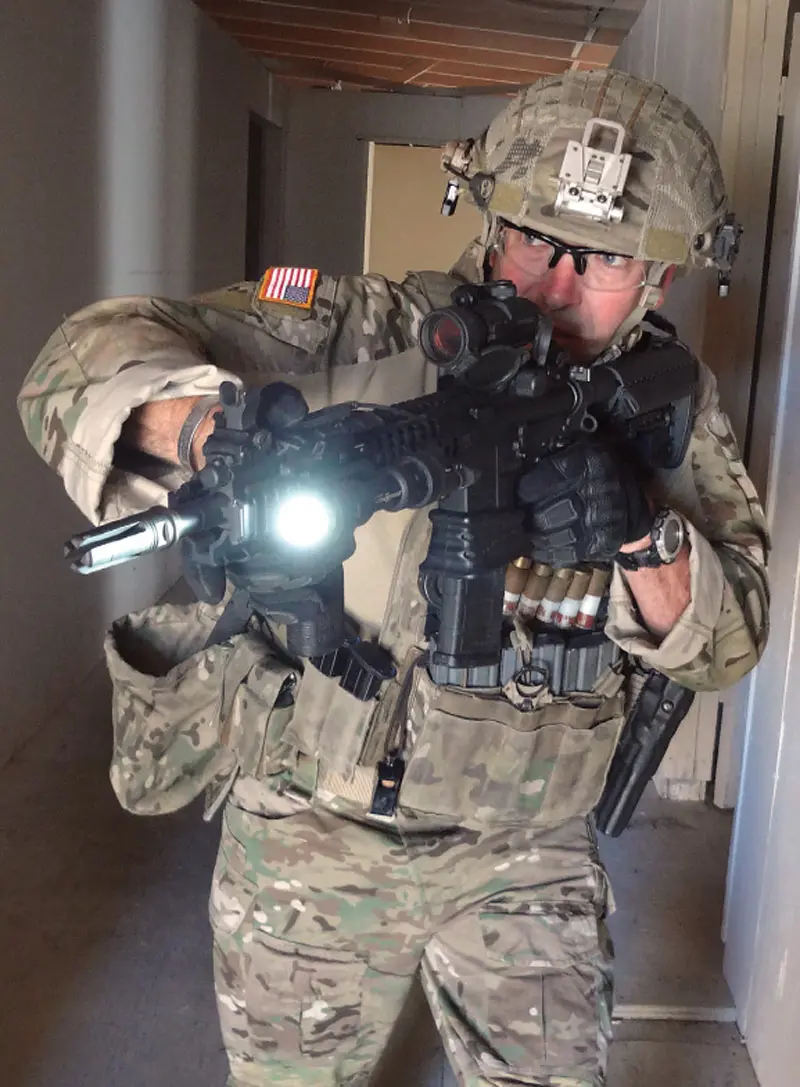
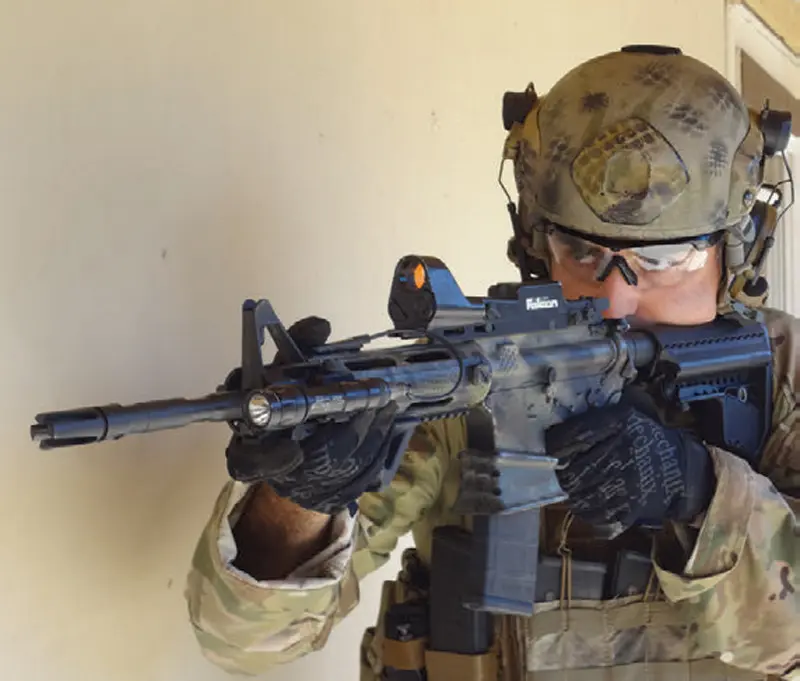
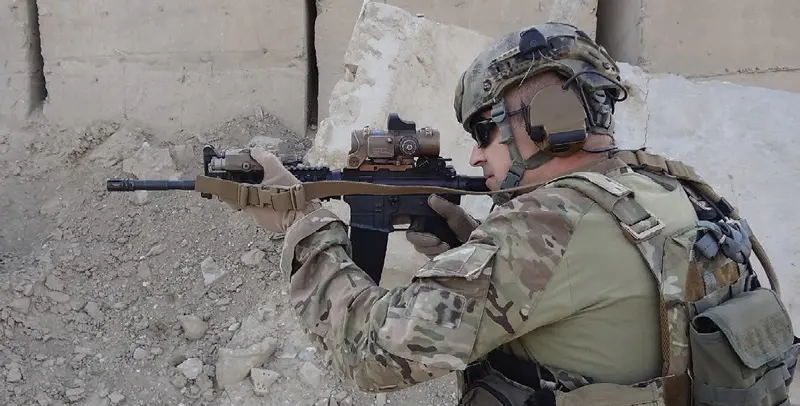
A good principle to follow when setting up accessories on the forearm is to place everything around your support hand first. White lights and other accessories such as IR lasers should be placed where operating them is just a matter of moving one finger onto the button or pressure pad to activate.
If at all possible, they should not be mounted where you must adjust or change your support hand. Having to reposition your hand to turn on lights and lasers can lead to slower reaction times under low- or no-light conditions. Or your support hand may interfere with your primary grip to facilitate gripping around a light or laser, affecting your ability to effectively support and grip the carbine.
This might seem like common sense, but time and again I have seen soldiers mount IR lasers and weaponlights in poor spots on the forearms of their rifles and carbines. Then they try to adapt their support-hand grip around all that stuff. Whatever accessories you choose to mount on your carbine, they should be placed where they complement your method of holding and gripping the carbine, enhancing your ability to engage targets day or night.
Table of Contents
VERTICAL AND ANGLED FOREGRIPS
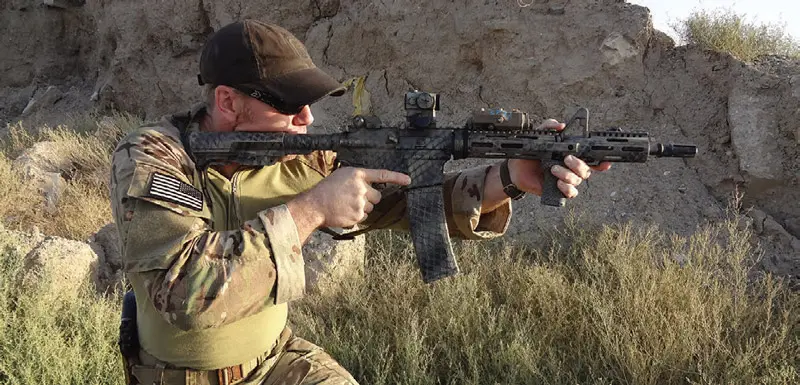
Used correctly, a vertical grip can complement modern methods of gripping the carbine such as the C-clamp grip (gripping the forearm of the carbine with the thumb on top and support-hand fingers curled up on both the rail and against the vertical grip). This allows you to pull straight back on the carbine, so you can drive the gun better from target to target and have more recoil control.
When mounting a vertical grip on a carbine, ensure you place it far enough forward on the rail that you can pull back on the rifle. On a normal carbine-length M4, I recommend placing the vertical about two thirds up the rail toward the muzzle. You want just enough room for your thumb on top in front of the front sight post, your fingers underneath gripping the forearm, and the bottom knife-edge portion of your hand resting against the vertical grip.
Don’t mount it too close toward the magazine well, as that puts both your hands too close together. Like using a magazine well support, this creates an up-and-down pivot point. During firing, the muzzle rise can be increased because of the pivot point effect, leading to slower shooting due to waiting for the carbine to settle between shots.
Angled foregrips such as Magpul’s AFG are designed to support a C-clamp grip. Using one puts your thumb on top of the rail and the rest of your fingers curled up around the angled grip, creating a perfect C-clamp grip on the carbine. I find that angled foregrips work well with carbines that have mid-length rails and longer. With carbine-length forearms, there isn’t enough room on the rail to mount it far enough forward to get the correct support-arm extension.
The AFG needs to be mounted on the forearm where you can extend your support arm out about 75 to 80% of the way, with your elbow resting naturally down. If your arm is too straight, it can place too much muscle tension on your support-hand wrist, which leads to muscle fatigue that can affect shooting. Like a vertical grip, the key is that an angled foregrip should be positioned so you can pull straight back on the grip, which aids in settling recoil and helps you drive the gun.
In deciding to use a vertical or angled foregrip, it depends on the overall use of the carbine. Is it just a range plinker or a competition set-up for something like 3-gun? I recommend basing your decision solely on whichever one seems to balance the carbine the best and facilitates your natural arm extension and grip.
For a tactical or defensive carbine, foregrip selection is a little more difficult. In addition to holding the carbine and controlling recoil, your support hand needs to be able to effortlessly operate the controls of the lights and lasers required on a fighting carbine.
CHOOSING THE RIGHT LIGHT
The first weaponlight I ever used that attached directly to a rail was the Visible Light Illuminator (VLI), from the first SOPMOD issue back in the late 1990s. Powered by six AA batteries, I could activate it via toggle lever or a pressure pad, and its incandescent bulb produced a whopping (for the time) output of 90 to 110 lumens. (Having used one, I would say the output was definitely closer to 90 lumens).
Thankfully weaponlights have evolved since then, to the point where now most start at about 200 lumens and you can choose anything from lights with several brightness settings to lights that also include IR and strobe functions.
With all the weaponlights out there, choosing the right one can be an involved process. For a tactical set-up, how bright a weaponlight do you need, and what functions should it have?
Starting with brightness level, a weaponlight needs to be able to brightly illuminate out to a distance of at least 50 yards or so. Lumen wise really any light with an output around 150 will get the job done. In CQB that is enough output to illuminate most rooms and long hallways you might come across.
As far as using a weaponlight with multiple operational modes such as strobe and IR, it should depend on the purpose of the tactical carbine. For self-defense, where your illumination needs might simply be to search and clear your home in the dark, the KISS (keep it simple, stupid) principle applies. A simple one-setting white light may be all you need.
completely out of the way of shooter’s support hand.
A light with multiple buttons or one that requires a certain amount of presses on a button for the beam or brightness you want might be too complicated. Under the pressure of facing a real threat, the last thing you want is to be fumbling around with the controls on your weaponlight when you should be scanning for threats. A single-setting light controlled via a simple pressure pad makes perfect sense for many looking for a home-defense set-up.
For tactical operations, where you are not only shooting in self-defense but are also expected to go on the offensive, such as room clearing and CQB, having a light capable of multiple modes can come in handy. Strobe functions, multi-brightness settings, and being IR capable (applied correctly) can come in very handy for tactical work.
A strobe setting (very fast pulses of light) can be disorienting to the person viewing it. Aside from making yourself hard to spot, it becomes very confusing and hard for the enemy to pinpoint where and how many assaulters there are if the whole team is running strobe lights.
The benefit here is that, if you can cause confusion with strobing lights, you are slowing down the enemy’s ability to process information. In a combat situation, any time you can affect someone’s reaction time, you have an advantage.
Moving on to multiple brightness settings on a light, they can be useful if you want to check something out under white light but do not want to use a super bright beam. With white light in CQB, every time you turn it on to engage a target—even from inside a structure—you chance pinpointing your position to outsiders looking in via windows and openings. Having the capability to dim down during soft searches or re-clears can minimize this danger.
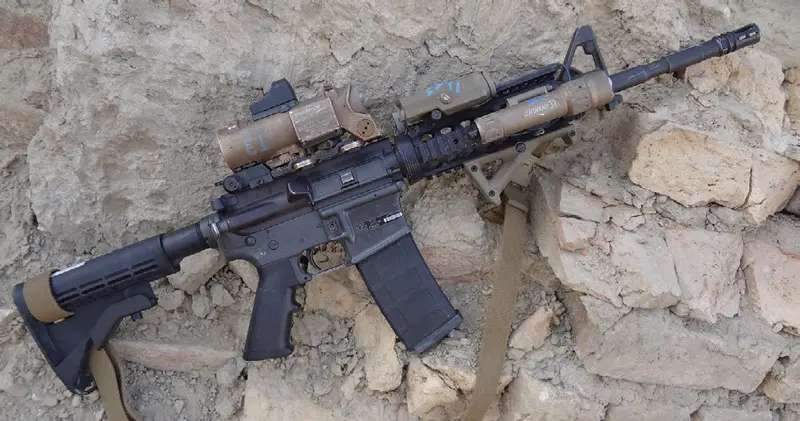
Lastly, if you have IR capability with your weaponlight, that gives you the ability to illuminate an area much the same as an IR flood beam setting found on most IR lasers. If you can manage without an IR laser pointer for aiming an IR-capable light, it makes a cheaper alternative to purchasing a separate IR laser such as the LA-5. It gives you a backup to your IR capability while running blacked out.
WEAPONLIGHT MOUNTING OPTIONS
While picking a light with the right operational modes and brightness output is important, another factor to consider when choosing a weaponlight is its method of activation. How the light is activated can determine the light’s mounting options.

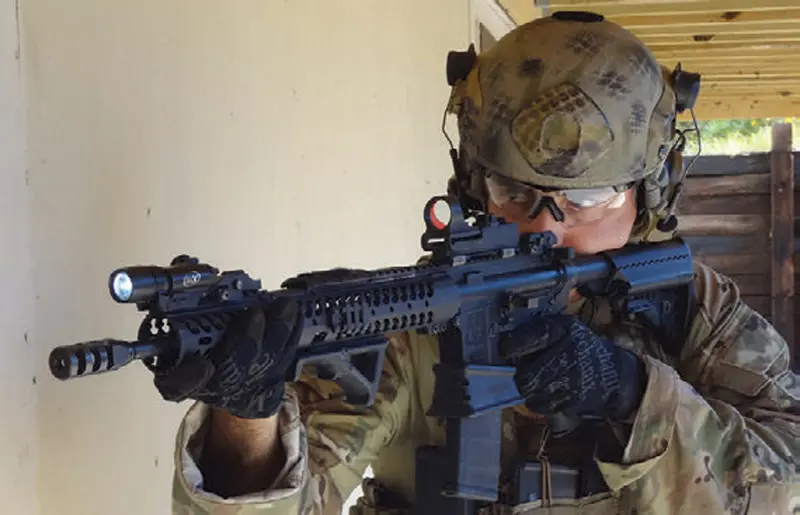
I prefer lights with a pressure pad mounting the light on the opposite side of my support hand, with the pressure pad on top of the rail. Doing so allows a modern-style C-clamp grip and, with the thumb naturally resting on top, it is right on the pressure pad. But with this set-up, it’s very easy to have a white light AD, as you can activate the pressure pad by the natural tension of your hand from gripping the rifle, either from shooting or just carrying the rifle.
While I usually stay away from mounting lights on the same side as my support hand, the one exception is with the Inforce WML (Weapon Mounted Light). Because of its angled push button, it fits perfectly right in front of your support hand on the same side. Moving your thumb from the top rail to the side, pointing it toward the target, puts it right on the angled button with very little sacrifice of support-hand grip. From here, it’s very easy to manipulate the button and control on the WML.
In addition to same-side support-hand mounted, the WML also works great mounted at 12 o’clock on the forearm. With its angled button, it can be easily accessed by your support-hand thumb as it rests naturally on top of the rail.
While I am personally not a fan of top-mounted lights (running a top IR laser is not practical on my combat set-up rifle), it can be a good option for many who do only run a light on their rifle.
Twelve o’clock mounting works especially well with lights that use toggle-style buttons, such as those found on most pistol-style lights like the SureFire X300 and Streamlight’s TRL series. Again using a C-clamp grip, they are very easy to operate with your support-hand thumb.
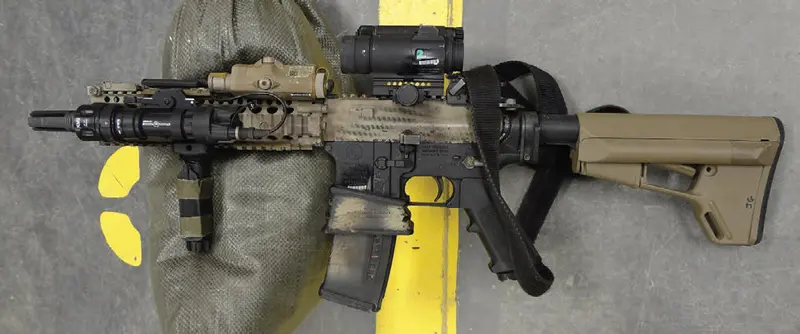
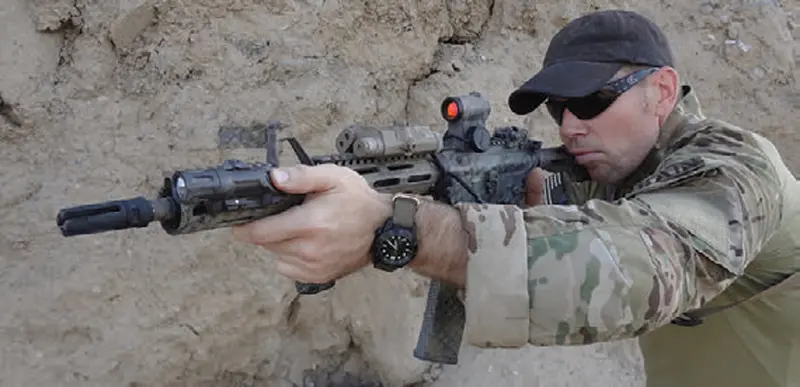
One more light activation method that affects where it is best mounted on a carbine is a push-button tail-cap light, which makes a great choice if you are using a straight vertical grip. Mount it so the push-button tail cap is within reach of your thumb after you wrap it around the vertical grip. If I’m running a white light with an IR laser, this is one of my preferred set-ups. I always run a pressure-pad switch for my IR laser taped to the side of the vertical grip.
Using a pressure-pad tail-cap light and vertical-grip combo with an IR pressure pad, both controls are in the same position for my support hand. With no need to adjust my support hand, switching between the two is instinctive and I can do it very quickly. Although in order to operate the light or IR laser I must switch from a C-clamp grip to holding onto the vertical grip, it works well for the way I employ a light and IR laser.
Without going into TTPs that much, the only scenario where I use a white light is indoors when my expected engagement distances are CQB. At short ranges (room distance), not using a perfect C-clamp grip does not hinder my ability to shoot fast and as accurately. And using an IR laser with NODs because I am looking over the rifle and aiming with the laser (usually a center-chest style hold), a perfect C-clamp is not required.
ADDITIONAL MOUNTING CONSIDERATIONS
The main reason I prefer to mount the weaponlight opposite my support hand is that I do not want to be gripping around an object to hold onto the carbine. A wide grip on the forearm is not as strong as a narrower grip, which is why you see smaller diameter rails being used more by top 3-gun competitors. Using a smaller grip around the forearm permits better control of the rifle, which can equal faster split times between shots and faster target indexing. Same side, top or bottom mounting of lights is fine as long as they are not in the way of your support hand.
One other consideration is, regardless of what clock direction the light is mounted on, do not mount it so far forward that the bezel of the light is near the muzzle. While most weaponlights have some sort of shock rating and are designed for the muzzle blast and recoil of a weapon, placing it right next to the muzzle adds extra stress to the bulb, possibly degrading its operational life. Having your light mounted parallel with your muzzle also exposes it to extra impact. Aside from the obvious muzzle striking of an opponent, your muzzle can come in handy for other tasks such as window clearing.
A good CQB technique for window breaching—after you break or blow open the building or car window and prior to going through or reaching in— is to rake the muzzle of your M4 across the windowsill, breaking off any jagged pieces of glass that might catch on or cut you. Doing so with a light mounted next to your muzzle isn’t good for the service life of that light.
MOUNTING IR LASERS
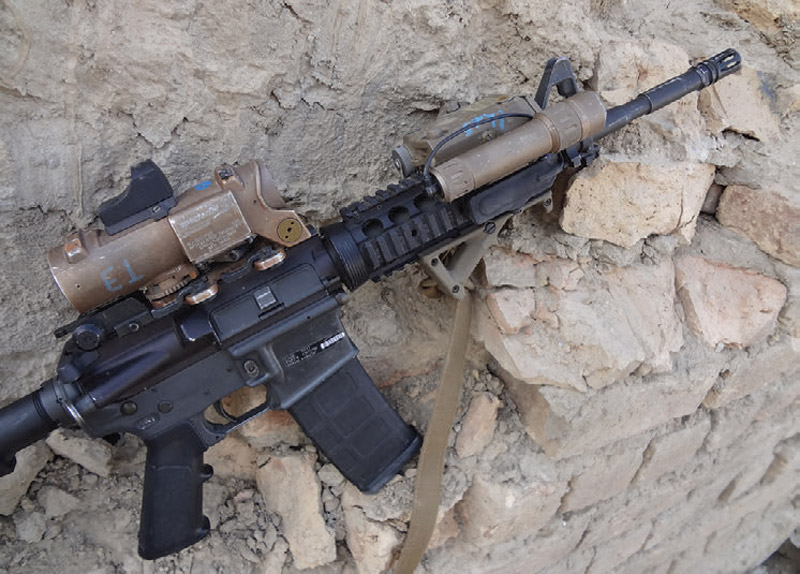
Most shooters mount their IR laser as far forward on the forearm as possible, so there is no IR splash off the front sight post or blocking of the IR aiming laser or IR flood beam. I actually find this reason to be flawed. Maybe with older models of lasers such as the PEQ- 2, which had a weaker beam, there was a chance of front sight interruption.
The newer generation of IR lasers, such as the LA-5 and LA-15, has little interruption with the front sight. But mounting the laser forward, you are forced to expand your grip around the laser. As mentioned with weaponlights, this can mean a less comfortable and possibly weaker grip.
My recommendation is to run the laser behind your support hand just in front of whatever optic you are running. Doing so allows a C-clamp grip on the rifle and, despite what many believe, being mounted a few inches back on the rail causes no interruption or blockage by a fixed front sight of the IR aiming laser. Only if you have an IR flood beam you might notice a little shadowing from the front sight.
Some do prefer to use the built-in push button on top of the LA-5 and 15 and don’t mind a wider grip. In this case it’s preferable to have the laser mounted forward on the forearm so the thumb naturally rests on it, making it very easy to activate the IR laser with the support-hand thumb.
Side mounting a laser is an option, but I don’t recommend it. Using an IR laser, you already need to have some side and height above bore offset. Side mounting the laser complicates things by making the offset even more. In CQB, engaging targets at room distance requires split-second processing of information. You already have to factor in one hold-off for whatever primary optic you are running. With a sidemounted laser, depending on what side it’s mounted on, the laser beam could be down low or up high. Either way, it requires you to remember two different holds—one for your optic and one for your laser.
Staying with a top-mounted laser— aside from a little side hold-off, maybe an inch or so—your hold-off almost exactly matches that of your optic. Under the pressure of a firefight, whether you are using your optic or IR laser, you don’t have to change your hold-off that much. Because of this, I always recommend top mounting the IR laser. The less I have to remember in dot placements and hold-offs, the better.
THE WRAP UP
One reason for the popularity of the AR/M4 carbine is it’s easy to customize and accessorize based on the shooter’s needs. Whatever the expected situation— CQB, long-range shooting, day and night operations—along with proper selection of accessories, proper placement of the accessories is paramount to you being able to shoot your best.
Always build upon your method of holding the rifle. In doing so, you set yourself up with the best chance of winning the fight.