Table of Contents
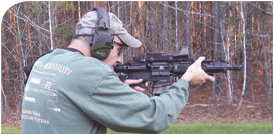
C-CLAMP | OPTIMAL RIFLE GRIPPING TECHNIQUE
Employing a grip that facilitates both short- and long-range shots is essential to rifle shooting, no matter if you are a law enforcement, military, competition or recreational shooter or a defensive-minded civilian.
One technique, the C-Clamp grip, allows just that: one technique for both super-fast strings at CQB [Close Quarters Battle] distance and a steady platform for shots out in the 100-meter range while standing. The C-Clamp technique has its roots in both the competition world with Three-Gun shooters and from the tactical side with military shooters.
VERTICAL FOREGRIP
Around 1997, the SOPMOD program reintroduced a forward vertical grip on military rifles. The main function of the vertical grip was to allow the shooter to reach around with the support thumb to activate the toggles and push buttons on white lights and IR/visible lasers. Because of this, wrapping the support hand solely around the vertical grip was taught as the primary method of holding the rifle. While this does facilitate instant activation of the white light, it does not facilitate a strong and stable grip for shooting.
The problem is that, by holding on to the vertical grip alone, it allows a side-to-side pivot point off the support hand. To compound this, if the shooter likes his vertical grip back toward the magazine well, it also creates a second pivot point, because now the shooting hand on the pistol grip and the support hand on the vertical grip are close together, creating an up/down pivot point off the muzzle of the rifle.
The fix for this is to mount the vertical grip about onethird of the way up the rail from the magazine, which allows you to grip the rifle on the forearm while resting the last few fingers of your support hand against the vertical grip. This facilitates a straight pull-back of the rifle into your shoulder.
Around the same time, Three-Gun competition shooters were experimenting with the optimal rifle length to facilitate shooting fast at multiple ranges. The result was the production of different forearm lengths and widths. Longer and thinner rifle forearms allowed shooters to change up the angle of their support arm and play with different methods of gripping the rifle.
C-CLAMP GRIPS
Today there are multiple variations of the C-clamp grip. All the variations incorporate the same fundamentals and accomplish the same thing—provide a constant, steady and stable grip.
The differences in C-clamp grip methods depend on the set-up of the rifle and the size of the shooter. What length rail you run, a slick rail or a foregrip (vertical or angled), and what feels natural to you will all play a part. I’m a firm believer that just because one method works for 90% of the shooters out there does not mean it’s right for you. Your body mechanics have input, and a standard technique might take some tweaking to work for you.
The goal with the C-clamp grip is to get a straight pull-back on the rifle. This not only holds the rifle steady, but also (and more importantly) helps redirect the felt recoil—from an up-and-down muzzle rise to a straight push-back on the shooter. Additionally, the C-clamp will aid in switching between targets by allowing you to move the rifle from point to point with minimal overswing.
TAKING UP THE C-CLAMP
As mentioned, there are numerous variations of the C-clamp. The differences generally center around how far out the support arm is and whether the shooter shoots with the support-side elbow up or down. As far as the grip on the rifle itself is concerned, it’s mostly the same, with the exception of if you use a front grip on the forearm or not.
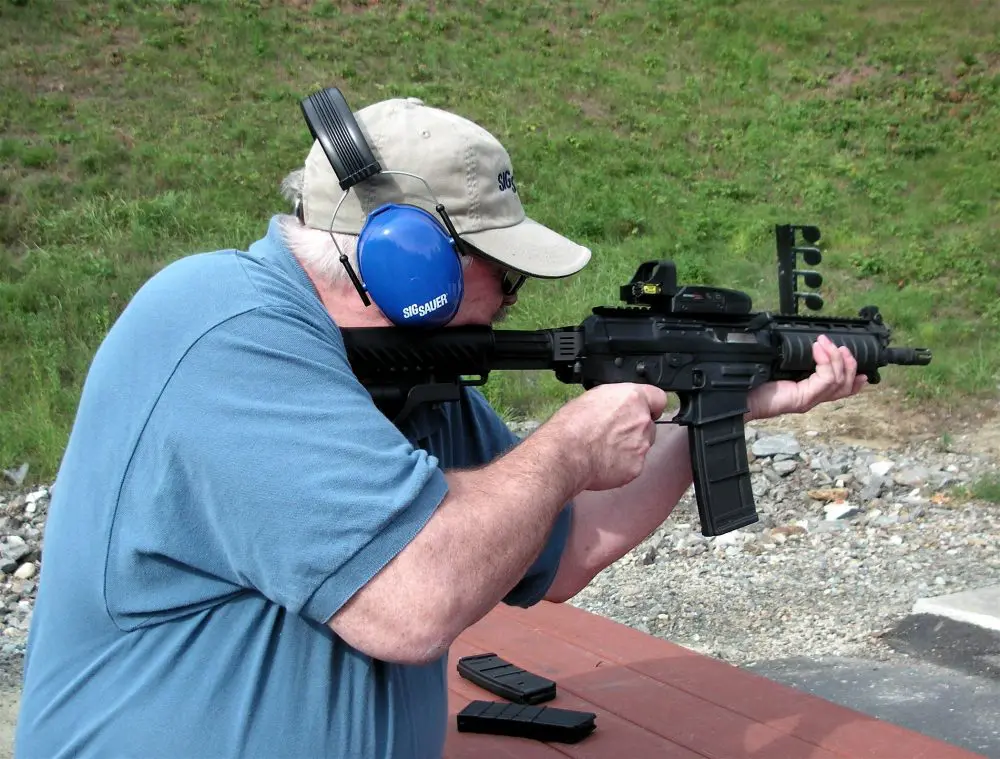
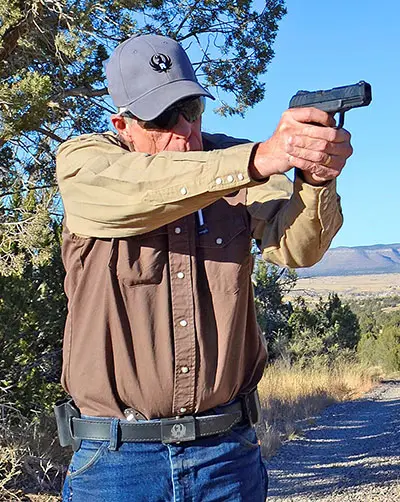
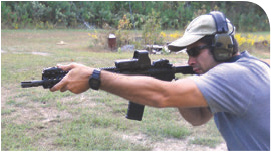
On a slick forearm with no vertical or angled grips, place your hand on the forearm with your thumb resting on top (12 o’clock position on the rail). The rest of your fingers should be under the forearm, with your palm on the side of the forearm, hence making a C.
The difference here as compared to a traditional riflesupporting grip is that a traditional grip has your palm under the forearm fingers coming up forming a V. While ideal for the prone, since it allows minimal contact with the rifle so you don’t disturb the shot, using it standing up permits the rifle to rise up each shot. Having your thumb on top with the C-clamp helps to minimize muzzle climb.
For recoil control using the C-clamp, you want to pull back on the rifle with your support hand. But you don’t want to pull back so hard that you start getting the shakes from too much muscle tension. This will of course make you tired quickly, but pulling back too hard also causes a tendency to pull your shots in the direction of your support hand, especially when shooting at distance. Using myself as an example, being left handed and using my right hand as the support side with the C-clamp, when I pull shots they are usually low and right on the target.
A good gauge to measure the right amount of rearward pull is: assume the C-clamp. Once you have it established, remove your firing hand off the pistol grip and hold the rifle in place with the support-arm only. The rifle should not move. When holding the rifle with the support hand only, if the rifle starts to shake or move in less than a few seconds, you are pulling back too much. If the rifle dips or moves when you take your firing hand off, then you don’t have enough pressure.
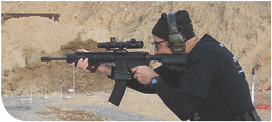
C CLAMP WITH VERTICAL GRIP
How do you get a C-clamp with a vertical grip?
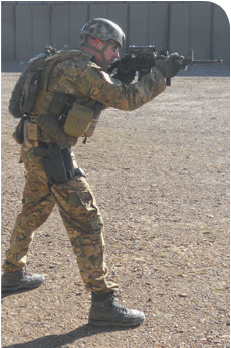
The key is to rest the last three fingers of your hand on the vertical grip and your thumb on top of the rail, forming the C. I find using a vertical grip enhances the C-clamp as it allows me to really pull straight back on the rifle as opposed to just using a slick rail. Magpul’s AFG (angled foregrip) was designed specifically to facilitate a C-clamp grip. Using it puts your hand naturally in a C-clamp with the thumb on top. The AFG gives extra purchase for your fingers to wrap around and facilitate rearward pull.
ELBOW PLACEMENT
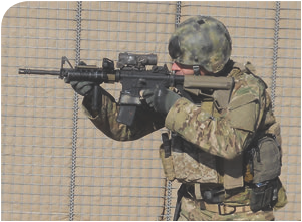
Different techniques of the C-clamp generally involve elbow placement with the support arm. Here is where rifle set-up and body size of the shooter have input. In the tactical/competition shooting community, the three most prevalent techniques I have seen are: elbow up, elbow down, and straight arm (arm extended out to maximum length on the rifle). I don’t believe any one method is generally better than another. Whichever one feels the most natural is the one for you. Obviously if you have a carbine-length rail, you can only place your hand out so far, but with longer rails you have options for different methods.
I prefer the elbow down technique: keeping my arm relaxed and letting my arm bend naturally from the extension to where my hand sits on the forearm (on a midlength rail, about 3/4 of the way up toward the muzzle). Keeping my elbow up or extending straight to lock-out for me takes active muscle tension, and that’s what I don’t want. With my elbow down, my arm is relaxed and the only tension I’m applying is a straight pull-back, which aids in settling the rifle between shots, which increases the rate I can put rounds on target.
The elbow up and straight support arm techniques that some shooters prefer put emphasis on driving the gun from target to target and keeping the gun down during fast strings of fire by providing extra torque with the support arm locking the rifle down and in place. Arm locked out as far as it can go (straight arm) is just a variation of the same thing. By locking the support arm out to almost full extension, it braces the rifle in place and helps drive the gun on target.
WHAT’S BEST FOR YOU?
Again, I must emphasize that I don’t think any single technique is better than another. Which one is “best” should be based on what feels the most comfortable and natural to you.
Yes, one technique might allow you to blaze at room distance, but if you have to readjust your support arm in any way to go from a ten-meter shot to say a 50-meter shot, then I think you have an issue. Moving your grip around to facilitate different shots can take time that’s time wasted both on the flat range and in a gunfight.
To help you find out which is the best technique for you, I recommend doing a simple drill specifically aimed at discovering the optimal support-hand distance on the forearm and angle of your elbow that gives you the best natural feel and support.
The drill: place one target at five meters and one at 50. Shoot a two- to five-round string as fast as you can at the five-meter target, then immediately shoot a double at the 50-meter target. If you feel yourself changing the angle of your forearm at all in between the five- and 50-meter shots, you want to change your grip and support-arm distance or angle. The goal is to use the same natural-feeling support arm position for both distances. Once you can do that, I think you will have the best support-arm position for the C-clamp grip technique for you.
The next thing to ensure you have the optimal C-clamp grip is applying the right amount of rearward pull to get the most out of minimizing muzzle rise. As with the forearm elbow up/down angle, I don’t think there is a “one size fits all” answer. Finding out how much tension you need to pull back with your support hand can only be learned by putting rounds downrange.
HOW MUCH TENSION?
One good live-fire test to see if you are applying the right amount of tension is to shoot strings of fire and watch your sights and see where they settle between shots. Start with just enough rearward pull to hold the rifle in place, shoot a string of fire, then increase your grip pressure with your support hand and at the same time increase the rearward pull. As you tighten up the tension, you should notice a point where your muzzle rise between shots is minimal. As you keep applying tension and exerting pressure, you will find the point at which you are pulling shots off target. Once at that point, back off to the middle ground or “sweet spot” where you first saw a noticeable difference in muzzle rise between shots. That is where you want to be in regard to how much grip tension and pull to exert.
Like proper support-arm angle, you ought to be able to shoot a five- or 50-meter target with the same amount of tension.
Here’s a simple drill to help measure tension and a good goal to work toward: on a single target, shoot a five-round string on a five- to seven-meter target in under two seconds. To really bring it, shoot the same five-shot string on a single target in 1.5 seconds or less.
SUMMARY
Are you looking to increase your rate of rounds on target and improve your chances of making stand-up shots at distance? Whether you’re on the flat range or in the shoot house, at a Three- Gun match or in a military operation, I recommend you give the C-clamp technique a try.
No matter which variation you shoot—elbow up, down or straight arm—and whether you run a slick rail or a vertical grip, I think you will find the C-clamp method of supporting and gripping the rifle can be adapted to fit any shooter and any situation.