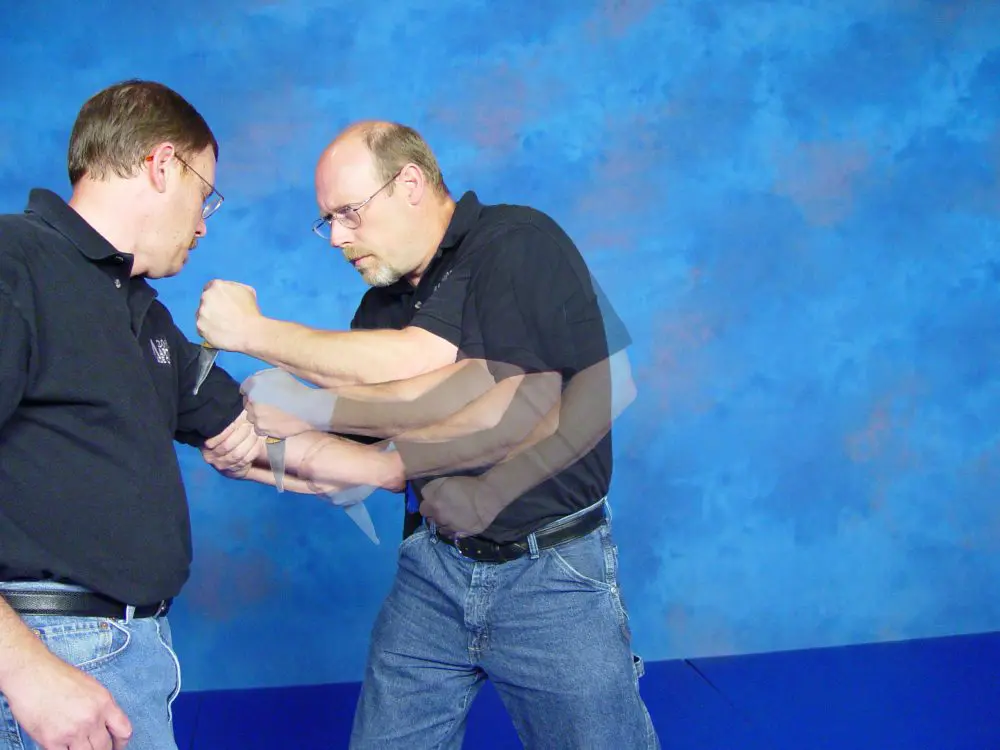

Using a strobe, camera catches technique from start to completion.
Firearms tactics have come a long way in the past few years. The increasing use of Simunitions, Airsoft, and other types of force-on-force training has done a lot to make gunfighting training more dynamic and realistic. It has also helped shooters understand skill sets that are often hard to appreciate in sterile, square-range training—particularly skills like weapon retention.
Let’s face it, whether you are an armed professional or a lawfully armed private citizen, if you carry a firearm, you must maintain positive control of it at all times. That means learning at least some fundamental weapon-retention tactics.
One approach to handgun retention that has become increasingly popular is the idea of using a knife as an auxiliary weapon. Basically, when the bad guy grabs your gun, you draw your knife and cut the bad guy off of your gun to regain control over the situation.
Although this may sound simple, there’s a lot more to it than that. Let’s take a step-by-step look at what’s really needed to employ a knife effectively as a weapon-retention tool. In the process, we’ll build a sound system of workable tactics. We’ll also learn that the common practice of sticking a tactical folder in your weak-side pocket may be a recipe for disaster.
The first step in dealing with any gun grab is understanding and accepting the reality of the situation. The bad guy is not only trying to take your gun by yanking you all over creation, he is probably trying to beat the snot out of you while he does it. As such, a good weapon-retention technique should not only address the grab itself and the violent dynamics of the situation, but should also provide some type of guard to protect you from getting hit.

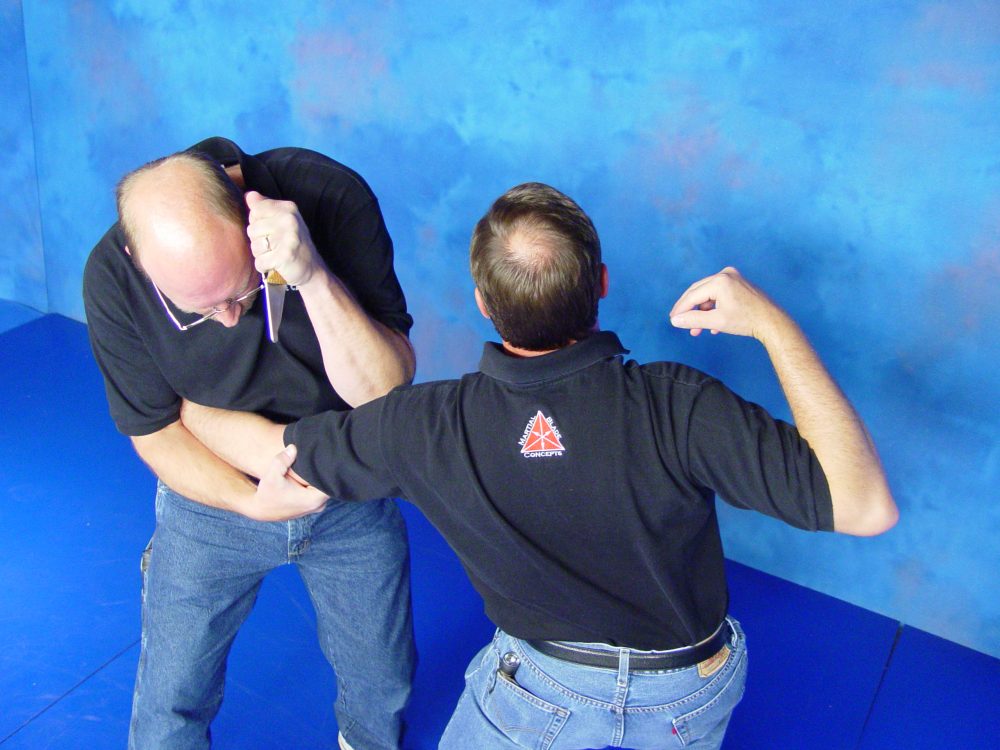
The time to practice retention techniques is in a dojo, as depicted here—not on the street when the chips are down. This sequence shows the author’s recommended use of the knife for weapon retention. When the attacker grabs your gun, immediately grab his arm above the elbow with your right hand. At the same time, grip your knife with your left hand and prepare to draw.
Obviously, the primary function of any weapon-retention tactic must be to prevent the attacker from gaining control of the handgun and being able to shoot you or some other innocent party. Ideally, that means that your equipment and your preferred tactic should keep the gun in the holster. If the gun does come out of the holster, your tactic should still allow you positive control over the attacker’s arm and the direction of the gun’s muzzle.
With his arm stabilized, draw straight from the sheath to his bicep. Place the blade, and then power it through the muscle with a pressure cut.
A good weapon-retention tactic should also force the attacker to release his grasp on the weapon. Although pain compliance may work, ideally this should be done by forcing a true mechanical release of the weapon—whether he feels pain or not, he’s got to let go.
Finally, your tactic should work the same way whether the attacker grabs with his left hand, his right hand or both hands. Better yet, the body mechanics and basic principles should also function as an empty-hand defense should your knife draw fail, and work as a pre-emptive defense if you react before the grab is secured.
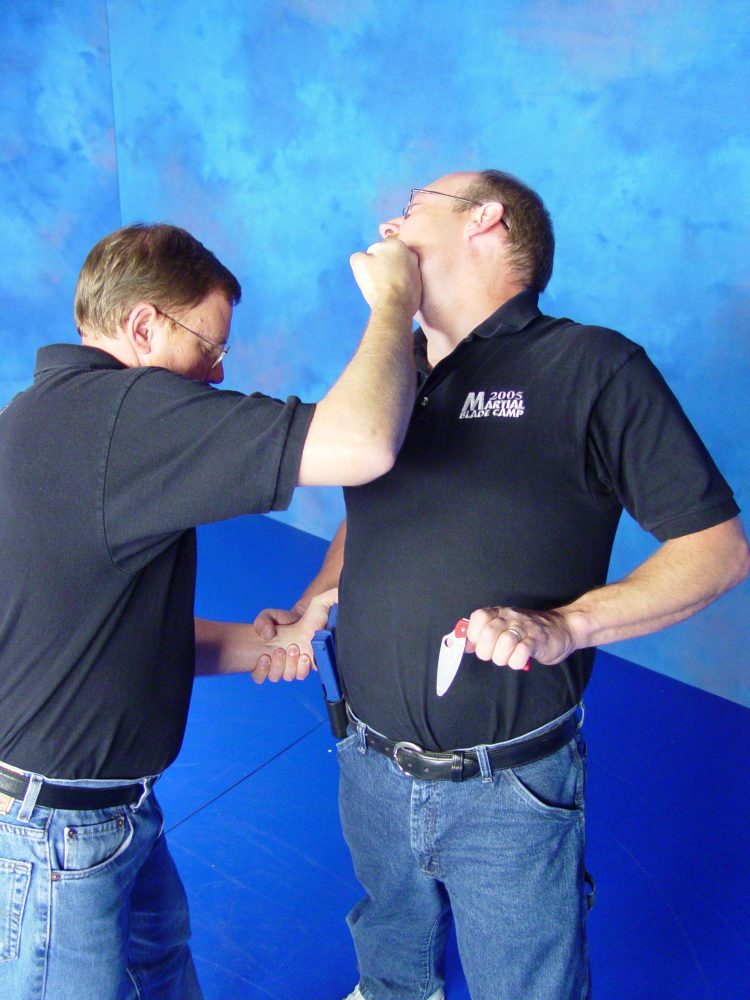
At the completion of the cut, your left hand forms a guard to protect against your attacker’s strikes.
With all this in mind, let’s first take a look at the most common approach to using a knife as a weapon retention tool. It typically goes something like this:
- You carry a tactical folder in your weak-side pocket.
- Bad guy grabs your gun.
- You grab bad guy’s wrist.
- You draw and open your tactical folder with your weak hand.
- You cut bad guy’s hand off your gun.
Once again, the basic theory is great. However, we need to bear in mind the ground rules we established above. Remember that a gun grab is a violent, dynamic situation that typically involves yanking, pulling, hitting and lots of movement. You also need to understand that once you latch onto the bad guy’s wrist, you have committed yourself to a gross-motor-skill tug of war. Once that commitment is made, your entire body kicks into that mode, making it extremely difficult to perform complex motor skills with the other side of your body—especially things like opening sharp folding knives with your weak hand. If you add to that the fact that once you purposely lower both your hands to waist level, the bad guy will probably accept the invitation to hit you in the face with his other hand, you have what is known as a “soup sandwich.”
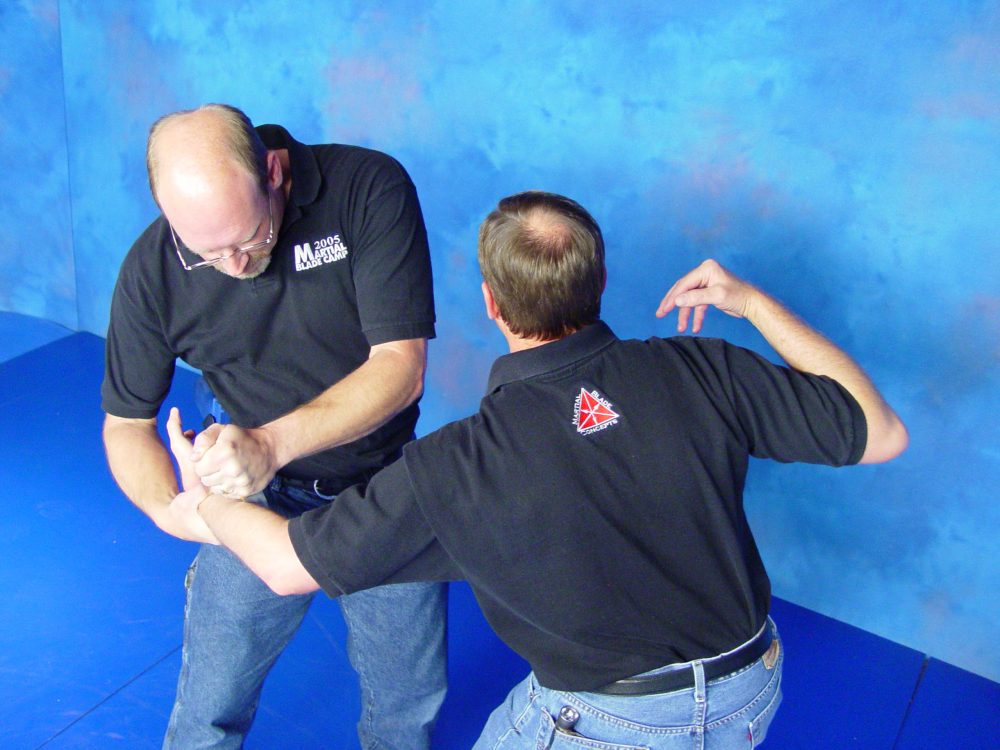
If he has not released his grip, slide your right hand down to his wrist and cut the muscles or the flexor tendons of his forearm to release his grip.
Before I go any further, I know that there are many folks out there who believe in and religiously follow this approach to weapon retention. I also know that this method has been successfully used to defend against real gun grabs and has saved the lives of the officers involved. I am not trying to argue with that success and I am certainly glad that it worked out that way. However, I feel that the credit for the success of the technique lies more with the motivation and dedication of the officers than the technique itself.
If we again accept that a real gun grab will quickly degenerate into a gross-motor-skill battle, the best knife-based weapon retention technique should not require any fine or complex motor skills—like the one-handed opening of a tactical folding knife. With that and the other factors identified earlier in mind, my preferred use-a-knife-to-keep-your-gun tactic goes more like this:
- Carry a fixed blade (or open folder in a sheath like a fixed blade) in front of your body for a left-hand, reverse-grip draw (for a right-handed shooter).
- Bad guy grabs your gun. For purposes of illustration here, let’s assume the attacker grabs the gun with his left hand.
- You grab the bad guy above the elbow to limit his mobility to one joint (the shoulder). Now, every time he pulls, you simply “ride” the pull with your whole body. The gun stays in the holster or, if it comes out, it stays trapped under your arm and pointed at something other than you.
- You draw your knife in reverse grip with your left hand and raise it straight to his bicep. With full body weight, you pressure cut his bicep in half.
- Bad guy stops pulling because he has no bicep.
- If he still has a grip on the gun (the forearm muscles and flexor tendons may still act independently), you track your hand down to his wrist or forearm and cut again to sever his forearm muscles and/or flexor tendons to mechanically release his grip.
Bad guy’s hand releases. - You create distance and draw a superior weapon to assume decisive control.
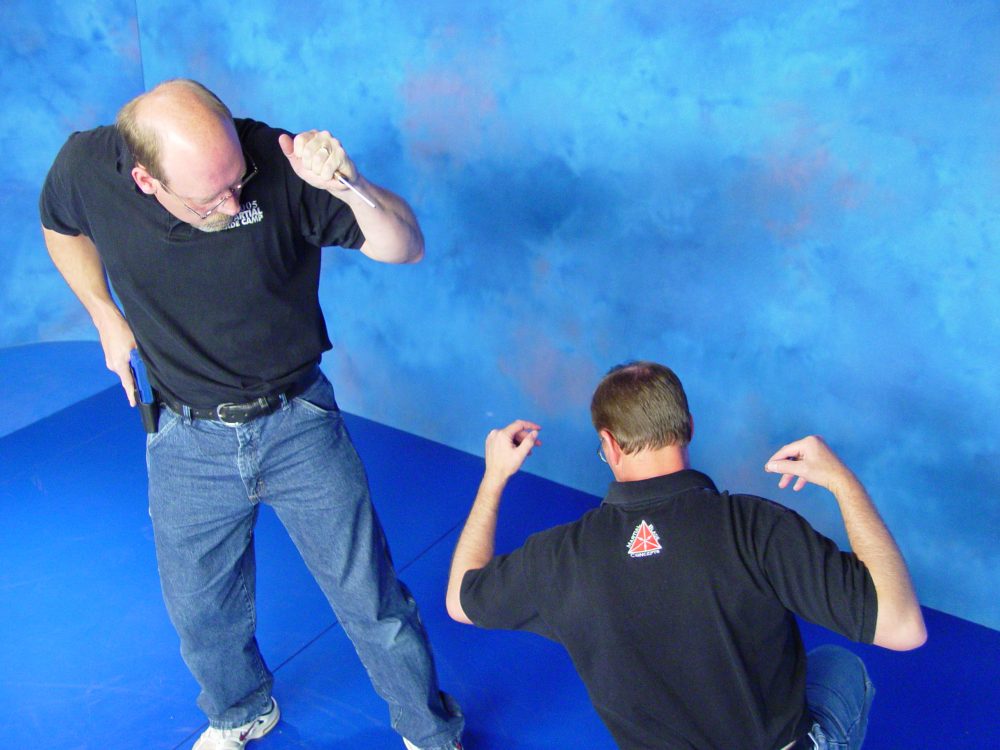
Create distance and be prepared to escalate as necessary.
This approach offers a number of significant advantages that the traditional tactical folder method does not. These include:
- All your motions are gross-motor-skill based.
- You achieve better control over the attacker’s arm and body—and your gun—by grabbing above the elbow rather than at the wrist.
- Your attack directly targets the muscles that are causing the problem and therefore force a true mechanical release.
- The motion of your knife arm also shields you against the bad guy’s free-hand strikes and positions your knife for follow-up attacks to the attacker’s face or neck if necessary.
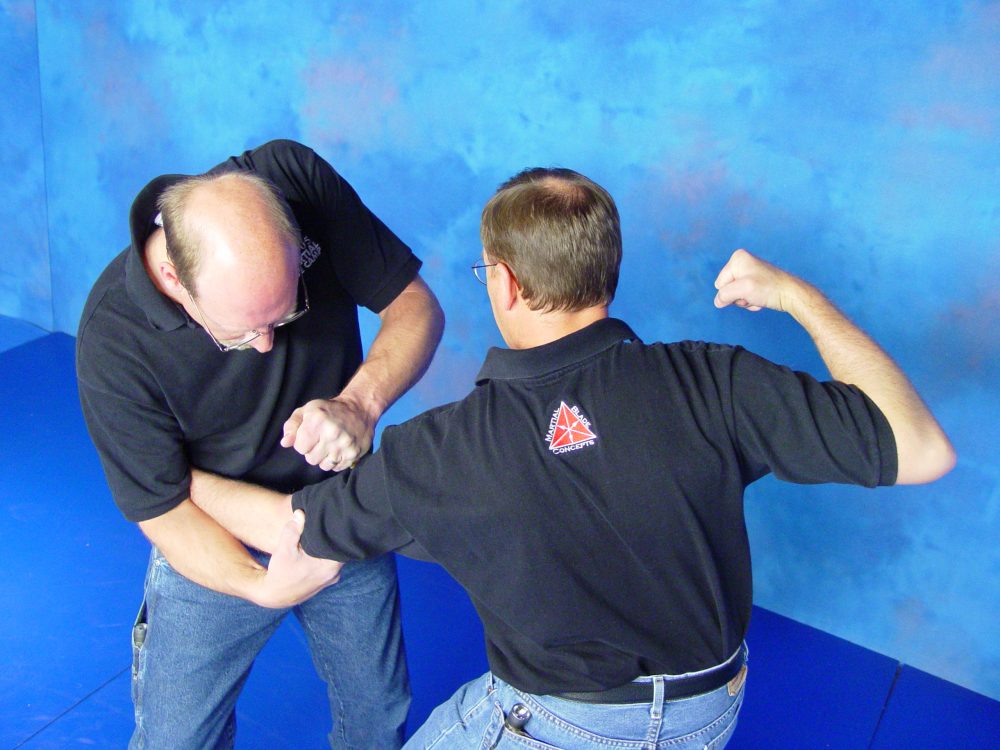
As mentioned previously, a good weapon-retention technique should also work against a right-handed grab and a two-handed grab. That allows you to have one go-to technique, reduces your decision-making time, and promotes faster reactions. If we apply the same basic mechanics we used against the left-hand grab against a right-hand grab, it would go something like this:
Against a two-handed grab, you can target either arm or both arms as you see fit, repeating the same basic body mechanics and cutting appropriate targets as they become available.
Although drawing a fixed-blade knife is much simpler and more gross-motor-skill-oriented than drawing and opening a tactical folder, it is still possible that you could foul your own drawstroke or even drop your knife. What then? Well, you simply perform the same mechanics empty handed. What was a cut with the knife in reverse grip now becomes a full-power elbow strike to the arm. What were backhand thrusts to the face now become back elbow strikes and hammerfists to the face and neck. And what was an elbow break or armbar is still an elbow break or armbar.
What’s the best defense against a gun grab? Not letting the bad guy grab it in the first place. And with that goal in mind, this technique still works great. As either hand (or hands) extends toward the gun, use the same body mechanics to sweep the left arm upward and deflect the grab with your elbow or forearm as you pivot your gun side back and away. If necessary, follow through with a backhand hammerfist strike to the face, create distance, and take control.
For the record, the basic mechanics of this tactic also happen to work very well when the left hand is holding a flashlight. If the light has a tail-cap switch like most tactical lights do these days, your grip on it will be very much like a reverse grip on a knife. Since the light doesn’t cut, the cutting motion becomes a pure elbow strike. The thrusting/hammerfist actions are now powerful strikes with the bezel. Add to that the ability to activate the light to momentarily blind and disorient the attacker while you’re pounding on him, and you once again have the basis for a sound and very versatile set of combative body mechanics.
In any real self-defense situation, theory isn’t good enough. You need practical, versatile tactics that provide you with a workable, yet flexible, game plan. More importantly, you need to validate your tactics through regular, realistic force-on-force training so you have the confidence and reflexes to use them on the street. If you make the effort to do that, go ahead and bring a knife to a gunfight. You’ll be glad you did!
[For information on training opportunities with Michael Janich, please consult www.martialbladeconcepts.com.]