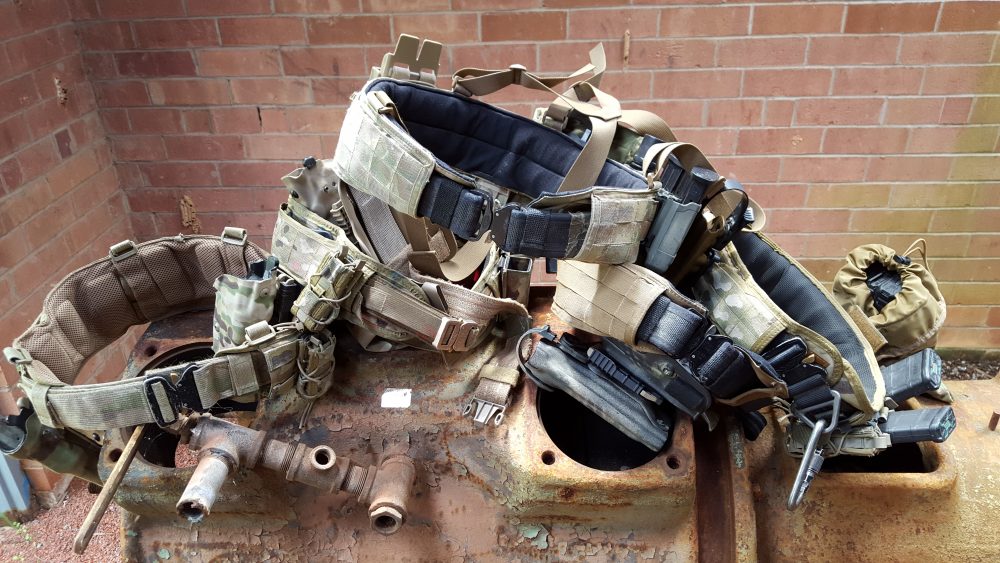
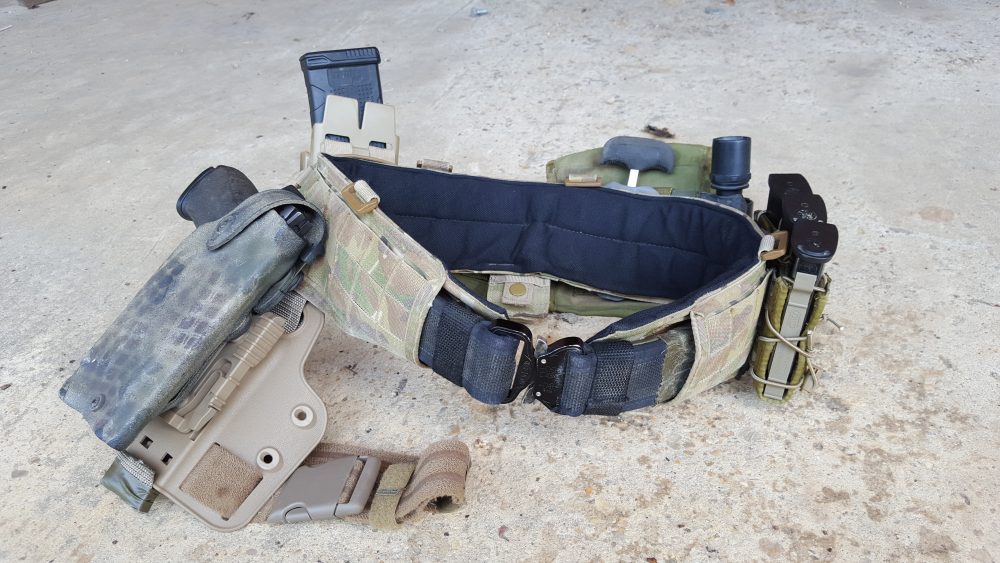
Three approaches to belt liners (left to right): mesh with raised pads with slots in between pads to allow for air flow, rubberized liner, and mesh lined over padding.
Carrying spare ammunition for both primary and secondary weapons, medical items, night-vision equipment, communications gear, breaching charges, and maybe a couple of grenades or flash bangs can add up to quite a combat load. And let’s face it, there is only so much space on plate carriers, body armor, or chest racks to mount and store these items.
One solution to help carry and better distribute a full combat load is wearing a battle or “war” belt. Even for those who do not run a pistol, these belts offer more real estate for mounting pouches and, because of their padded design, remain comfortable even when loaded down.
What’s the difference between a war belt and a battle belt? Really nothing. It just depends on how the manufacturer of the belt refers to their product. The belts generally consist of a padded sleeve with three rows of MOLLE webbing running the length of it and requiring an inner belt to secure it around your waist.
Not just for combat operations, war belts make great overall range belts. Again because of the built-in padding, they make a very comfortable platform for a holster, multiple magazines, and other pouches.
Looking for a belt for competition use? I find war belts ideal for 2-Gun matches (rifle and pistol). The comfort cannot be beat, and it creates a stable platform for the three pistol and two rifle magazines I typically carry during a course of fire in a match.
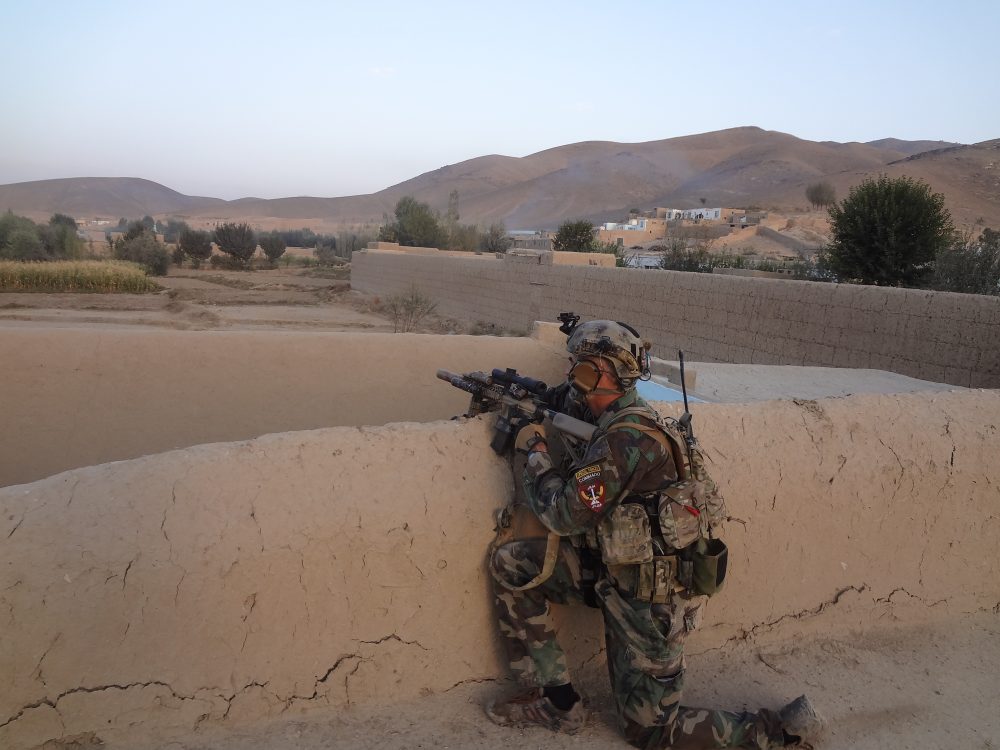
Afghanistan 2015: ATS War Belt is just visible below plate carrier. Not visible are low pro suspenders under plate carrier connected to belt. Suspenders keep plate carrier from pushing belt down onto the hips. This is not only more comfortable on long hikes, but also allows for better freedom of movement over rough terrain.
Table of Contents
CHOOSING A BELT
Aside from quality of craftsmanship (and price), the biggest differences among most belts are the thickness of the padding and what the inside of the belt is lined with.
The biggest complaint from battle-belt users is that the belt can sag or move around on the waist. This is because some belts are overly padded. While they might feel great, very thick padding does not provide a solid grip around your waist unless you cinch it down to a ludicrous level to compress the padding—in which case, you lose the comfort value you were looking for in the first place.
I have also found some belts to be too wide. While the majority of battle belts have three rows of MOLLE webbing, the space it takes to have three rows of MOLLE generally determines the width of the belt.
Some belts have extra material past (above or below or both) the MOLLE webbing, making them slightly wider. I have found that the wider the belt is, the more likely it will have the same issues as too much padding. The belt does not grab well around the waist or stay in place while running and jumping.
Aside from padding thickness, the other big difference among a lot of belts is what the inside of the belt is lined with. The three most common options are a rubber non-slip lining, mesh-style breathable fabric, or hard padding with slots between the pads to let air in. Which is best seems to be a matter of personal preference. For me, it’s the breathable mesh-style lined belts. Most of the conflict areas around the world are in very hot climates. Rubberized lined belts—which do have better non-slip properties—are a little too moist and sticky for my taste when I have to wear one for 12 or more hours a day in 90+ degree temps.
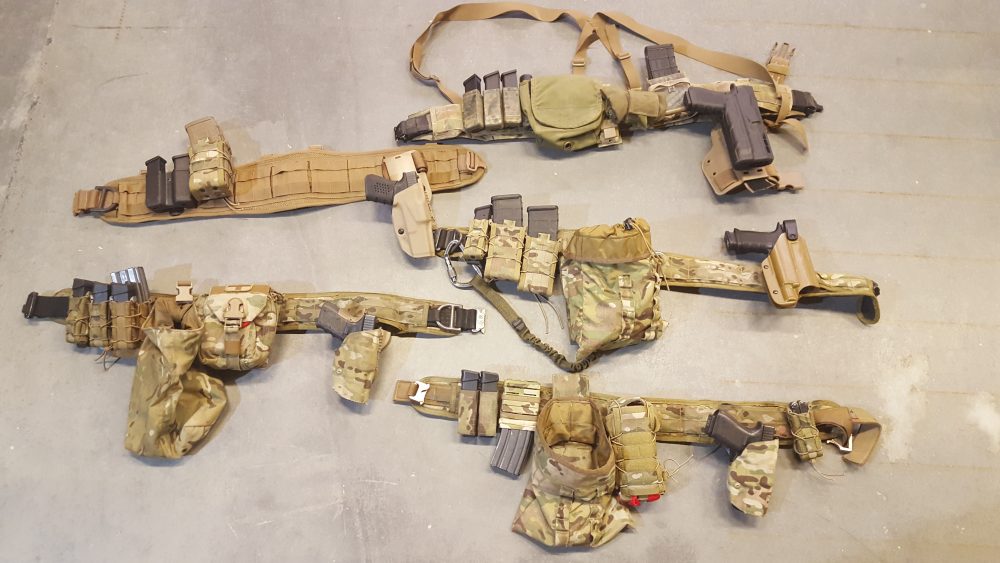
Five battle belt set-ups from different assaulters. Minimal amount of spare magazines on each belt indicates they are using their belts just to supplement their combat loads. All but one has a dump pouch attached.
RIGGING UP: TACTICAL PRIORITY!
One very popular principle to follow in terms of rigging up gear is the “line priority” method, which divides your gear into levels or “lines” based on the order in which you would put it on.
- The first line is the bare minimum—sometimes based just on what you carry in your pockets—but can also be applied to tactical belts.
- The second line is your basic fighting load: what you would wear in a firefight (vest or plate carrier/body armor).
- The third line is usually mission sustainment: what you would carry to last 24 to 72 hours (what goes in a rucksack or go bag).
With this line method, the idea is to be ready to handle an immediate threat with your base layer, then fight to your other lines or, as the situation progresses, you line up to full-blown mission sustainment phase.
While this is a very organized method of looking at how to approach a combat load-out, I find it flawed. No matter what, when going into harm’s way, I want some sort of ballistic protection first. While one could argue that you can wear a belt all day in a relaxed environment or grab an easy-to-reach fully loaded war belt in an emergency, do you really want to head into a firefight with no ballistic protection?
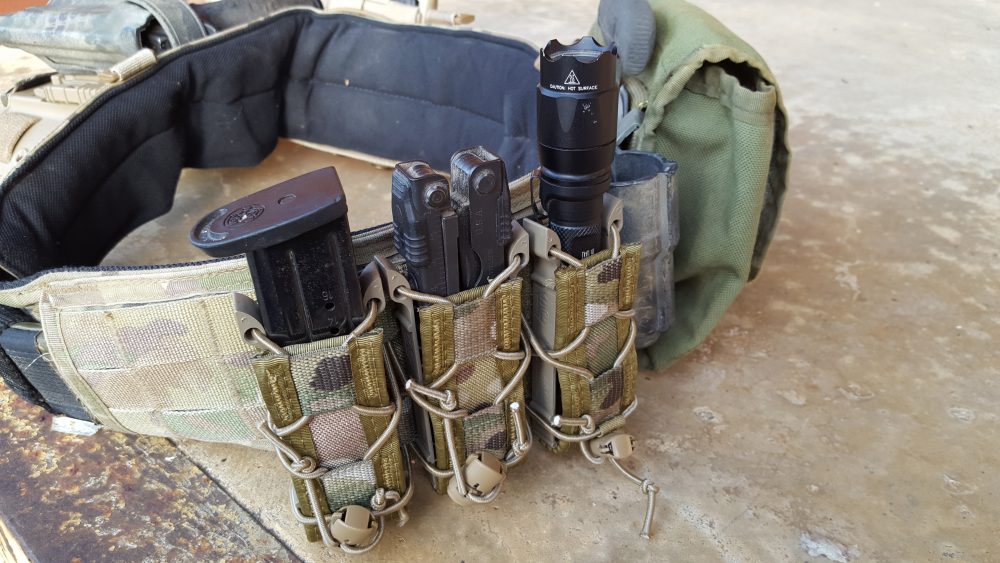
Pistol mag pouches, like this triple pistol Taco by HSGI, can also be used to hold items like multi-tools and flashlights.
My approach to rigging up a battle belt is that it should be used for supplementary gear—just more of the stuff you already have on your plate carrier that you might need for a fight, such as a few extra rifle or pistol mags, grenades, or another general-purpose (GP) pouch for extra charges, chemlights, etc.
For medical items, there is some merit to mounting an individual first aid kit (IFAK) on a battle belt in the small of your back so you can reach it with either hand.
If something kicks off, I’d rather just have to grab one item (besides a rifle) that has a little bit of everything, including an IFAK, that I might need and that also provides ballistic protection. So again, when approaching what and how much to put on a battle belt, I view it as supplementary to already having a basic combat load on a plate carrier.
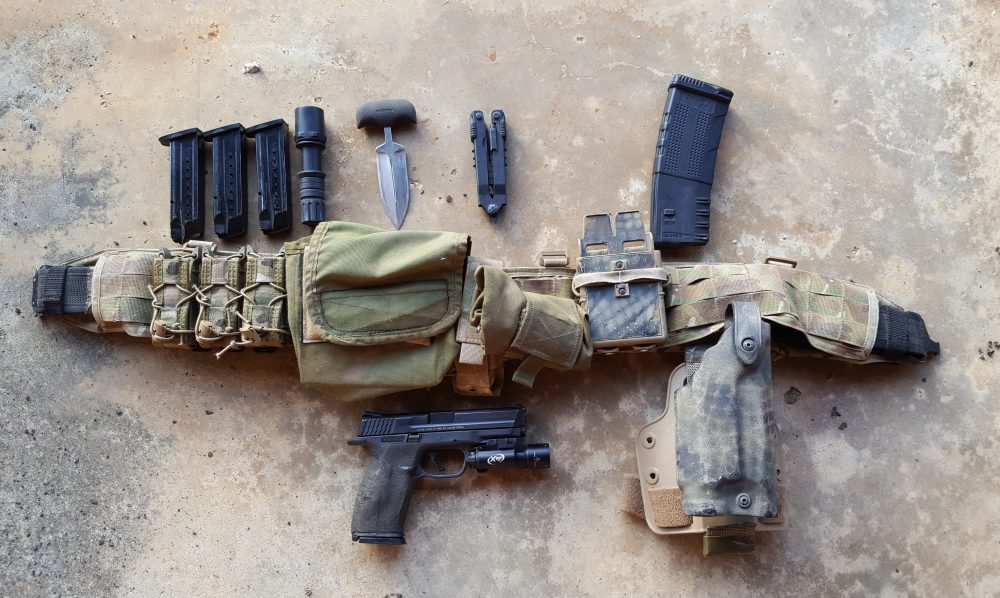
Gurwitch’s preferred battle belt load-out: three pistol mags, handheld light, push dagger, Gerber AR multi-tool, GP pouch for storing night vision, dump pouch, rifle mag, and pistol. He shoots pistol right-handed and rifle left-handed, hence placement of rifle mag on right side of belt.
WHAT AND WHERE TO CARRY
Keeping the above in mind, everything needed for a fight is already on a plate carrier, with the exception of a pistol, which really is a contingency to the rifle going down. Everything on the belt is extra stuff needed or enhancement items such as a multi-tool—not a required item for a firefight, but very handy for multiple reasons.
For the pistol, I recommend at least two magazines and up to four. If you have to transition to the pistol, seeing as you are now most likely going up against rifles, you cannot shoot back too much.
Double tapping a threat is great for training, but most shooters’ normal response to a real threat is to shoot the threat until it’s down and stops moving. In reality, we’re talking at least five-round strings. Since most 9mm mags have 15 to 17 rounds, that’s enough ammo for three threats per mag. Having at least two extra mags gives you some wiggle room.
If your battle belt double duties as a competition rig, you always want to carry one extra magazine than a course of fire in a match requires in case you need to make up for misses or you have a malfunction and need to jettison that mag and go for a fresh one.
Fully rigged-up ATS War Belt.
In the majority of action shooting sports such as 3-Gun and USPSA pistol shooting, the longest courses of fire for a pistol are about 40 rounds, which means three extra magazines (based on 15-round capacity). One in your pistol and three on the belt give you plenty of ammo to make up misses, or if you have a malfunction, you can ditch the mag and go for a fresh one.
This also applies to rifle magazines. The rifle magazine load-out for going into harm’s way is one to two on the belt. The average extra mags most soldiers run is between six and eight. Having six mags on your carrier and one or two extra on the war belt spreads out the weight a little.
For many, including myself, it is faster to get an emergency reload off the belt as opposed to a plate carrier.
KNIVES, TOOLS AND LIGHTS
While I am not of fan of giant fixed blades, having a knife on you is a good idea. In fact, the “two is one and one is none” rule applies pretty well here: one on the plate carrier and one on the battle belt is my preference.
In terms of having to fight with one, I don’t relish the notion of a one-on-one knife fight, slashing it out until one man is left standing. Instead the knife should be used as a space maker. If an attacker is on you for a gun grab or trying to stab you, you can go to the knife if there’s not enough space or time to go to the pistol.
One example is getting tackled by a threat. I was trained to keep one hand on the pistol to prevent a gun grab, while the free hand goes to the knife to make space via stabbing to allow drawing the pistol to finish the fight.
Running IFAK on a battle belt is not a bad idea, especially if you rely on belt for range training. Ensure you can reach it with either hand.
Also like a pistol, you have to ensure the knife’s placement is not easily accessible by an attacker. On a battle belt, I utilize a push dagger off my left hip (opposite) side of the holster. This gives me options: if one hand is busy holding a threat at bay, I can go either to the pistol or knife depending on which arm is free.
I already mentioned the handiness of carrying a multi-tool. If you’re trying to decide between a standard multi-tool versus one of the weapon-specific tools, go with the weapon specific. Many have great AR-specific tools such as front sight movers, special bolt scrapers, etc. When looking for a multi-tool pouch, 90% of the pistol-mag pouches made for double-stack magazines work great for holding multi-tools and flashlights.
Speaking of flashlights, like knives, having more than one—spread between plate carrier and battle belt—is not a bad idea. Even if you run a pistol light, having a handheld white light gives you the ability to check things out without flagging everyone with your pistol. And if Murphy strikes, you still have the ability to see targets if your weapon-mounted lights go down.
TO DUMP OR NOT TO DUMP?
Depending on your method of retaining partial and fully spent magazines, a dump pouch may or may not be a necessity.
Detractors of using dump pouches will point out that if you throw all your mags in there, you never know what you might pull out if you are down to needing partially filled mags to stay in the fight. Thrusting your hand into your dump pouch and having to fish around a sea of empties to find a partial may not only cost you time but could cost you your life.
I hate to say this, but I bet most who are against running a dump pouch have not been in an extended gunfight. Having a dump pouch on your belt gives you an option. I agree that if you have time, you should be tac-loading and putting partial magazines back in your kit, but sometimes the enemy does not give you time to do this.
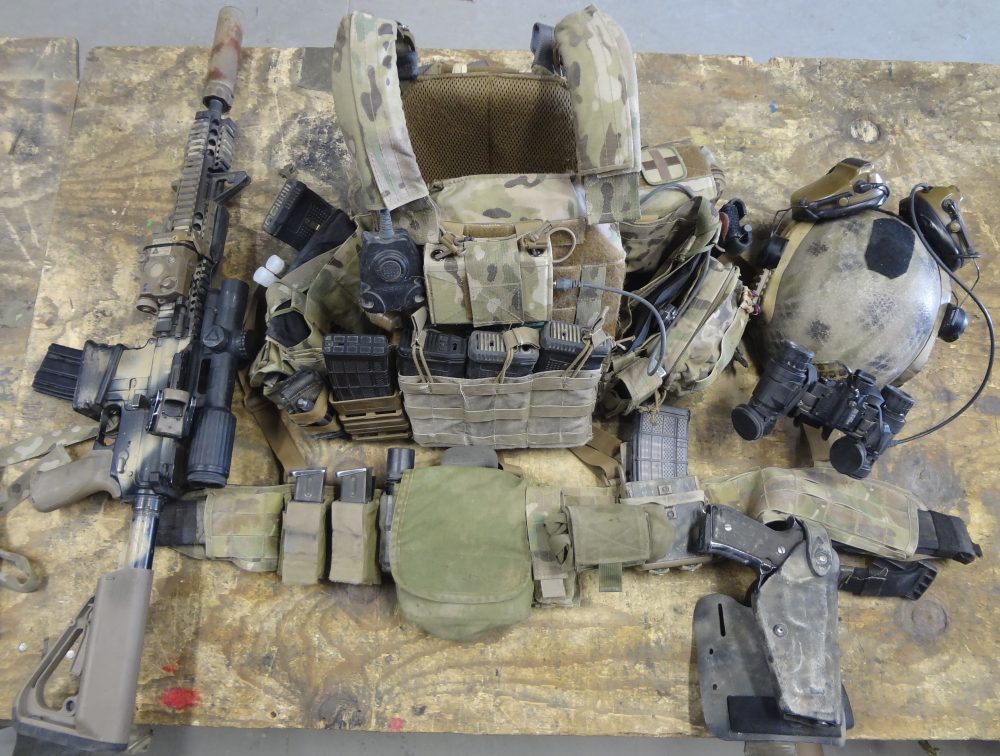
Author’s full kit laid out as used in his last deployment in Afghanistan.
There are times when keeping lead going downrange toward the enemy at a very rapid rate is necessary. Gaining fire superiority, covering movement of fellow assaulters, or reacting to a close ambush can call for more than just controlled well-aimed fire at a single target, especially if you are moving to different positions or places of cover to engage a threat.
Pausing to practice good magazine management could cost you the advantage in rate of fire on a threat or slow you down when trying to maneuver on a threat. Not having a dump pouch in a high rate of fire situation means your empty mags are getting tossed on the ground, in the hope that you have time to pick them up at some point.
The way to go is to wear a dump pouch on your belt purely as a contingency as opposed to just dumping a used magazine on the ground and possibly never getting it back. If the situation allows for proper magazine management—rotating full magazines to the front of your kit and stowing the partials and empties in the rear pouches—then by all means do it.
GP POUCHES AND IFAKS
The last two items I would like to cover are GP pouches and IFAKs. Having some sort of GP pouch on a battle belt can come in very handy if you need to plus up on grenades, small breaching charges, chemlights, extra IFAK items, or simply as a pouch to stick a Pro Timer in when you are not using it on the flat range.
I have a GP pouch on my belt specifically to place my NODs in when not wearing them on my helmet. I believe you should have NODs on you at all times as the quick trip out in daytime often turns into an all-night slug fest. In a pouch on my belt allows me one-handed quick access to put on or take night vision as needed.
I previously mentioned in regard to the line principle that I prefer to have my IFAK on my body armor. That does not mean running an IFAK or other medical items such as tourniquets on your battle belt is a bad idea. I have worked with plenty of assaulters who run theirs in the middle of the back of their battle belts, allowing access with either hand.
If you are planning on just using a belt for range training or matches, having a small IFAK or tourniquet on the belt is not a bad idea.
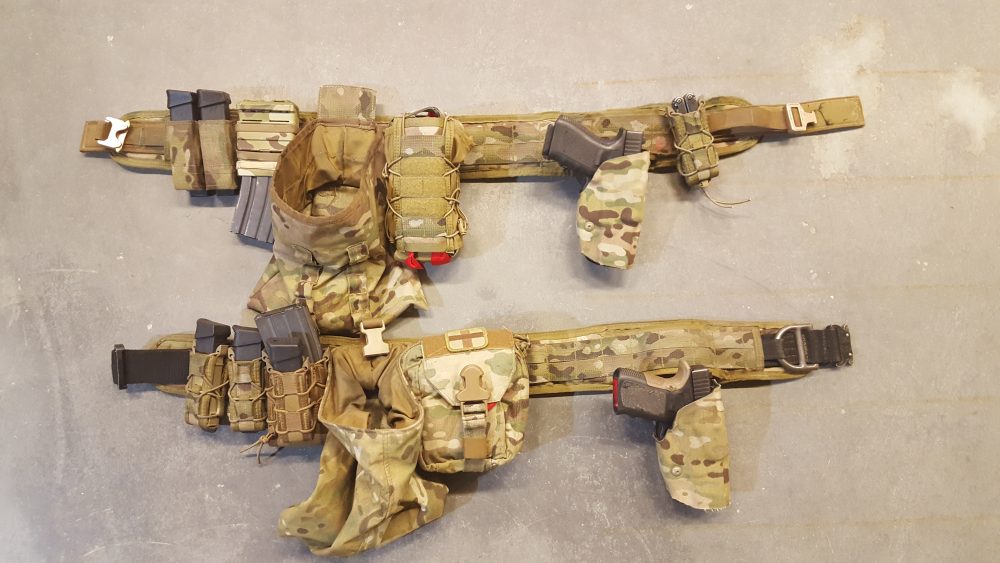
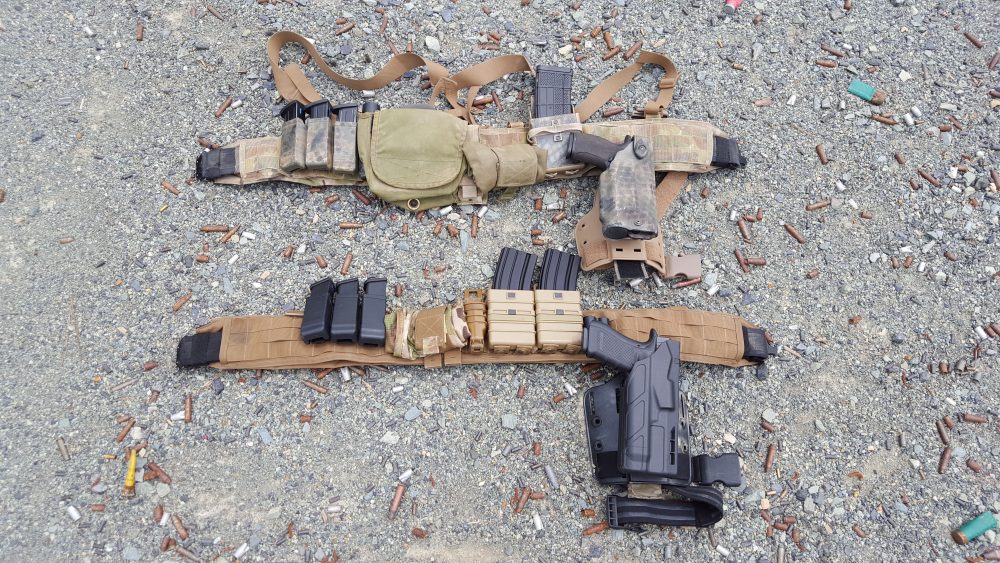
Top belt for work, bottom rigged up for range training and 2-Gun matches. Aside from the extra pouches, their layout is consistent. Train as you fight is not a bad idea to follow.
THE WRAP-UP
The first belt I was ever issued in Special Operations back in 1998 was a rigid two-inch-wide reinforced nylon belt—the same style that most law enforcement SWAT teams wore. It was fine for a few hours on the flat range and short movements.
During the early years in Iraq and Afghanistan after 9/11, we all learned through hard use that this type of belt fell way short of what was needed, including not being designed to mount the new MOLLE-style pouches as they came out and total lack of comfort when loaded down with what is really needed for a fight.
Thankfully tactical nylon manufacturers stepped up and rose to the challenge of creating belts built with both comfort and carrying capability in mind. Whether you call it a war belt or a battle belt, the three-row MOLLE padded belt has secured its place as a “don’t leave home without it” piece of kit with many of America’s best. If you’re looking for a way to enhance your tactical load-out, I recommend giving one of these belts a try.
Jeff Gurwitch has 25 years military experience—17 with U.S. Army Special Forces. He served in the first Gulf War, three tours in OIF, and three tours OEF. He has been a competitive shooter for over a dozen years, competing in USPSA, IDPA, and 3-Gun.

1 comment