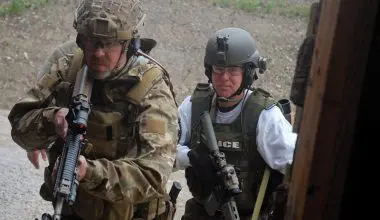
Having a white light on a carbine may be necessary, useful or useless, depending on your point of view, frame of reference, MOS, job title, or vocation. For our purposes, we’ll assume you understand the necessity of having a white light on your carbine: being able to identify and if needed engage a potential threat.
The state of the art of white lights and mounts has come a long way since the Maglites and hose clamps of not that long ago, but the bottom line is still the same. However, now we can do it more efficiently, and with smaller, brighter, and better illumination tools.
The early problems—how to attach the light—have been made a non-issue with the near-universal adoption of the Mil-Std-1913 rails that replace the plastic handguards, as well as mounts that are compatible with the rails.
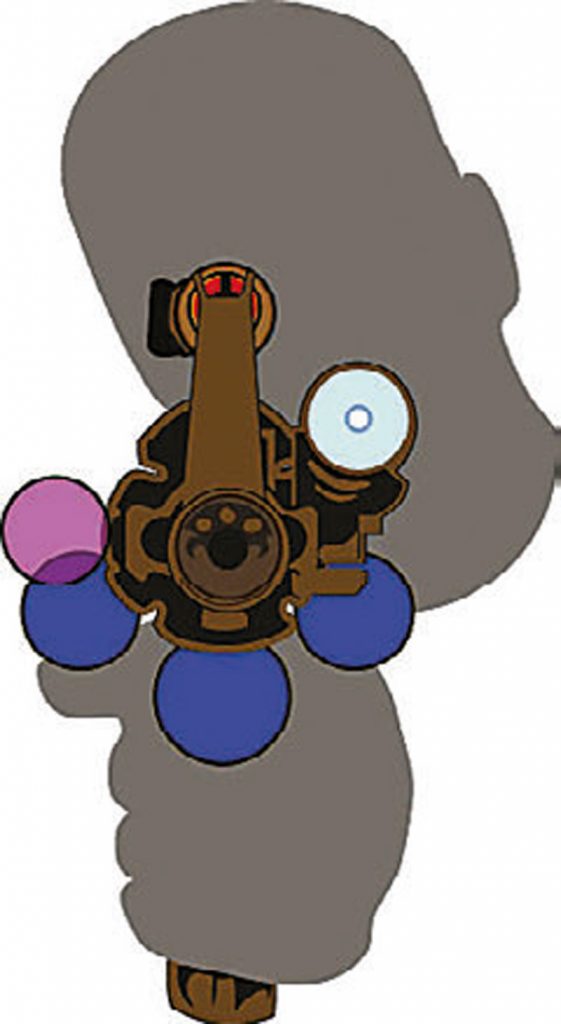
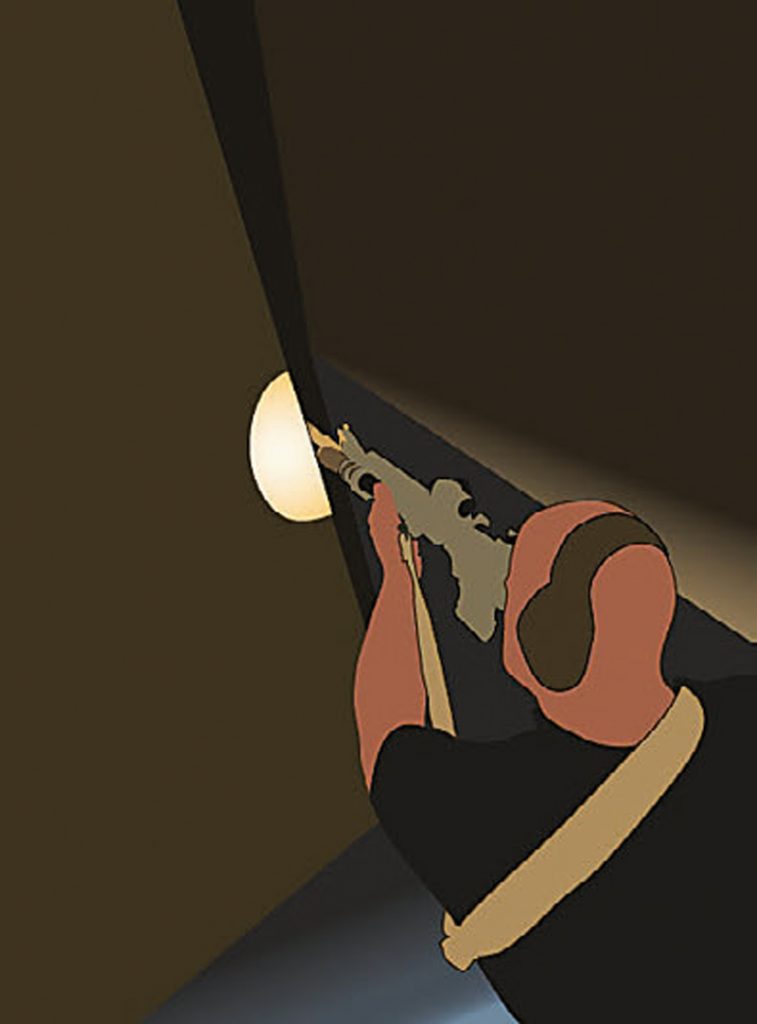
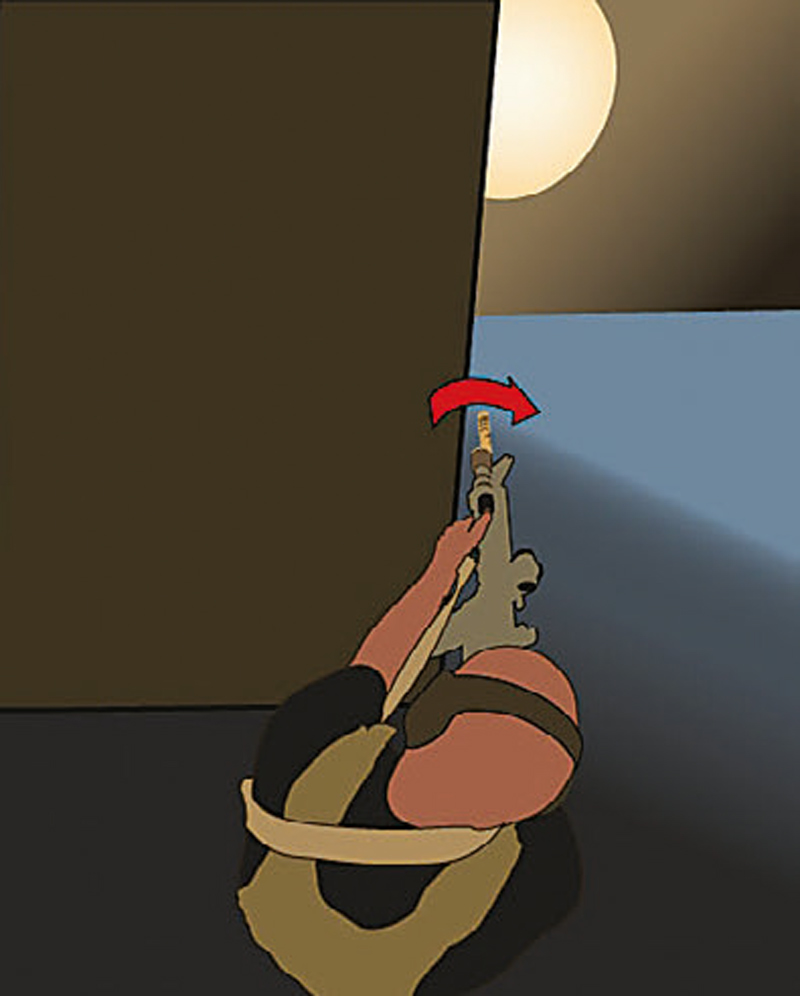
Table of Contents
WHERE TO PLACE THE LIGHT ON THE GUN?
The issue of where to place the light on the gun is, has been, and always will be a subject over which arguments are made. We’ll try to make the choice somewhat less complicated, but at the end of the day, you may not have much choice.
At the very beginning, you need to understand that the light mounted on the carbine is an illumination tool, not a less-lethal weapon, although that distinction is often blurred.
You also need to understand that the light is there to assist you in acquiring, identifying, and processing a potential threat. And while the light is important, placement of the light and the switchology necessary to operate it should complement—not interfere with—your ability to use the carbine efficiently. This is a point many either fail to understand or deliberately ignore.
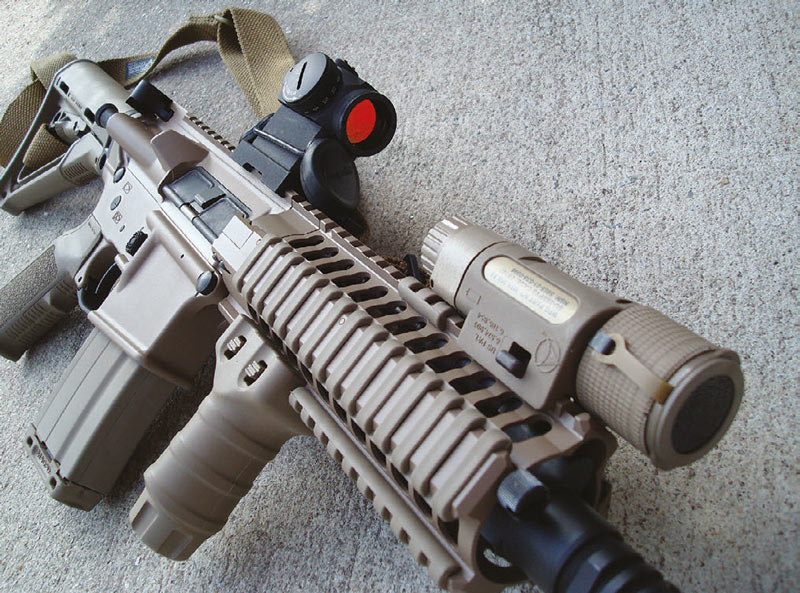
The quad rails found on many weapons give the operator a choice of attachment at four points: 12, 3, 6 or 9 o’clock. Light mounts can be offset to allow for additional mounting options.
As long as you cannot mount it in the bore of that bullet launcher, any mounting on the gun is coaxial with the bore, and therefore a compromise. That compromise includes downrange barrel shadows as well as illumination splashback from close barricades.
Splashback can be defined as the beam of white light that should be illuminating the area/person down the hall from you, but instead hits the wall directly in front of you. You have failed to put the light where it needs to be and instead illuminated yourself. We can mitigate one or both, but it is unlikely we can eliminate either without a complete change in the integration of the support/weapon systems.
The original mounting of the aforementioned Maglites and hose clamps varied according to user preference, but was generally at 3, 6, and 9 o’clock. There could be some variation of the position due to the round shape of the flashlight and the round or oval shaped handguards used. The 12 o’clock mounting was never used due to interference from the front sight base.
SOPMOD KIT
With the introduction of the SOPMOD Kit in the late 1990s, life became easier. The Knights Armament Company RIS and later RAS provided four 1913 rails to which one could mount mission-essential attachments at 12, 3, 6 or 9 o’clock.
The issue Visible Light Illuminator (VLI) was a poor performer for a great many reasons and was replaced almost immediately at different levels with SureFire lights. The widespread use of the SureFire family of lights also broadened choices. With the SureFire lights also came a tape switch, which permitted placement of the switch away from the light. The light didn’t need to be convenient to your hand. It could be mounted anywhere you wanted it.
The tape switch was not without faults, though. While permitting the quick light on/light off technique used by many, it was also susceptible to white light negligent discharges. These might be operational, or as mundane (but embarrassing) as having the light activate inside a gun bag.
When considering where to place the light, first try to imagine how the light would interface with the carbine and your non-shooting hand. If we look at the carbine from the business end, we can see a variation of where the light might be mounted going literally around the clock. But where on the clock should we put the light?
ROUND THE CLOCK
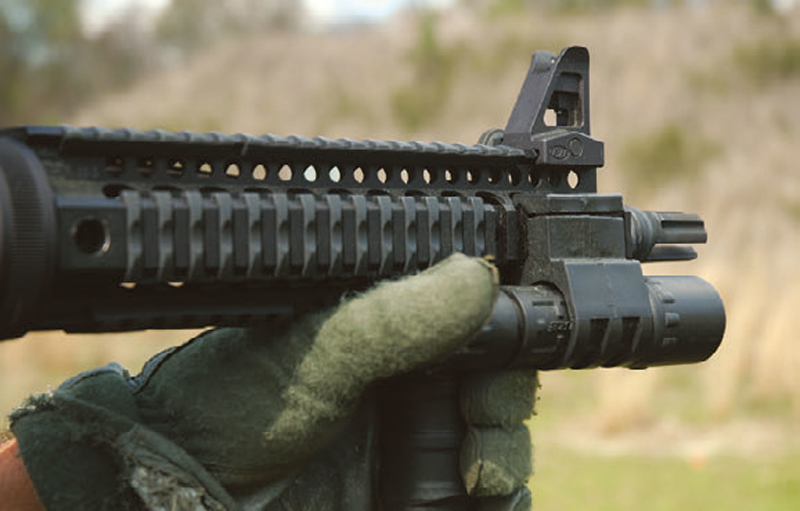
Clearly the optimal place for the light would be at 12 o’clock. The light would cast a shadow below the barrel, but that is not a major issue. However, it would require a folding front sight. Not a big issue for some, but my preference travels to the opposite direction. I prefer a fixed front sight base. The rationale for this is simple. In the event of a red dot sight (RDS) failure, you can instantly use the ocular lens of that downed sight as a large ghost ring aperture—providing the front sight is up. If you have a folding front sight, you may have to fumble for awhile to get back in the fight.
IR illuminators and laser aiming sights, such as the current AN/PEQ-15 Advanced Target Pointer Illuminator Aiming Light or the DBALa2 Dual Beam Aiming Laser Advanced Squared, are commonly mounted at 12 o’clock and they have priority over the white light. Of course, if infrared is not in your playbook, drive on with that 12 o’clock mounting for the white light.
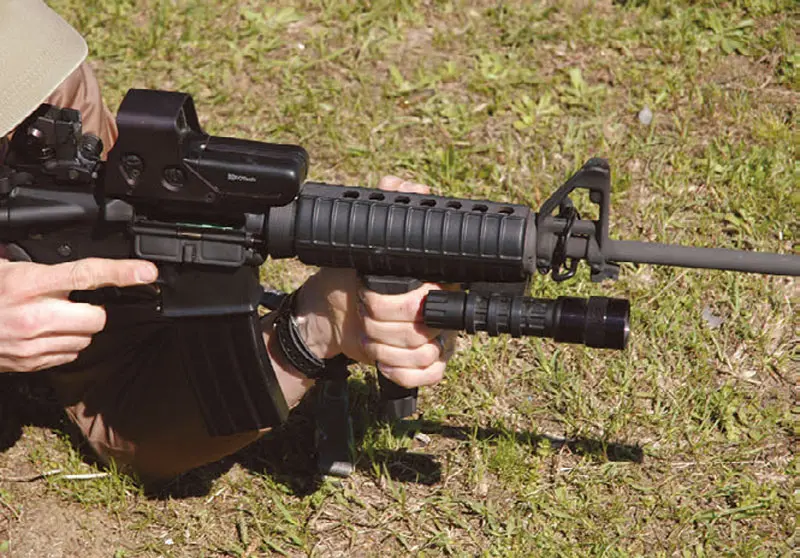
The 6 o’clock position was very popular, and the SureFire (SF) M900/910 lights, while large and heavy, combined a Vertical Foregrip with a very capable light. They also provided a lock-out switch; something long overdue.
But it cast a very distinct barrel shadow above the barrel. When shooting behind a close barricade it could, depending on weapon orientation, cause splashback if you illuminated that close wall instead of what was beyond. If the light was kept vertically underneath the barrel, there was no problem, but canting the carbine (rotating it around the bore axis) could cause that problem.
The wing positions—3 and 9 o’clock—were default positions for those not using the M900/910 lights. The SF Millennium Universal Light with integral mount was an issue light for many units and was used in these positions. While bulky, it was functional and is still in use. The small, lighter, and more useful Scout Lights also had an integral mount and were used in a similar fashion.
SPLASHBACK AND OTHER ISSUES
What are the drawbacks of any of these locations? Light splashback can be a problem, or not. The waffling here is because the closer you are to a barricade, the more likely and the more pronounced that splashback can be. Tactical geometry dictates that as you get farther away from the barricade, the fewer problems you will have—with lights or otherwise.
Except that in the real world, rooms are small and full of furniture, garbage, and other impedimenta. You may not have that 100% solution and just might have to punt to stay in the game.
The 3 and 9 o’clock positions can cause splashback if the carbine is vertical. You can rotate the carbine out to clear both the muzzle and the white light, but it may require a rotation of up to 45 degrees.
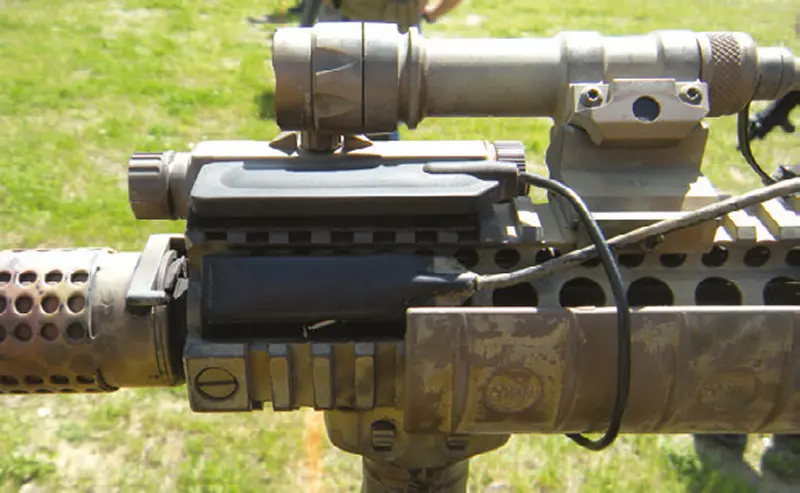
If you use an offset light mount, you have additional options as well as problems. Offset light mounts are generally used in conjunction with Vertical Foregrips (VFG).
Those using a VFG have a choice of hand positions. The conventional position wraps the hand around the VFG as if you were holding a beer can. Another (and perhaps better) method is to short stock the VFG—bringing the hand high up so the thumb is on the support side of the handguard and not wrapped around the VFG.
Those using the first method usually run their lights on an offset mount, putting the light at approximately 5 o’clock for right handers and 7 o’clock for wrong handers. Those using the short-stock method run the lights at 9-11 o’clock for right handers and 3-1 o’clock for lefties.
Generally speaking, the top or bottom light positions usually require the use of a remote (tape) switch. Using the wing positions allows direct access to the tail cap or use of a tape switch.
If you are a right-hand-dominant shooter using a conventional grip, a right-hand barricade will present little grief. But if you’re behind a left-hand barricade, you have issues. That 7 o’clock white light will have to be rotated waaay over in order to clear the barricade—not generally acceptable. Alternately, you can expose more of the gun (and you) to get the light and bullets downrange (reverse this for left-hand-dominant shooters).
If you are adept at switching shoulders, you can minimize this to a degree, but that may be at the expense of a degradation of accuracy.
By using an offset mount, you can bring the light above the barrel, and while casting a shadow, it will be at 5 o’clock (7 o’clock for left handers). It is closer to the boreline and thus requires less rotation to clear close barricades.
MULTI-TASKING
A fair number of people have come to my classes with the light not where it might be best placed, but rather where it might fit. Additionally, the method used to activate the light was often an afterthought—if any thought were given at all. Often the shooter had to change the placement of his nonfiring hand drastically from the normal firing grip to turn the light on. This is not a realistic scenario.
Most people can perform a single function well. When faced with two functions to be performed simultaneously, some degradation of skills can be expected. When tasked with three or more functions, a greater loss of skills can be expected, based on my observations over the years.
An example is a shooter who is locked on to a single drill while on the square range. Adding a “two, speed reload, two” drill adds other levels of complexity, and some start throwing shots they shouldn’t. Throw a movement into the mix: “two standing, speed reload, two kneeling” and some have more problems.
That same locked-on square-range shooter is able to perform multiple drills by breaking them down into separate, individual components and do pretty well. But take that same shooter and put him into the shoot house, and he will exhibit Bambi Syndrome—a deer in the headlights. Instead of a flat range, he is now in a non-linear environment. Targets may be in front, to the sides or even behind him. Other shooters and instructors may be downrange or in close proximity.
The complexity starts building exponentially.
Now add low light: having to work a white light to acquire, identify, and process what you see. Life has become pretty tough. It will be tougher if you fail to integrate the light and the means to operate it efficiently.

ONE WORKABLE SETUP
For classes taught by my company, EAG Tactical, we needed a useful white light that would not break the bank, as we had to get lights on a fair number of guns. I settled on the following:
- SureFire G2 Light
- TNVC Q5 LED drop-in
- Z59 or Z49 clickie switch
- Viking Tactics VTAC Light Mount (NSN 1010015344536)
I am a right-handed shooter, so I place the light on my guns at approximately 11 o’clock. I use a short grip with my non-shooting hand, so my thumb naturally rides high and in close proximity to the Z59/Z49 switch. I run a DBALa2 on the 12 o’clock rail, with the pressure switch located on the 9 o’clock rail. I can operate the DBAL switch with the heel of my non-shooting hand.
The advantage is (or should be) obvious: I can run the gun normally in well-lit environments, and run a white light, IR illuminator, or laser aiming dot without drastically changing my non-shooting-side grip. The set-up is intuitive and easy to master.
The Viking Tactics Light Mount is made of plastic and can accept a variety of lights, to include the SureFire Executive and G2 series lights. We have been using a number of these and are well satisfied. Other companies that manufacture quality offset light mounts are Daniel Defense and Vltor.
The system described above works for me but may or may not for you. As with all things, your mission requirements will define what equipment you need. Make those decisions wisely. If you have a white light that requires you to switch your hand position to activate it, it may be detrimental to your continued existence.
Above all, seek and acquire quality training with your weapons system. You, the bullet launcher, and any support equipment on the gun have to work in harmony to be effective—and the only way that happens is through habitual association under pressure.