Whether you are military personnel on a transport detail of a high-value target, a law enforcement officer patrolling the wrong side of town, or an average citizen in an ambush carjacking, knowing in-vehicle firearms tactics may be the difference in a life-or-death situation. Unfortunately, this aspect of self defense and firearms work is probably the least considered and least trained by many.
Understanding in-vehicle tactics is not just something for Hollywood or our troops fighting in Afghanistan. Statistics show carjackings and violent encounters are on the rise, and more citizens are arming themselves. It’s safe to say we will be seeing more people taking a stand. But before they do, there’s a lot to consider.
Prior to getting into the specifics and tactics of in-vehicle firearms, let’s take a clear look at a few not-so-obvious factors. In addition to threats outside the vehicle, there are several problems inside the vehicle: other passengers, breaking glass, percussive effects, and compromised stability for shooting, to name just a few. Our actions need to address all of these. Suddenly, the threat outside the vehicle may seem like the least of our problems.
The primary objective of being in a vehicle under fire or ambush is always to get the vehicle in motion in order to escape, evade and maneuver. That being said, sometimes we have no choice but to engage. The slang term “riding shotgun” simply means that the passenger is typically in charge of the dirty work while the driver’s job is to drive.
When teaching in-vehicle tactics, I prefer to simplify it into four basic components. Deploy, Position, Response and Command are easy terms that anyone can understand and recall under pressure. When following my DPRC system, we address as many hazards as we can at the same time—quickly.
Table of Contents
DEPLOY
One of the most overlooked aspects of in-vehicle pistol tactics is the deployment of the firearm, and yet it is quite possibly the most important. After all, what good is having a firearm if you can’t access it when you need it?
Military and law enforcement often utilize a chest-mounted holster that attaches to a vest or chest rig. The realities of civilian life don’t allow that, so the majority of citizens carry the firearm in a standard holster, ankle holster, or shoulder holster. All viable options, but not very effective when in a vehicle.
The seatbelt is always in the way of reaching to your waistline, along with the fact that you are seated. Furthermore, if the driver has engaged the brakes, the forward inertia activates the seatbelt safety sensor and will lock you back to your seat temporarily. This is an excellent feature in case of a collision, but your worst nightmare for any firearms deployment.
When I teach this aspect of firearms, my first bit of advice to anyone is to survey their vehicles to see what their options are. You may be able to mount holsters under the dashboard, or you might tuck the firearm snugly between the side bolster of the seat and the center console.
Better options may include newly released storage boxes designed specifically for vehicle storage and emergency deployment. Many have quick-release designs and are definitely the safest way to go. These are just a couple of ideas that will place your firearm within arm’s reach and are not affected by the confines of being in a vehicle. Be quick to get your gun into the fight and slow to take it out of the fight.
POSITION
When taking an in-depth look at positions, certain criteria need to be met. First and foremost, we consider the safety of our passengers and keep them from taking friendly fire. Second, we get to a point where we can have minimal body movement to acquire our target. Last, we try to place ourselves in a manner that offers stability for shooting.
Here are the four basic positions you need to know. These positions give you virtually 360 degrees of coverage. For ease of understanding, I utilize a clock reference for the direction you will be shooting. The 12 o’clock position is straight ahead, 3 o’clock to your immediate right, 9 o’clock to your immediate left, and 6 o’clock to your rear.
The objectives of any in-vehicle firearms work are to neutralize the threats and make sure the driver begins to maneuver the vehicle immediately. You don’t want to be stuck in this situation, nor do you want to spend time to see what other surprises may await. Whatever you do, get the driver to drive!
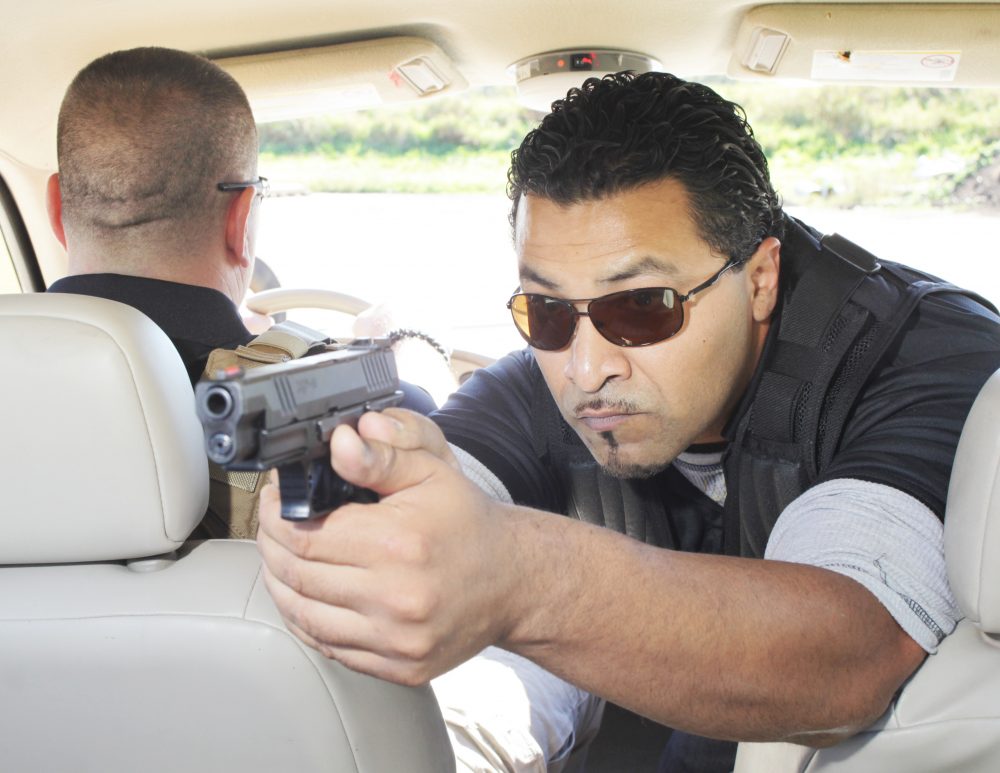
Author in 12 o’clock position. He leans back into the seat for additional support.
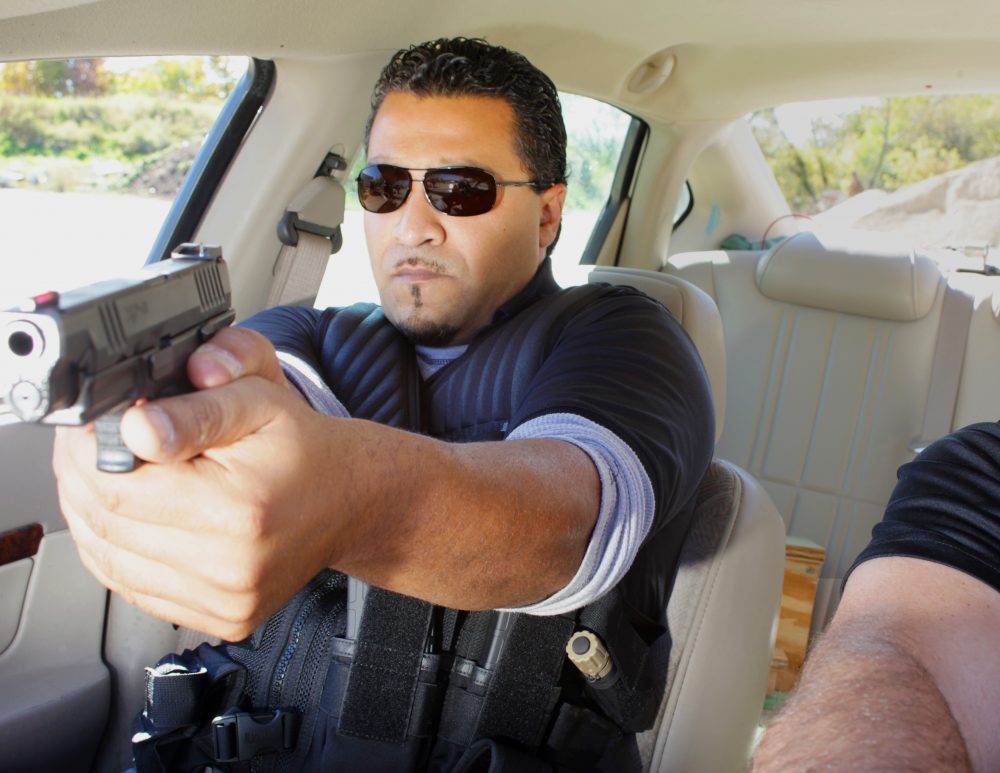
12 O’CLOCK
This position is definitely the easiest to deal with. The targets are directly ahead of you and give you a wide range of angles to shoot from and to. Best, there is no threat of friendly fire to other passengers in the vehicle. However, shooting through glass inevitably webs the glass and will at minimum limit visibility.
Body Position
In this position, you are simply leaning back into the seat and pushing backward with your feet in a wide base to help ensure stability. Center the firearm to your chest and press straight forward and fire through the glass.
Some instructors have you lean forward and rest the firearm on the dashboard, but there’s a risk that your muzzle will hit the glass and render the firearm “out of battery,” meaning the slide cannot lock forward. You will also lose postural stability, which greatly affects your shooting capabilities. Lastly, you do not want your face close to breaking glass.
Response
This is the action part. You need to get lead downrange as quickly as possible. A couple double taps will afford some cover fire and time to change directions if needed. Acquire the target, verify the surroundings, and engage.
Command
The only commands you typically produce are for the driver. “Drive” in a loud and forceful voice can help snap the driver out of any shock. Stress induces auditory exclusion, so commands have to be loud and clear. This command is used in every scenario.
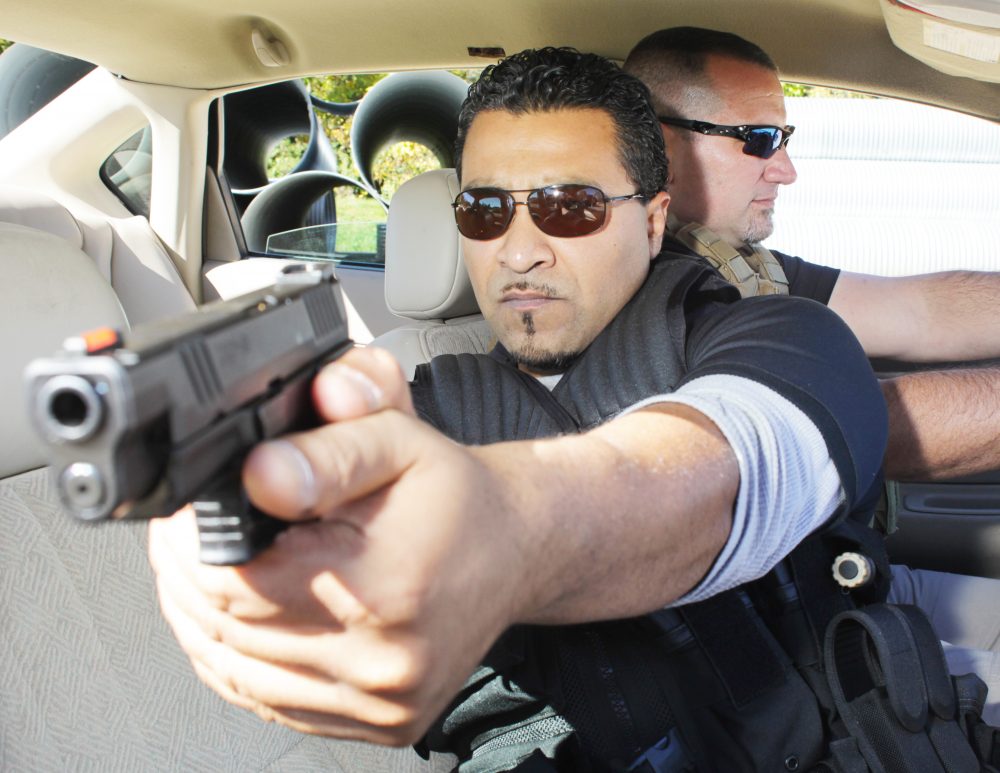
Author demonstrates 3 o’clock position. He’s gained stability by leaning back into the driver’s seat.
3 O’CLOCK
This is a fairly stable position with no threat to passengers. Side glass typically breaks easily and doesn’t restrict driving visibility. However, there are many limitations to the angles you can engage in, and all movement is restricted by the seat.
Body Position
To achieve the 3 o’clock shooting position, turn your entire body to the right and lean back into the side of the driver’s seat. Use your left foot on the floorboard and push for additional stability, then tuck your right foot under your left knee. This position is very stable but takes practice to achieve quickly. You can also easily transition to and from the 12 o’clock position.
Response
You have to be very careful in this position as you will be constricted by the seat back. Take a couple shots toward the target and assess if there is an angle change. You may have to cease fire, readjust or reposition.
Command
The words “Drive” or “Move” are used here as well. Be forceful and loud with these and any other command.

Nine o’clock position requires the most effort.
9 O’CLOCK
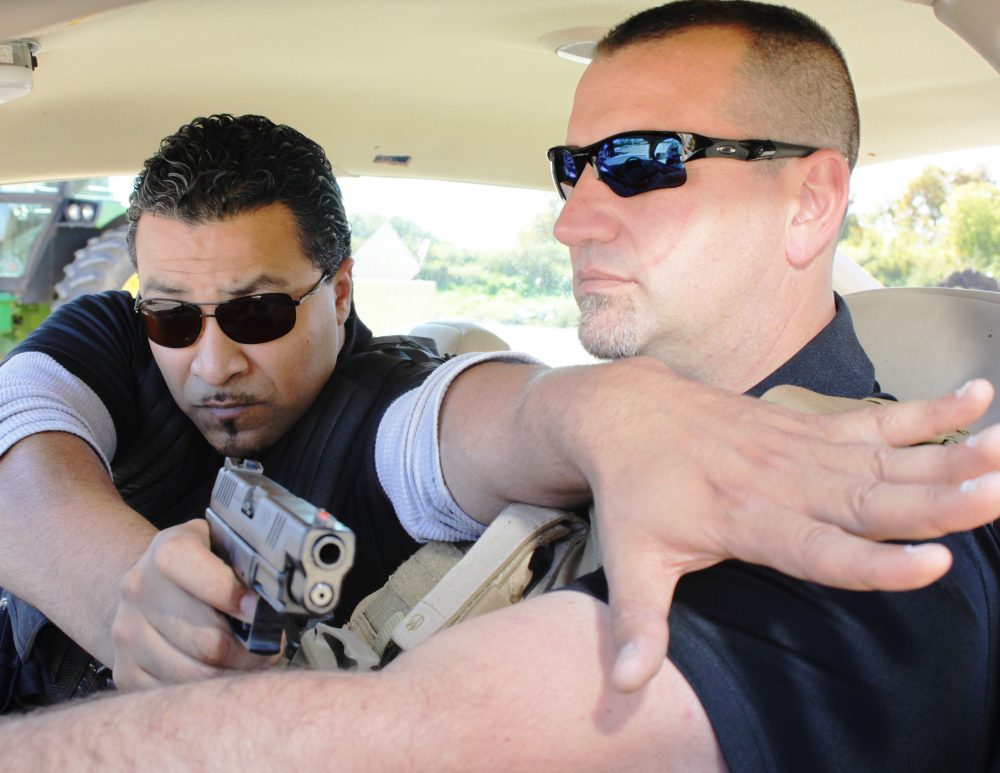
I don’t have many good things to say about this position. It is uncomfortable, causes quick muscle fatigue, and you have to engage past the driver, which truly changes the dynamic of your shooting. If I were to say which position makes me cringe, this would be it!
Body Position
The 9 o’clock position is the least preferred shooting position. You have limited field of vision, poor stability, and a friendly close to the line of fire. Getting to the 9 o’clock position requires a great sense of awareness.
Twist and lean to the left while using your right foot to press against the floorboard like a runner on the starting block. Your shooting hand has to extend far enough so the muzzle clears the driver but doesn’t hit the glass and force the gun out of battery. Your support hand pins the driver back into his seat by crossing his chest in a firm and forceful manner. For left-handed shooters, use the right hand to shoot. And if you must engage the firearm with both hands, use your left forearm to push the driver back into his seat, and do it with force. It is key that you understand this is a high-risk position.
Response
If there is one place that you must follow the objective and get the vehicle in motion immediately, this is it! Neutralizing the threat is only a bonus. Speed is greater than accuracy in this position. Get some rounds out and move!
Command
Once again utilize the “Drive” or “Move” commands. Because of the close proximity of the gun to the driver, their hearing may have been affected, so keep yelling the commands until you are in motion.
Six o’clock position engages targets behind the vehicle. Be sure to clear any back-seat passengers.
6 O’CLOCK
Engaging targets behind you is both good and bad. It’s good that they are behind you, and driving away quickly will hopefully resolve the issue. Like the 12 o’clock position, you have a wide angle of view and can engage multiple targets if needed. But if you have passengers in the back seat, this poses a serious threat. It’s also a tough position to get into quickly.
Body Position
The 6 o’clock position is rarely utilized but important to know. Typically if you’re shooting at a target behind you, it means you are already beyond it and getting away. But this isn’t always the case, so knowing this position is critical. As you get into position, be careful not to sweep anyone with your muzzle.
Cross your right knee over the top and scissor your left leg under. This gives you a twisting motion and space to place a knee on your seat. Lean into the space between the two front seats until your shoulder is against the side of the driver’s seat or your elbow is by the driver’s headrest. Having this support greatly helps your shooting stability.
Command
Encourage the driver to move and, if you have passengers in the back seat, give an additional command: “Heads down.”
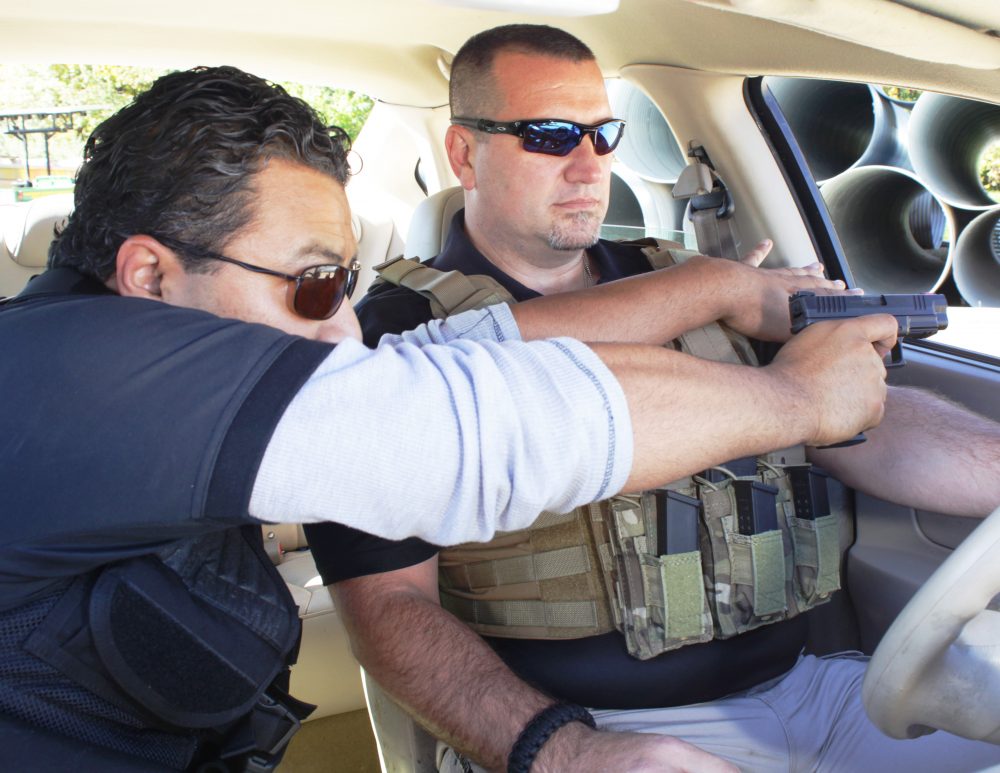
In 9 o’clock position, muzzle of pistol must extend beyond the driver.
TRAINING
You don’t want local authorities coming to your home because you’re in your car in the driveway swinging your pistol around, and the neighbors think you’re nuts! But you can—and should—train these scenarios. All training should be progressive and methodical. Here is the basic progression I recommend to my clients.
First, you want a training firearm such as a yellow or blue gun that fits your holster. Sit in the passenger seat and get used to reaching for your firearm and getting it into position. Try it with both the right and left hands and see how it feels. Try different holstering and storage options while you’re there.
Second, isolate each individual position. See what it feels like to get into each one. Every vehicle will also put forward its own challenges. Once you think you have the positions down, combine the draw and one position. Place targets on the walls of your garage and get the sights aligned while you’re at it.
Now make things a little tougher and combine positions along with the draw. Get the firearm out, get into the 12 o’clock, then transition to the 6 o’clock, then transition to the 3 o’clock!
The more you move through the vehicle and establish good positioning, the better prepared you’ll be. Start slowly and build up speed progressively. Mix positions as often as you can.
Finally, if you can find a range that has a mock set-up for vehicles or allows chairs, you can practice with live fire. This should be the absolute last type of training and done with all range safety rules in full effect.
Now you have the four positions that all in-vehicle tactics revolve around, plus some basic training methods. I suggest all shooters get their hands on a non-firing training gun and practice the entire scenario from deployment to command.
Nothing works better than muscle memory and practice!
Nik Farooqui is the founder and Chief Instructor of the Street Safe Institute. He can be found travelling the country with his seminars on all aspects of self-defense, law enforcement training, and civilian training. For more information, go to www.streetsafe101.com.