IF you become stuck in a wilderness survival situation, you should care about only one thing—staying alive through a cold night. If you can do this, it is almost guaranteed you will live through the 72-hour time frame it takes for most lost persons to be found.
Though all components of survival are important (e.g., water, food), nothing kills faster than exposure. You always want to build your shelter not too far from a water source, so it is accessible for drinking, cooking and cleaning purposes, but not so close that you are in a flood zone or catching a cold-air draft from the breeze passing over the water.
Abraham Maslow proposed the idea that humans have a hierarchy of needs that motivate us throughout life. Before any of our higher needs are met, we must take care of our physiological and safety needs.
The survival community has adapted this philosophy to shelters and called it “the hierarchy of shelters.” It ranks shelters from the most limited amount of resources to the most abundant. In this article I will cover shelters one can build within at most a couple of days.
A shelter provides the survivalist with security. It shields against the environment, gives you shade in times of extreme heat and warmth in times of cold. It is a place that gives a psychological boost and added confidence. It is a place where you can rest, relax and work in comfort. You can build traps and snares, process what you gather and hunt. You eat, plan the next step, and sleep there.

Table of Contents
HEAT-LOSS MECHANISMS
To properly know how to shelter yourself, you have to understand how the body loses heat. The five ways we lose heat are from: radiation, respiration, evaporation, conduction, and convection.
Radiation
The human body constantly radiates heat. It tries to maintain a constant temperature of 98.6°. Often that is warmer than the surrounding environment. The warmer of the two areas gives off heat to the cooler. Thus we overheat in a hot environment and get chilly in colder environments.
This is the idea behind sleeping bags. They trap heat in pockets between the down and keep it close to our body.
Our head and feet are major sources of heat loss, which is why it is important to have a hat and an extra dry pair of wool socks when hiking.
Respiration
We are constantly losing heat through respiration. As we breathe in, we bring cold air into our lungs. Our body warms the air and releases it as carbon dioxide. We cannot do much to curb heat loss this way, but we can try to warm the air a little by tying a handkerchief or loosefitting cloth over our mouth.
Evaporation
Our bodies regulate excess heat through sweating. When we exert ourselves, we sweat to avoid overheating, which is fine when it’s warm and dry outside. But in winter, sweating is a killer, especially before bedding down for the night. Rain, sleet and snow all produce the same effect, and it is imperative we stay dry or have a way to dry ourselves, such as fire.
Conduction
When we touch a object cooler than ourselves, we lose heat through conduction. The cold ground will suck heat from a body extremely fast and cool our core body temperature. This is why we can be comfortable when the air is 80° but we can become hypothermic if we are submerged long enough in water of the same temperature.
Convection
When air flows over us, it moves the warm air our bodies radiate away from us. This has a chilling effect. Essentially it is not our clothes that are keeping us warm but the pockets of air within our clothing. Even a slight breeze will do this. That is why 70° is comfortable on a still day but can become chilly with an added breeze. Meteorologists call this wind-chill.
OVERNIGHT UNDER THE STARS
Most hikers or hunters don’t realize they are lost and not getting home until late in the day. It is essential to know what to do.
If you are running out of light and it looks like there won’t be rain, the first line of defense is your clothing. If rain, mist, sleet or snow aren’t problems and you are low on time, it is best to choose a place to bed down for the night, ideally under some natural shelter (rock outcrop, cave, hollowed tree, or under a tree) to shield you a little from wind and maybe some rain. This will keep you alive, but the night will be miserable and cold.
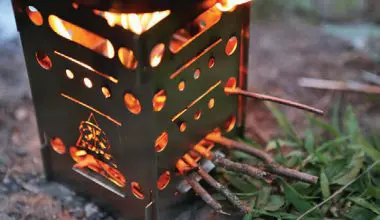
Next you must build a bed to sleep on. Remember the rule of conduction: the ground will suck heat away from you twice as fast as air. It is best to build an insulating layer between you and the ground. You can use any available material such as leaves and pine needles. Pine boughs work great and are fast, springy and warm. If you have a lighter or other means to start a fire (which every outdoorsman should have), build a fire as long as your body and sleep beside it.
In really cold weather, you can build a fire on either side of your bed a body width away and sleep between them. Remember to harvest enough wood to last through the night.
NATURAL SHELTERS
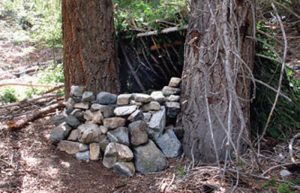
The next step up in the hierarchy of shelters is a natural shelter. This includes rock outcrops, trees, hollowedout trunks, overhangs, and caves. These provide basic cover. Natives have used natural shelters for thousands of years. Why do more work when nature has already done it for you? If you can find a rock wall, build a fire on the far side of you and sleep in between the rock and the fire. The wall will reflect the fire’s heat and warmth.
Another nice thing about natural shelters is that you can add to them with minimal effort. If you are simply given a rock wall, you can stack branches against it, essentially sheltering yourself from the elements.
If pressed for time, you can lay up next to a tree. This will provide some overhead cover. The trunk can be used to rest against and as a wind block and heat reflector.
LEAN-TO SHELTERS
The first step to more advanced shelters is the lean-to. It’s quick to set up and provides ample space to sleep one person, shed rain and snow, and start a fire. It’s a great option for a short-term, relatively good weather shelter.
The lean-to consists of supporting a crossbar over your head and pitching a steeply angled roof to shed heavy rain. Build a bed of pine boughs or any available material under the roof and tuck in for a night
of rest. The shelter becomes wind resistant on one side, but in the mountains, wind can be unpredictable, which is why it is only a starting point for shelters.
The lean-to really shines when paired with a fire. Students in a RAT survival course built a really solid lean-to that was almost a longer-term shelter. In front of the shelter, they built a rock wall about three feet high. The heat from a fire was reflected inward from the rock wall, and the roof helped keep it from escaping. If you are out for more than one night, I suggest building a lean-to paired with a rock wall. One person can complete a set-up like this in two days with available materials.
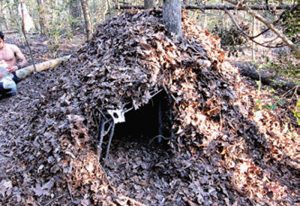
DEBRIS SHELTER
This may be a little claustrophobic, but it provides shelter from whatever nature throws your way. It is a fully enclosed shelter that is still comfortable and warm even when there is no fire. This is the shelter I would build if I had a few hours of sunlight left and no means to produce fire.
You are creating a small space to trap warm air in, keep cold air out, and shelter you from rain. It can be propped up by a tree or by tying two perpendicular sticks together as support for the ridgepole.
The ease of construction for this shelter varies depending on the terrain you find yourself in. In pine forests, it is extremely easy to make and one I teach in survival courses. Pine boughs make not only excellent bedding but also excellent thatching for a roof. If not in a pine forest, you can use any debris, leaves, branches, etc.
Start by building a bed that fits your body snugly—think less than a twin-size bed—so there is less air space to warm up. Then find anything you can: a stump, branch of a tree, or simply two sticks tied together, to support a ridgepole. You want the ridgepole a few feet longer than your body to cover you from head to toe and have room to move your feet.
Lay vertical pieces of wood right next to each other (imagine rafters) against the ridgepole to create a framing for your “home.” A steeper pitch sheds rain more efficiently. Next pile leaves, pine needles or pine boughs on your shelter to create a water-resistant layer. Repeatedly crawl inside your shelter and cover up any holes you see light through.
The debris shelter is very strong and, when made correctly, can support a man on top of it.
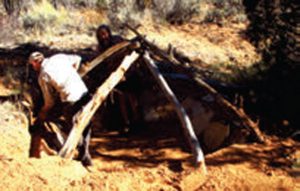
WIKIUP
If you’re going to be in a situation for a long time, you can build a wikiup, which can usually house more than one person and support a fire inside. This is the type of long-term shelter that many Native Americans lived in, because they were easy to put up and could support a family cooking inside.
These shelters are great for housing one or more people and are at the top of the shelter hierarchy because they provide a house to do chores in, cook, and congregate with others.
In Utah, my friend and survival expert, David Holladay, taught my brother and me how to build a wikiup that would essentially last a lifetime as long as it was maintained regularly.
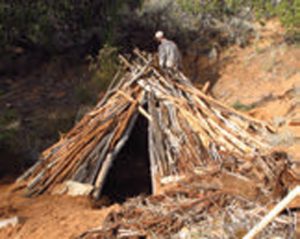
We started by stacking logs about bicep thickness together in a tepee pattern. It helps to have a couple with a forked end to rest other logs on. From there we added long sticks, much like a debris shelter. Wrist-size pieces work well and, as you keep adding poles, they can be smaller and smaller. You are trying to construct a solid surface.
From there you want to perform “chinking”—adding small pieces of debris to fill in spaces between the rafters. Bark works particularly well. We used Juniper bark, which is fibrous and can be stuffed into cracks.
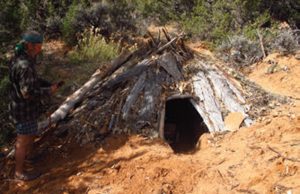
The wikiup starts looking like a proper shelter at this point, but is still too bare to shed much rain or cut out wind. Add a couple feet of leaves on it to make a rain-tight structure. Remember to keep the roof pitch steep to shed rain.
All shelters should be maintained and added to every day. As the days pass, leaves will settle and bedding will thin out. This is actually good, because as your shelter settles, it will become stronger and more resistant to the elements.