
And while these are quick to build, the only problem is that they typically rely on a good banking fire to keep you warm during cold nights. What happens if you wander off or get lost without any survival tools and the temperature is falling?
If you’re in a wilderness area that has debris on the ground, such as a deciduous (leaf shedding) forest, a coniferous (needle shedding) forest or even grasslands, a debris shelter can make the difference between living and dying when the temperature drops below freezing.
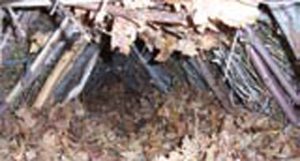
Unlike most types of refuge, a debris hut is built from what’s lying on the ground, thus the reason for the name. Basically what you’re doing is building a large squirrel or rat’s nest by stacking debris around you to create an insulating effect from the dead air space. In fact, if you build it right, the only room you will have inside your “nest” is just enough to lie down and turn over. When built in this fashion, your body heat will warm the shelter nicely and keep you from freezing to death. A properly built debris hut will also be waterproof even in the heaviest of downpours.
And if you would rather the average person not see you, then a debris hut is the ticket, since they blend nicely with the environment. I’ve built them on the side of a trail and observed people walk right past and never recognize them as being anything other than the normal landscape.
At this point, I’m sure a lot of you are thinking, “This is too good to be true. Without using tools, build a shelter that keeps you warmer and safer than other survival shelters. Show me.”
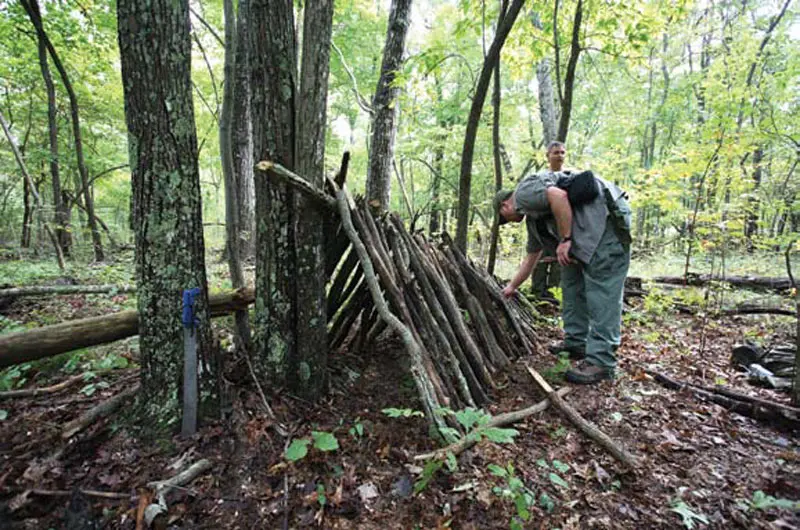
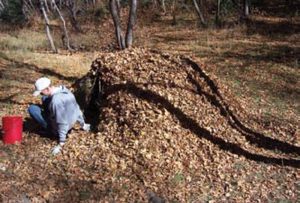
While there are many variations to these shelters, the classic debris hut is made by propping a ridge pole about crotch high against a tree, while allowing the other end of the pole to touch the ground. The overall length should be slightly longer than your body when lying under the ridge pole—make sure your feet have enough room to move without touching the framework. After this, it’s just a matter of finding dead sticks, breaking them to length and then stacking them against the ridge pole to build an “A” frame that’s a little wider than your body. The side sticks don’t need to go too far past the ridge pole, since any stick that is too long can cause leaks if it’s sticking out of the debris.
When finding sticks on the ground, remember that they only need to support the debris you will be piling on top. They don’t have to be massive telephone poles, since most of the weight will be evenly distributed. Also, always try to break your sticks by placing them in a forked tree and pulling on one end. Never put them across a log and jump on top of them—that’s an accident waiting to happen.
Once you have your “A” Frame built, start gathering any leaves, straw, grasses or other soft debris on the ground and start piling them on top of the frame. If you have a poncho or large jacket, you can place that on the ground, pile leaves on top of it, then carry them to your frame and dump them. Ideally, you need about three feet of debris thickness to protect you down below freezing temps. It doesn’t matter if the leaves you are gathering are wet. In fact, wet leaves seem to seal better when the rain starts. Just keep in mind that the more debris you pile on top and around the sides, the warmer the shelter will be.

Once you have sufficient debris on and around your frame, shove as much dry debris inside the shelter as you can, while leaving yourself enough room to crawl inside. This will become your “mattress” and help to insulate your body from the ground. You can also take small sticks and place them sideways at the peak of the roof to build an “attic” to hold more leaves from the inside. The point is that the more debris you can get close to your body, the more dead air space you are using as insulation.
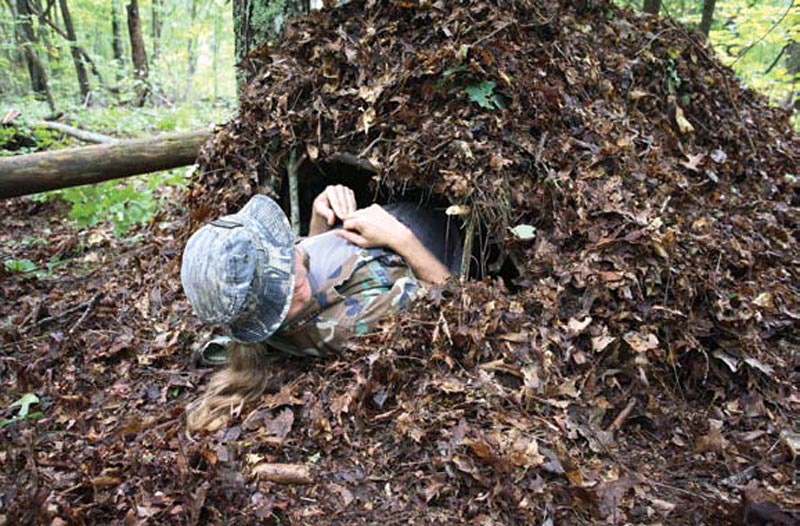
Once you have everything finished inside, gather enough debris to shut off the opening once you crawl in. You can even fabricate a door out of sticks that will hold your leaves. Again, think of a squirrel or rat’s nest when you build a debris shelter. When you’re ready to crawl inside and rest, do it feet first.
When teaching this method to students in my wilderness survival training courses, we always see concern in their eyes when we finish up and ask them to crawl inside. The first question we always get is, “What about bugs?” Answer: “Well, we won’t guarantee that you’ll be bug-free, but if the weather’s cold enough to need this shelter, then most insects are gone. Of course your other option is to let the SAR team find a frozen, bug-free body.”
I realize debris shelters sound like a lot of work, but in a wooded or grassy area, one man can easily build a great shelter in about three hours. Not only will he be protected from the cold without having to build a fire, but snow, rain and other weather variables will not penetrate a properly built debris hut. Lastly, these are not a one-time-use deal. Debris shelters can last for months (or years) with just a little maintenance, by replenishing the debris to make it good as new.
In the end, the debris hut is truly a lifesaving device if you live, hunt, adventure or travel in colder climates. Learn the skill, practice the skill, and then store the knowledge away for the time you may be working against all odds.