Nowadays we all carry a handheld GPS on our hunting trips or treks into the woods, but do we really understand how to use it the way it was designed? In other words, can you translate what you see on the small electronic screen to the real world by quickly plotting the position onto a paper map? What we’ve found in our training classes is that most people can’t. You’d be surprised how lost many people can get even with a working GPS in their hand. They either use the internal GPS topo mapping software or they simply use the device to point them back to their truck without ever really knowing where they are located at any given time.
That simply doesn’t work for me.
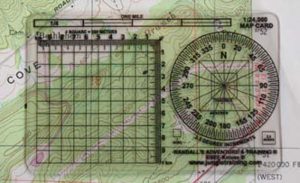
In the past five years, I’ve had two GPS units die in the woods, so I refuse to trust my navigation ability to anything that requires batteries or circuit boards. Besides, our brains don’t work well unless they can put things into perspective, so seeing a location on a piece of paper and being able to associate known objects to where we are, instead of viewing that location on a tiny GPS screen, allows the critical overall picture to sink in. Bottom line is that, if you’re going to carry a GPS, then carry a compass and a map to back it up, preferably a 1:24,000 U.S. Geological Survey map with the Universal Transverse Mercator (UTM) grid already lined in.
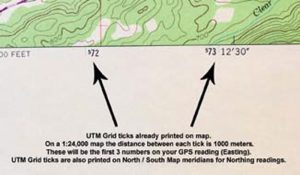
Table of Contents
UTM COORDINATE SYSTEM
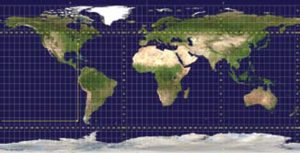
UTM is a rectangular coordinate system that divides the earth into 60 zones (numbered 1 through 60) and 20 latitude bands. All coordinates are expressed in meters, since it is much easier to have a mapping system based on the power of ten than to figure equations such as: 12 inches equal a foot, three feet equal a yard, 5,280 feet equal a mile, etc.
This equally divisible “world laid out in flat” grid system allows it to be projected onto maps without the curvature distortion caused by the Latitude/ Longitude system. So, the distance between UTM grid lines remains constant through the mapping system, unlike Lat/Long.
UTM is by far the easiest method of relaying your position to others, finding yourself on a map after getting a location fix with a GPS unit, or navigating to a position on a map using a GPS unit. The beauty of this grid system is that you only have to plot the last three numbers on the map, since the rest of the coordinate values are already printed on the map.
FINDING A GPS LOCATION ON A MAP
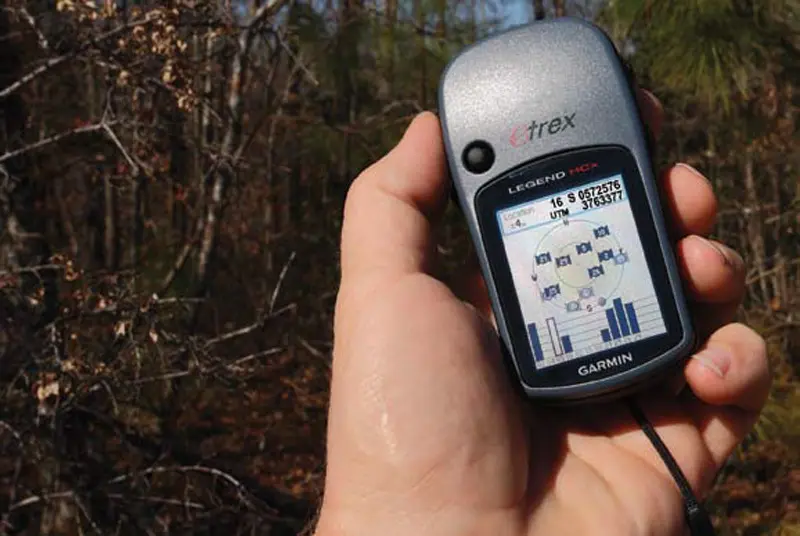
Let’s assume that our GPS screen (in UTM position format) gives us the following readout:
16 S 0572576 3763377
The reading 16 S 0572576 is the Easting reading and will always be the first coordinate given. The Northing coordinate is 3763377. The 16 S is the UTM map zone. (Map zone information will be printed on the data section of your topo map.) The next digits (0572) will be found on the bottom Easting (left to right) meridian of your map. The 0 will typically be left off, so you will be looking for 572 and a small blue tick mark. Once that is located, the remaining three digits on your GPS reading (576) are the actual number of meters east (to the right) of the 572 blue tick mark.
To determine this on your paper map, use the correct scale map card (in this case 1:24,000) and measure 576 meters east of the 572 tick mark and mark that point.
To find your Northing location on the map, use the same process as Easting. In the example above, the 3763 will already be marked on the Northing map meridian, so you only need to plot the 377 meters north of the 3763 blue tick mark. Where the Easting and Northing locations cross is your exact location on the map.
If you haven’t already figured this out, each blue tick mark is separated by exactly 1,000 meters on a 1:24,000 topo map. Pretty simple stuff, eh?
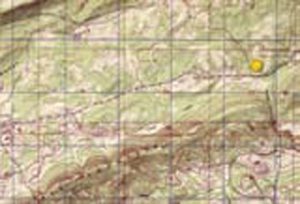
Using this same system and technique, you can also find any point on the map that you wish to travel to using your GPS. Simply pick out where you want to go on the map, plot its exact UTM position using your map scale card, then enter those coordinates into your GPS as a new way point.
TROUBLESHOOTING
As with any system, there are a few things you should watch out for that will cause problems. The most common mistakes are having the wrong map datum programmed into your GPS unit or not using the correct position format.
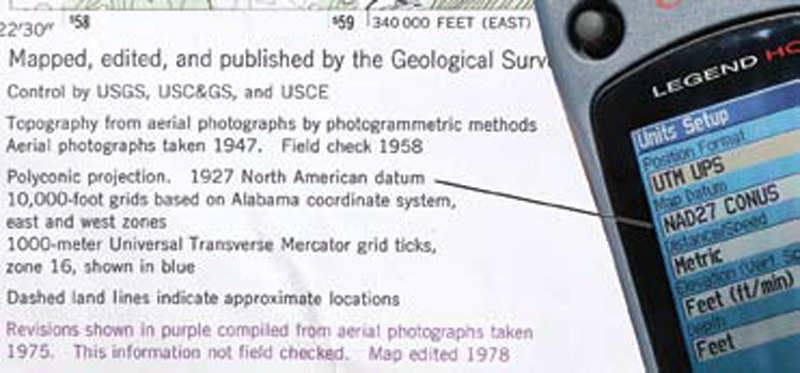
Always look at the map data paragraph located at the bottom of the map. (On Geological Survey maps, the map datum will usually be printed in the lower left hand corner of the map.) For example, it may read “1927 North American Datum,” which translates to NAD27 on your GPS unit. Other common datums include NAD83 and WGS84. If you use the wrong datum, you can easily be several hundred meters off once you plot your coordinates from the GPS unit to the paper map. Also, make sure you’re using UTM as your position format in your GPS unit, otherwise the coordinates you read will be useless for the UTM mapping system.
Another common mistake is having the wrong map for the area you are working in. Always verify the “big picture” of where you will be. If you’re going to be working in an area that’s close to the map’s edge, make sure to carry the next map in that series. There’s nothing worse than taking a location fix with your GPS only to find that grid line doesn’t exist on your map.
Remember to plot Easting first then Northing, since your GPS will always show Easting as the first coordinate and Northing second. Plot left to right then bottom to top. This seems to be confusing for newcomers to the map and compass game, so make yourself a note if you can’t remember it. This is extremely important if you get in a jam and have to radio your position to the SAR team or command post, because they are trained to go by the correct format (Easting then Northing).
Lastly, if you plan on verifying your position with good old map and compass skills (such as bisection and triangulation) and choose to orient your map using the UTM grid lines, remember that declination for the UTM system is the difference between Magnetic North (MN) and Grid North (GN). It is not the difference between True North (longitude lines on the map) and Grid North (UTM lines on the map). So, if your map shows an MN declination of eight degrees west and a GN declination of three degrees west, your actual declination for UTM would be five degrees west.
Overall, this should not be a concern for users who simply want to plot their location on a map using their GPS, but for the diehard map and compass user, it can be critical.
And keep one of my Wilderness Mantras in mind: we should all be diehard map and compass users. Relying solely on an electronic device that could fail is asking for trouble.