As an Infantryman in the 1990s, when it came to carrying a rifle for combat, the sole position I was trained on and used was the Classic Low Ready (both hands on the rifle, buttstock touching the shoulder, muzzle pointed down at the ground right in front of your feet).
At the time it made perfect sense. It was a great way to carry the rifle on long patrols and minimized flagging (covering your buddy with your muzzle) in close quarters combat.
It was not until I later joined Special Forces that I received formal training on other ready positions and realized that, along with good fundamentals such as stance and grip, utilizing the right ready position for the situation can be a crucial element in tactical shooting.
Classic Low Ready: muzzle pointed down, arms relaxed, buttstock still in contact with shoulder. Keep your head up looking for threats.
Table of Contents
CLASSIC LOW READY
In addition to being a great carry method and one of the best techniques to not flag someone, for new shooters the Classic Low Ready is also one of the simplest and safest techniques to learn. For close quarters battle (CQB), using the Classic Low Ready allows you to stack up super tight to the guy in front of you. This can make for fast room entry, as the closer you are to the guy in front of you, the faster everyone can make entry. A speedy team entry leads to surprise and domination of the target. The goal of any entry team going in on a hostile target is to create a wall of lead via all entry members shooting almost simultaneously at the threats in the room.
How To Execute
The keys are to keep the heel of the stock in the pocket of your shoulder and let the muzzle rest naturally down to about a foot in front of your feet. Engaging a target is just a matter of raising the rifle up, allowing your cheek to settle on the stock, and bringing the sights up to your eyes while simultaneously putting the rifle on fire. With one smooth motion, you’re ready to make the shot.
What Not To Do
When faced with a stressful situation such as a gunfight, shooters have a natural tendency to fixate on their sights. To combat this, many tactical shooting instructors emphasize searching or scanning after you engage a threat. Besides looking for more bad guys, the point is to break the tunnel vision that sometimes happens to shooters.
This same focus manifests itself with the Low Ready in that under stress, shooters may want to keep their heads oriented down toward their rifle sights. The issue with this is you are looking down and not up scanning for threats. Look at any photo of Military or LE SWAT teams stacked up using the Classic Low Ready, and chances are you’ll see at least one guy looking down at the floor where his muzzle is pointed. Not what you want to be doing when threats could come from any direction.
Because of this issue, many tactical teams now use other ready techniques that keep their rifles up, which in turn naturally keeps their heads and eyes up.

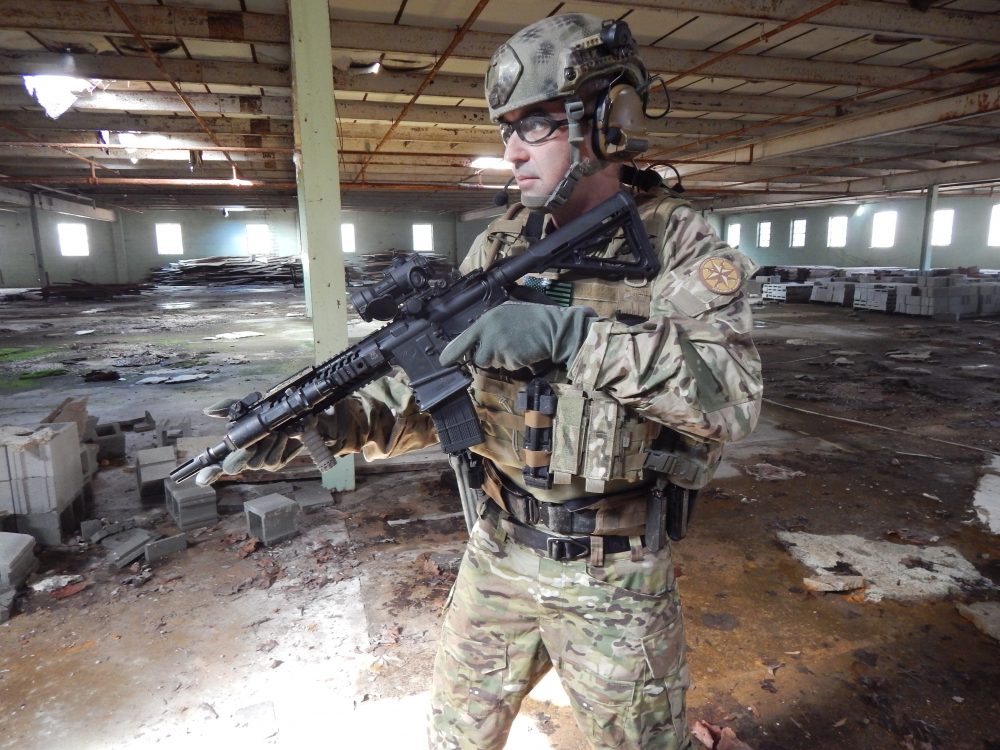
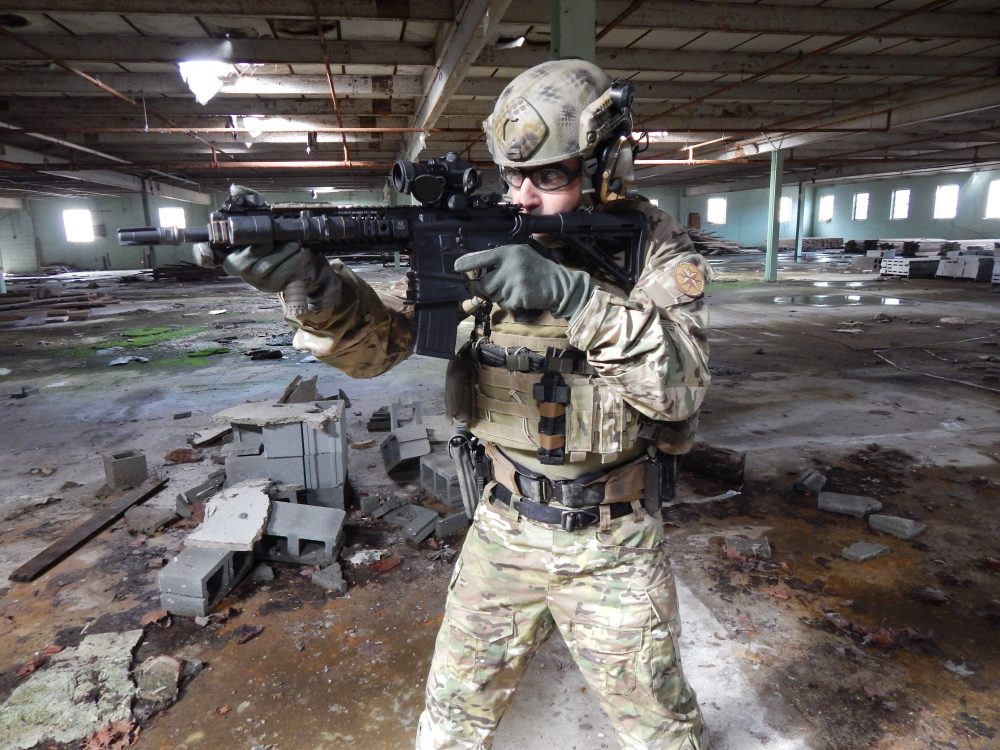
Modern Low Ready or Depressed Muzzle: drop rifle down just far enough to see over your optic, clearing your line of sight. Whether going into a room as number one man in CQB or starting a 3-Gun stage, this is the ideal technique. Minimal travel up to mount rifle allows maximum speed at engaging target.
MODERN LOW READY OR DEPRESSED MUZZLE
While it can only be measured in tenths of seconds, the reality is, the less distance you have to raise your muzzle, the faster you will be for your first shot. For this reason, most shooters today know the Low Ready as muzzle down just below your line of sight. That is why I refer to muzzle all the way down at the floor as the Classic Low Ready, to differentiate between the two methods.
This version of the Low Ready, or Depressed Muzzle (military term for this technique), derived from both the civilian and military worlds at the same time. On the civilian side, in shooting sports such as 3-Gun, what the Low Ready technique should look like is often left up to the discretion of the person running that course of fire. And in most cases, that person is also competing in the match. So just for the sake of getting off the fastest first shot possible, Low Ready is usually muzzle just slightly down. The intent of most start positions in matches is that everyone starts the same way to keep it fair. As long as everyone does it that way, it is legal in a match.
On the military side, within Special Operations I was trained on the new Low Ready (Depressed Muzzle) around 2006. As a direct result of our experience fighting overseas, the Classic Low Ready was just not getting it done because it’s too slow and, as mentioned earlier, the natural instinct to keep your head in line with the muzzle is not conducive to good situational awareness.
Using Depressed Muzzle keeps your head up and, with the muzzle down (at most 15º), allows for a faster first shot, especially if you’re the number one man in a stack going into the room. In current CQB training, number one guys using the Depressed Muzzle are encouraged to hunt the room for targets and make shots prior to going all the way into the room.
How To Execute
Like the Classic Low Ready, with the Modern Low Ready/Depressed Muzzle, you want to keep as much of the buttstock in the shoulder pocket as possible. Then it’s just a matter of lowering the rifle until whatever sights you are using clear your line of sight. When you are presented with a target, you are raising the rifle up only a couple of inches, thus allowing the fastest first shot possible.
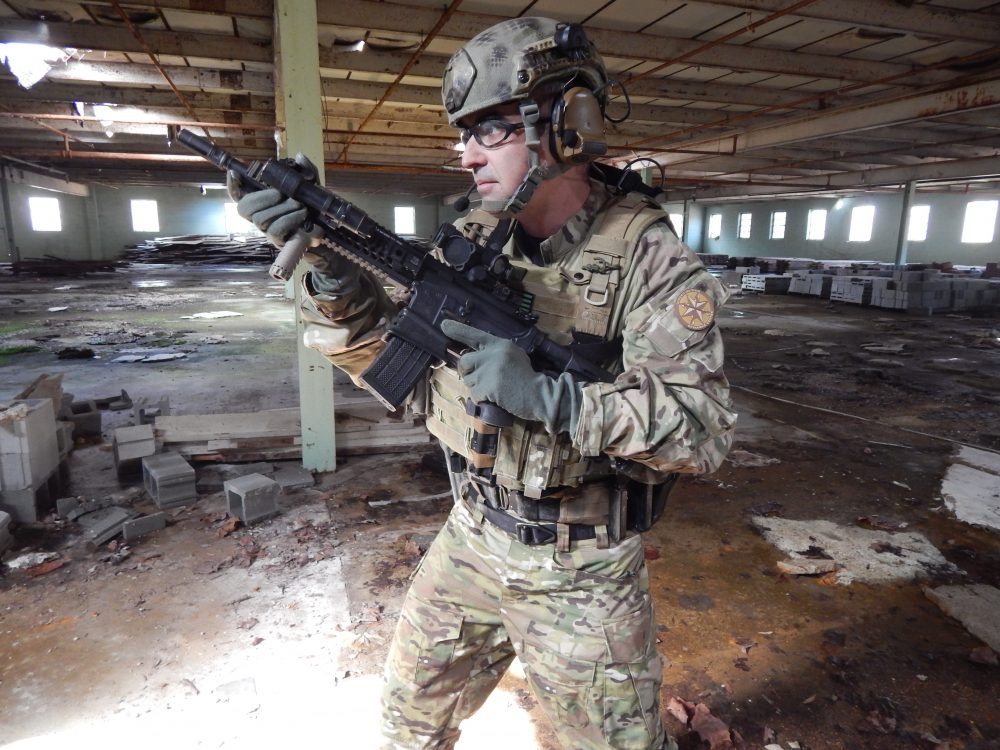
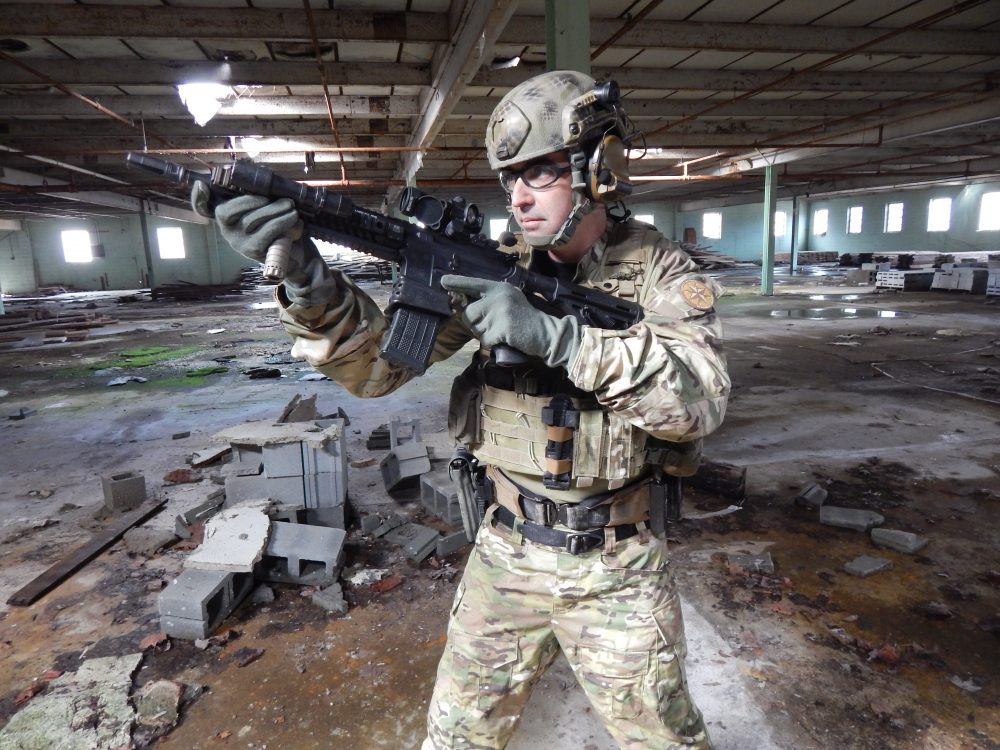
High Ready: buttstock between elbow and mid-section. Key is to keep gas block (or front sight post) up at eye level. This is author’s preferred technique for CQB if behind other assaulters or if he needs to move as fast as possible to a point of cover or a position in a 3-Gun stage.
HIGH READY
As already mentioned, the ability to engage targets faster is the number one factor why the Low Ready has transformed from muzzle at the floor to just down below line of sight. Speed is also the reason for the widespread adoption of the next ready position: High Ready.
The version of the High Ready I use was taught to me in 2004 by Rich Mason, CEO and Lead Instructor of the Direct Action Resource Center. I say “version I use” because aside from being probably the most controversial of the ready positions, it is also one of the most misunderstood and improperly executed techniques within the tactical community.
What has classified the High Ready as a “controversial” technique to many is the fact that, with the muzzle being up generally around eye level, the chances of your flagging someone go to a totally unsafe level. I agree that if you have an accidental or negligent discharge, the level of catastrophic injury can go up (a shot to a person’s head as opposed to the legs using the Low Ready). But I would like to point out that in the past ten years I have seen it used in CQB with proper technique and training by assaulters in my community, and the frequency of flagging incidents with the High Ready have not increased compared to other ready positions.
The fact is that CQB is the most dangerous scenario a gunfighter can find himself in. You might be surprised that most professionals with real world experience will tell you that in CQB, flagging sometimes happens and is not totally unavoidable. In CQB, safety for fellow team members relies on multiple layers. Muzzle awareness and trying not to flag your buddy, running finger off trigger until you’re ready to fire, and proper safety lever manipulation are all important in order to keep an incident to a fellow assaulter from happening.
Many assaulters will agree that any technique that allows you to engage threats and targets faster is worth using even if it riskier or more hazardous.
Bottom line: what’s the biggest threat in CQB? The enemy you’re facing or being shot by your teammate’s AD? The correct answer is the enemy, because they are the unknown variable. If you’re worried about being shot by your buddy, a) you’re in the wrong line of work, and b) with proper training and technique, the risks from flagging within the team can be mitigated.

Getting ready to shoot an all-rifle stage. In competition shooting sports such as 3-Gun, starting a stage at High Ready is commonplace.
Proper Technique
I can’t tell you how many different versions of the High Ready I have seen. Everything from holding the rifle muzzle up, to holding one handed with the buttstock sitting in the pocket of the bicep and forearm, to resting the buttstock on top of the shoulder, muzzle pointed skyward and most of the rifle above the shooter’s head!
Let me say that, as with any ready position, if you do not have both hands on your weapon, it’s not a ready position to begin with. Also any High Ready technique that has you holding the muzzle up so high it would bump into the top of a doorway as you go through it is one I would not want to use.
The version of the High Ready I use is generally referred to as the cross-body technique. To take up the cross-body High Ready, with your shooting hand on the grip and support hand on the forearm, let the rifle naturally angle across your body. The key is to hold the rifle up just high enough so the front sight post is at eye level. The buttstock should not be tucked under your armpit but rather hang loose between your elbow and midsection.
Keeping the front sight post at eye level not only facilitates a speedy first shot but also puts your muzzle in the best position to minimize flagging, because it’s in your line of sight and you can control where it points.
Using the proper cross-body technique, the rifle has to be totally dismounted from the shoulder. Having the buttstock float around your elbow and mid-section naturally puts your muzzle up at a 45- to 50-degree angle. The beauty of this is that, as you stack up closer to the guy in front of you, your arms holding the rifle get pushed in, which results in your muzzle rising to a higher angle. What you see in tight CQB stacks using the High Ready are muzzles pointed up between heads, not at the back of heads.
Begin with rifle at High Ready position.
What Not To Do
With the High Ready, keeping the buttstock low keeps the muzzle high and up, which is what you want. What makes for crazy and unsafe High Ready techniques is that some shooters try to keep buttstock contact like with the Low Ready so they are prepared to make a shot. Raising the buttstock will cause the muzzle to drop to a lower angle and increase the chances of your flagging someone, because you’re running around with your muzzle up only at 20 degrees or so—perfect back-of-the-head level for a lot of us!
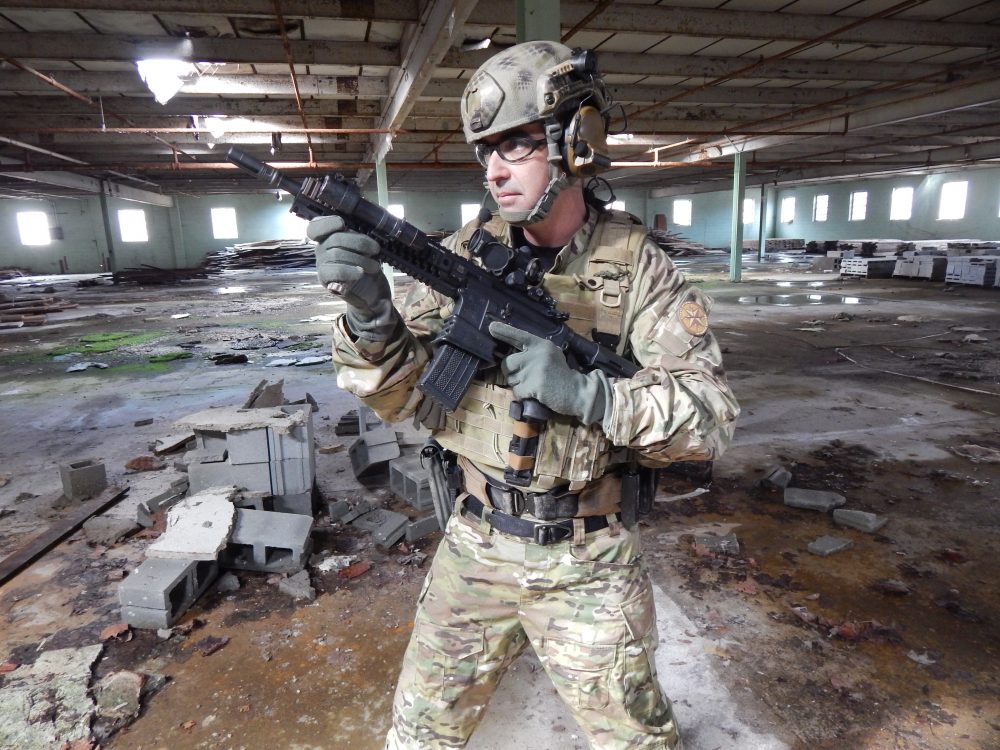
Push rifle up and out, clearing buttstock from under your armpit and simultaneously driving it at your target.
Push-Pull Technique
In the High Ready, because the buttstock is not shouldered and down under your armpit between your elbow and torso, to mount the rifle and make a shot, you must first get the buttstock out and clear. The best way to do this is the two-step push-pull technique.
Step 1: As a target presents itself, push the rifle up and out from your body just far enough so the buttstock clears from underneath your armpit and midsection.
Step 2: Once the rifle is clear of your armpit, pull back and seat it into your shoulder pocket. At the same time you’re pulling the rifle back, acquire your sights, move from safe to fire and, once you have the rifle seated, break the shot.
As you pull rifle into your shoulder, pick up sight picture and place weapon on fire.
Detractors of the High Ready point out that because you are using a two-step push-pull technique to make a shot, it’s nowhere near as fast as the Depressed Muzzle or Low Ready, so why use it in the first place?
If you’re shooting static, I agree—standing still on the buzzer, the High Ready is the slowest of the ready positions. Change the situation to having to move to a piece of cover, or a shooting box that’s more than a few steps away, or in CQB where your number one man breaks off to clear a room and you need to get your gun on target as fast as possible. Then the High Ready might be the best technique to use.
Advantages to Shooter, CQB and High Ready
We learned through experience that the Low Ready was way too slow for a number one man in a stack, so we adopted the Depressed Muzzle. The rest of the guys in the stack learned the same thing and also needed a faster method of getting their weapon on target.
For the number two man in CQB, as the number one man enters a room, you must wait for him to peel off left or right for you to manipulate your rifle up as you enter. The advantage the High Ready gives is that, as the guy in front of you peels off left or right as he enters the room to clear his corners, the High Ready lets you just drop the muzzle down naturally once the man in front of you is clear.
The difference between dropping down and bringing up from Low Ready is that coming down from High Ready, you can begin once the guy’s head in front of you is clear. With Low Ready, you have to wait until his whole body is out of the way. While it might only be measured in tenths of seconds, coming down from High Ready has proven faster for guys behind the number one man in terms of getting their weapon into the fight.
Another advantage of running in the High Ready is situational awareness. Your front sight post being up at eye level keeps you from staring down at the floor, as often happens with Low Ready—there is no natural tendency to keep your head in line with your sights. In fact, the front sight post being at eye level aids in driving the rifle onto target. Using the High Ready facilitates our natural tendency to put stuff between us and harm’s way. When you see a threat, you want to push your muzzle out, putting you in the position to give it a lead injection if needed.

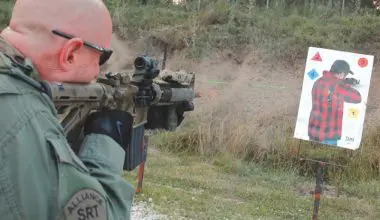
Depressed Muzzle seen from front. Lower your rifle just far enough so you can look over your sights and rifle, allowing clear field of view and fast first shot if needed.
EMPLOYMENT OF READY POSITIONS
In CQB scenarios, the High Ready and Depressed Muzzle have proven their advantages. For scenarios outside of CQB, such as on the flat range and in competition shooting, employing the right ready position at the right time can help you engage targets at speed.
Stationary Shooting
When shooting from a stationary position, Classic Low Ready or Depressed Muzzle are hands down the ways to go. Because they are both one-step movements and the High Ready is a two-step, they are faster. Doing up drills with a shot timer or starting a course of fire where you have to make a shot right away, Depressed Muzzle is the fastest technique.
At some shooting matches, you might have to start in High Ready. In 3-Gun, the most popular High Ready technique has you touch your buttstock to your belt or waist. This method has nothing to do with speed. It’s just a way to ensure everyone starts the stage the same way.
MANEUVERING THROUGH A COURSE OF FIRE
In most courses of fire in competition shooting, you are required to shoot at targets from multiple points. Not only do you have to decide what ready position between points you should use, but you also should shoot while moving through the course or move to spots where you can see the most targets and shoot static, then repeat until you have shot everything.
In some instances, the course of fire is dictated to you, such as you must make all shots from designated shooting boxes. In others, you just stay within bounds and decide for yourself how to shoot it.
I’ll save my advice for shooting on the move for a future article, but as far as the best way to move from point to point to engage targets, the ready positions I use in between them are based solely on the distance I must travel to the next point. My rule of thumb is, if the distance is less than three steps, I use Depressed Muzzle.
For example, if you are in one shooting box engaging targets and must move to another box three paces away, as you leave the first box, just drop your muzzle to Depressed Muzzle. While you can stay fully mounted behind the rifle, I like to drop to Depressed Muzzle to clear a view of the next set of targets, plus I can move faster. At the next shooting box or point, as your first foot enters, you should be mounting your rifle and lining up your sights on target, so as soon as your second foot is in and planted, you can be shooting.

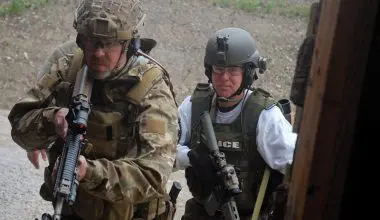
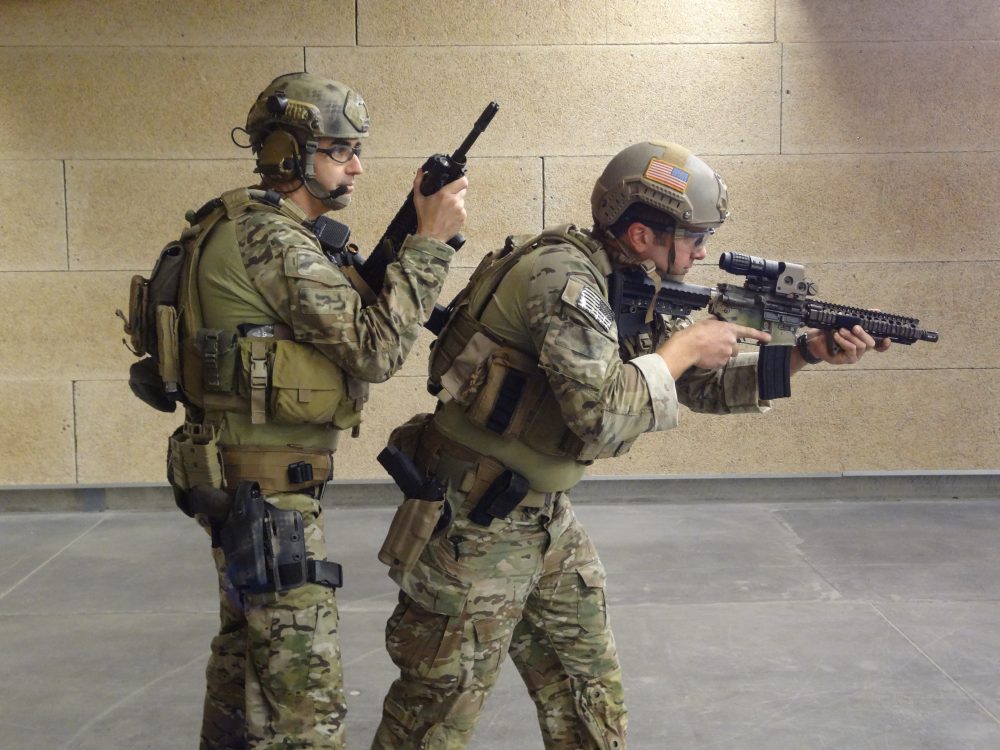
Number one man in this modern stack uses Depressed Muzzle; number two man at High Ready. With height of High Ready set off the gas block/front sight post and not the muzzle, even if shooter number two were using an SBR, chance of flagging is slim. If number two man closed the gap, it would push his forearm back, making High Ready angle closer to 90 degrees straight up—plenty safe.
Now let’s look at the same scenario, but this time the two boxes are beyond three paces to a dozen. For any movement of six paces or more, I prefer the High Ready, because it facilitates running, as you can pump your arms more than in Classic Low Ready or Depressed Muzzle. While you can pull off a hurried walk with the latter, running is out of the question.
The situational awareness aspect of High Ready, because of your head being up, is important. Like in CQB, users of Low Ready tend to look at the ground as they move. If you have to cover some distance, High Ready is the fastest method.
To get the most speed out of the High Ready, time your steps as you enter the box with mounting the rifle. When you are about three paces away from the next shooting point, start slowing down to a smooth, average-paced walk. At the same time, you can start the push-out step of the High Ready, getting the rifle up and driving the muzzle so it points at the first target you want to shoot.
As your first foot enters the box, the rifle should be all the way up so that, as your second foot enters the box, you are now pulling the rifle in, switching the selector to fire and, as your second foot plants down, you can make the shot.
THE WRAP-UP
Like all shooting techniques, you will find advocates for and detractors against every method. The key is choosing the ones that work best for you.
As most shooters know, to shoot effectively you must be able to balance speed and accuracy. It is the same with using different techniques: Classic Low Ready, Modern Low Ready/Depressed Muzzle, and High Ready. It’s all about using the right one at the right time to maximize your shooting.
Jeff Gurwitch has 23 years military experience—the past 16 with U.S. Army Special Forces. He served in the first Gulf War, three tours OIF, and two tours OEF. He has been a competitive shooter for over a dozen years, competing in USPSA, IDPA, and 3-Gun.