Zeroing can be defined as harmonizing the sights with the strike of the bullet. This is accomplished by firing the rifle over a known distance range, using a ballistic table for the weapon/ammunition combination.
As with most tasks, there are variables and constants. A variable may be defined as a value that will change, and a constant is a value that remains unchanged.
The constants in zeroing are the range (the distance you will be shooting), ammunition (bullet type and weight), and weapon.
Variables are environmental conditions (rain, snow, heat, cold, wind), and the most variable of all variables—you.
The human component is the wild card, and the one that can make or break anything we try to achieve.
Unfortunately for us, even the constants may not be that constant. The ammunition you use may be of high quality or something sub-par.
Your carbine may also be suspect. If you have a hobby gun, sub-quality parts may cause issues. Even if you have a gun made to or that exceeds the spec, the number of rounds fired previously will have caused wear, and barrel erosion may adversely affect the bullet strike.
Consistency is the mother of accuracy, and it is especially so in getting a zero. And along with that consistency, we need to drink a cup of common sense and have realistic expectations in what we are doing.
Our main focus is on the carbine, but we also realize that some are shooting one type or another of precision AR.
The standard of accuracy for the M4 is 5 MOA. Realistically, most new M4s will shoot significantly tighter than that, down to 2.5 MOA.
Table of Contents
AMMUNITION
How well they will actually shoot depends on two other issues—the shooter’s competence and ammunition.
Ammunition quality can be a showstopper, as a lot of it is problematic out of the box. It has become so bad that at my company, EAG Tactical, we do not allow some types and brands of ammunition in our loaner guns, nor will we do any on-site repair for students who insist on using crappy ammo.
If you use sub-par ammunition, you can expect sub-par accuracy, no matter how whiz-bang your carbine is.
For non-precision long guns, ammo from the same lot isn’t generally necessary, but it should at least be the same maker, same type (that is Ball, Soft Point, Hollow Point, etc) and the same weight (55-, 62-, 77-grain, etc).
 CARBINE CONDITION
The carbine needs to be in reasonable condition as well. The sights—both BUIS as well as optics, must be serviceable and the mounts tight. Remember that Loctite is your friend….
A few years back, I had a very opinionated shooter at class who told one and all about how the master armorer for a state police agency had reworked his $700 hobby gun into a wonderful $3,000 masterpiece, and that it was perfect in every way.
Except that he couldn’t hold a group under 8 MOA. He refused to listen to advice concerning his sight (an Aimpoint T1) and mount (a LaRue LT660). These are both excellent items and have proven track records over the years.
Finally on TD2, he started whining and complaining that the LaRue mount was loose. Putting aside for a moment the fact that I had asked him to check this on the morning of TD1, that mount will only be loose if it was not properly tightened on the rail when installed.
He finally allowed me to touch his carbine, and it became immediately apparent that the mount was rock solid tight on the rail. What was loose was the T1 on the mount. Very loose. When I removed the mount, two of the four screws fell out, and the other two were about to do the same.
The screws had no trace of Loctite on them—strange since LaRue sends them out with Loctite applied. He sputtered and slobbered and eventually became an NFE because of his attitude, but another student advised that his armorer had “upgraded” the screws to enhance reliability. He—or the master armorer— just never applied Loctite.
No matter how good and consistent a shooter you are, you will not get good hits if your equipment is sub-par.
ACQUIRING A ZERO
To acquire a zero, you have to fire a group—a series of shots, usually three or five—into a target. Based on where that group is on the target, we may have to move the sights so they will be in sync with the group on the target.
Any useable sights will have a click type of adjustment that will make this easier. If you have a sight with friction adjustment, you are in for a very frustrating time. Do yourself a big favor—86 that sight and get a worthwhile one.
Back to the clicks.
Each sight has a formula that advises you how far each click will move the strike of the bullet. For most nonprecision optics, this will be 1/2 Minute of Angle. This translates to ½ inch at 100 yards; ¼ inch at 50 yards, and 1/8 inch at 25 yards. Once you discern the center of the group, move the sights in the direction indicated to center the group.
Get back in prone and verify.
THE BIGGEST VARIABLE
Now comes the big issue—you. You need to have the ability to do three things:
- Get into a stable firing platform.
- Acquire a good sight picture.
- Control the trigger straight to the rear.
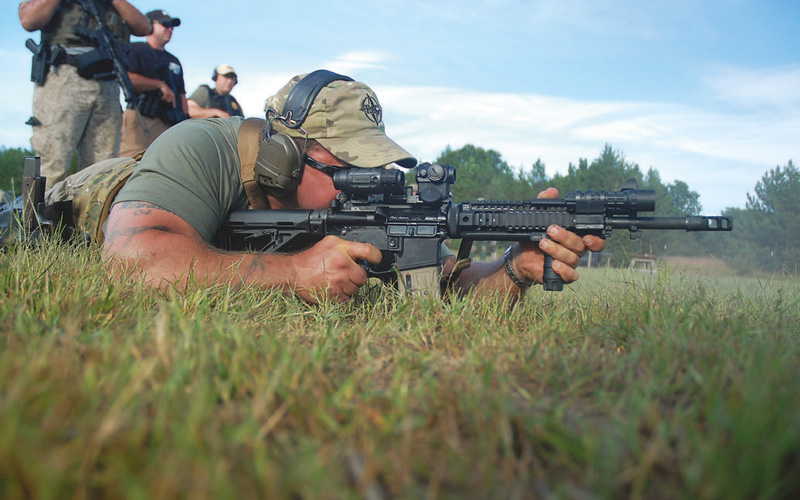
A stable prone firing platform should be simple, but for many it is not. There are several considerations here.
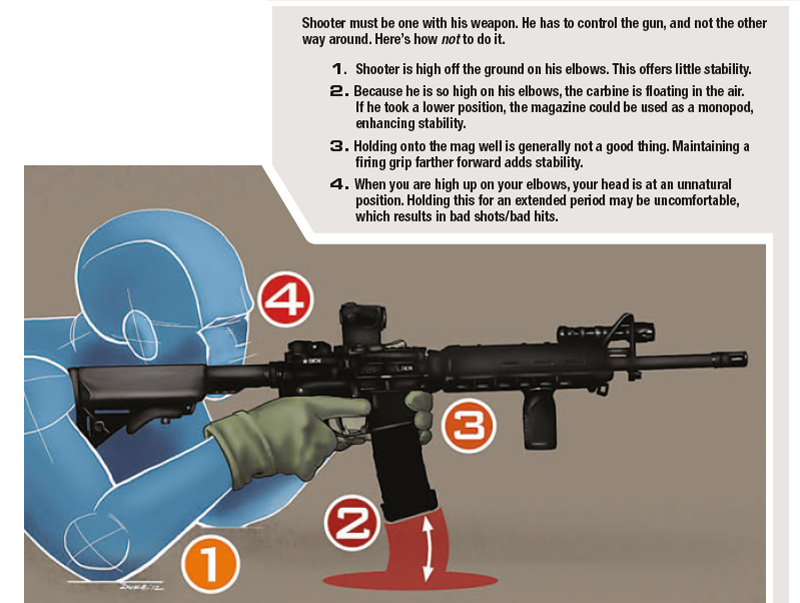
You need to be as low to the deck as you can be. Many will rise up on their elbows, back arched, and nothing supporting the gun. This is an unstable position and offers nothing for what we are trying to accomplish. To get this done properly, you need to get as low as possible. This means getting the gun as low as possible. Here we need to dispel some myths.
If you are running an AR type, get the magazine into the deck. No, Virginia, having the magazine touch the ground will not cause you to become sterile or cause the gun to blow up. If your gun is made to the spec and you have good magazines in it, that magazine will act as a monopod.
People often tell me they only use 20-round magazines so they can get lower to the ground, when in fact they are so high up off the ground they might as well be kneeling.
Military myth has long held that allowing the magazine to touch the deck is bad. And when we hear that any part of the gun touching the deck is “illegal,” that probably means it’s against a rule in competitive shooting.
PRONE POSITIONS
There are several prone positions available. We’ll look at two that have some commonality.
Keep in mind that we are talking about a carbine, not a precision rifle. Getting a natural point of aim—that position that is without muscle tension to stay on target—is a good thing, but may not always be possible. If you have the time, find that natural point of aim. If not, do the best you can under the circumstances.
What you must do is hold the rifle tight against your shoulder. For some, extending the stock out a notch may help. If not, roll your shoulder forward so that you have solid contact with the stock. Apply steady rearward pressure with both your strong-side and supportside hands.
If you are not applying some pressure to the front end of the gun, it will bounce around. If you allow the rifle to bounce around, you will have lost the consistency that we strive for.
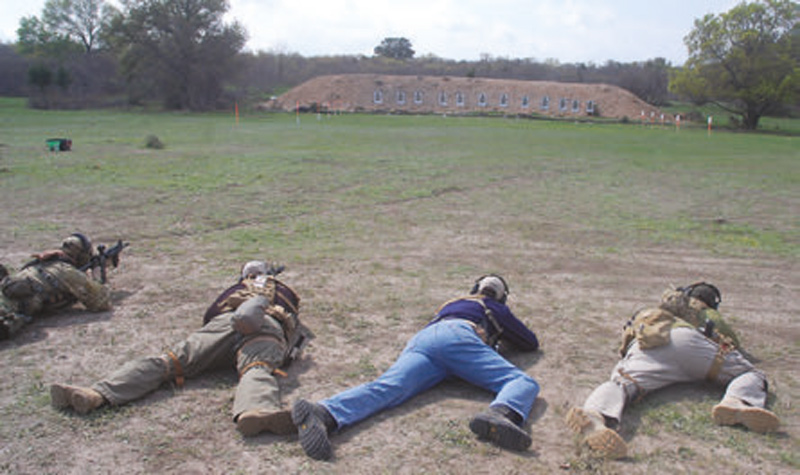
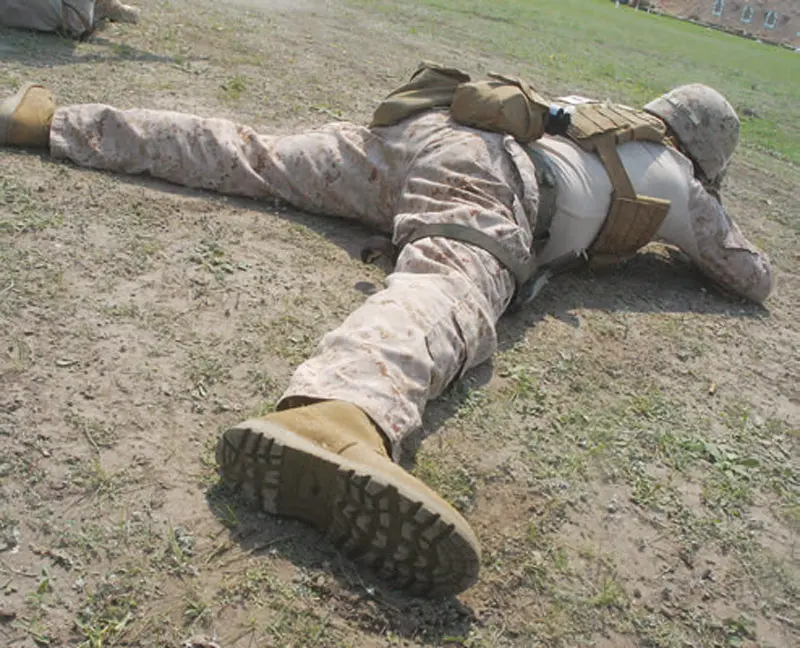
Conventional military prone is with the shooter lying flat on his stomach, in line with the rifle. The legs are splayed and the feet flat on the deck. Avoid being up on your toes—it can set up movement to the rifle.
If you are wearing armor with magazines stacked three layers deep, this position may not be for you. And if you have a humongous food blister from choking down Ho-Hos instead of your fruits and veggies, you may also have issues.
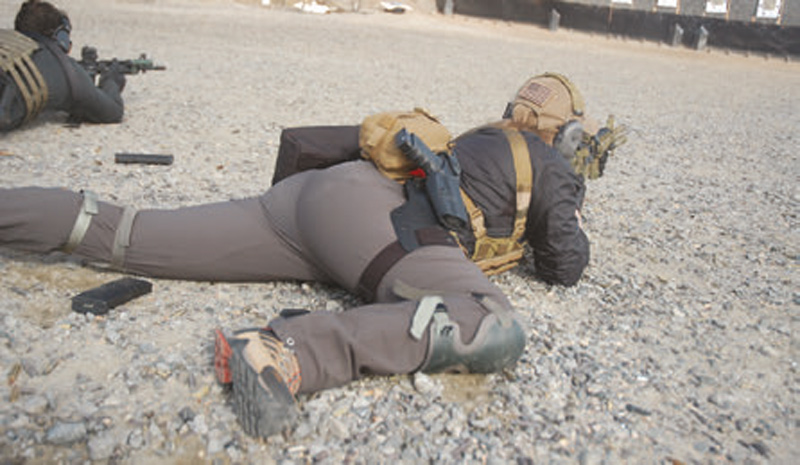
A second prone position is competitive prone: the shooter is also low on the deck, but his strong-side leg is drawn up sharply to the chest. This accomplishes two things. First, it gets the diaphragm slightly off the deck, but more importantly, it permits more mass behind the gun, enabling rapid accurate shots downrange.
This is one of several TTPs I carried over from High Power competition. I used it exclusively in the 300 Yard Rapid Fire stage, and it works.
SIGHT SYSTEMS
Acquiring a good sight picture will vary with the type of sighting system you use. If you are still running the legacy iron sights, you need reasonable light to be able to do this, as the rear sight aperture only allows so much light through.
Center the front sight tip within the rear sight aperture (known as sight alignment), then put it on the target (sight picture). With iron sights, you can only focus on one point at a time—the choices being the target, the front sight tip, or the rear sight. The “A” answer is to focus on the front sight tip. It is also much easier to do when you have excellent vision.
If you are using a Red Dot sight, life becomes a lot easier. Turn down the intensity of the reticle to the lowest possible setting with which you can still see the dot. This will not make the dot smaller, but will clean it up a bit.
Normally we look at the target and then superimpose the dot over it with both eyes open. If you are looking for a high percentage shot and have old or otherwise diminished eyes, you may find it easier to look at the dot instead of the target, for this type of shot only. Additionally, it may help if you close your nondominant eye.
TRIGGER CONTROL
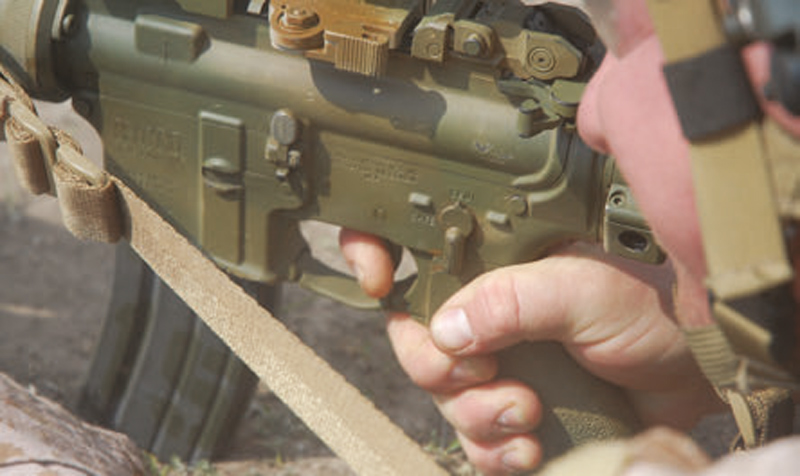
Once you have a stable firing platform as well as a perfect sight picture, control that trigger by placing your finger on the trigger up until about the crease in the first knuckle.
I say about, because we are all different. Some have short stubby fingers, and others long slender ones. Some have fingers that look like bratwurst, and I am glad they’re gunslingers and not proctologists.
No matter the size and shape of the fingers, you need to be able to press that trigger straight to the rear. It is more easily accomplished when you don’t have your finger up to the third knuckle wedged inside the trigger guard.
The amount of finesse we use to control the trigger straight to the rear is dependent upon our distance from the target. The Law of Inverse Proportions is at work here. The closer we are to the threat, the less precision we need, though we will need more speed to defeat the threat. Conversely, when farther away, we may have more time to deal with the threat, but we also need to be more precise.
For zeroing, I want those shots to be very precise. Therefore, as I fire the shot, I continue to hold the trigger straight to the rear and reset it with a deliberate motion. I can reset the trigger at the speed necessary, or slowly when firing a precision shot. But my preference is that the finger does not leave the trigger when resetting it. It can be done and is done by a lot of very good shooters.
When we fire the first shot, we want to make sure all our ducks are in a row. That is, we don’t have to readjust our position, regrip the rifle, and so forth. If we can fire five consistent shots without flyers (or worse, two separate groups), it will be easier for us to diagnose the group. If, instead of a group, you have a gathering of shots scattered all across the target, there is nothing we can do but get you settled down and shoot it properly.
… FOR DUMMIES
I see folks get down in prone, spend 20 to 30 seconds doing whatever, and all of a sudden their trigger finger appears from right field and they whack that trigger for all they’re worth and then let it fly off the trigger. This will sometimes be followed by a squirming movement, head coming off the stock, and other such nonsense.
This is the opposite of consistency, and if you have not yet mastered being able to shoot from prone, you need to go back to one of the “XXX For Dummies” books and start re-reading it.
You need to get into the prone position of your choice, acquire the target and control the trigger straight to the rear. Follow through (reacquire the sights and reset the trigger), and do it four more times.
If you fired a good shot group, with your sights right in the middle on the target, but it is not centered, do this:
Measure how far the center of the group is from the target center. For example, you are shooting an M4 Carbine with Aimpoint T1 mounted, at 50 yards for a 50/200 yard zero. The center of your group is two inches to the left of the aiming point. Your Aimpoint has 1/2 MOA adjustments, meaning each click will move it 1/4” at 50 yards. You give your Aimpoint eight clicks to the right. If you do everything right, the next shots should be where you want them.
Please don’t do what countless numbers of shooters—private citizens, cops and military—have done since we have had adjustable sights: hold off. Instead of making a precise adjustment with their sights, they make an imprecise movement in the direction they want to go in—with their carbine! This accomplishes nothing, except to waste the instructor’s and other students’ time.
Chasing the zero is another problem. It happens when a shooter analyses his shot group and makes a correction. He fires another group but overcorrects and it winds up on the opposite side of the target. He makes another sight change and once more overcorrects. It’s like a student pilot trying to keep the wings level and failing.
Remember that the M4 and Red Dot Sights are not precision instruments. If you think you can make a one-click adjustment (remember, 1/4”) and actually see that on the target, you may be smoking crack.
Be realistic in your expectations.
FIELD-EXPEDIENT ZERO
How about if we don’t have a real-deal flat range and proper targets? What to do then? Utilize a field expedient.
Field-expedient zeroing can be defined as acquiring a rough zero. As the name implies, it occurs when we don’t have the time or range facilities to get a solid zero.
We sometimes use it when we have a problem student or a problem gun— or both. Having a dirt or sandy berm helps, as we are looking for the strike of the bullet in that dirt. We need about 25 yards for this, but the exact distance is not critical.
Place an object on the berm. This can be a rock, cardboard cartridge box, or anything else that can be easily seen. Fire a shot at the object. If you have an assistant, have him watch for the strike of the bullet. Make a Sophisticated Wild Ass Guess (SWAG) and move the sights the appropriate number of clicks. Fire again to verify. Repeat as necessary.
This will not be precise, but it will get you on paper (or a bad guy) at close range. Verify the zero on a proper target at your earliest opportunity.
The rifle sights must be harmonized with the strike of the bullet if you are to have any chance of successfully engaging a target. It is not difficult to acquire a zero, but a great many make it appear that way.
Consistency is the key to accuracy. Shoot the very best zero drill that you can and drive on.