The Kalashnikov series of rifles, the world’s most widely produced and copied small arm, has been in service for almost 60 years. It’s become an icon, and its widespread use has made it a popular choice for citizens of our grand nation. It has served friend, but more commonly foe. It has seen use as a recreational gun, a defense weapon and a hunting rifle, taking anything from deer to feral boars.
Due to the popularity of the Kalashnikov platform and the change in the political climate, prices of already assembled rifles have risen. Lower-end AKs, such as the Romanian WASR series, are now more expensive than higher-end Russian VEPRs were just a few years ago.

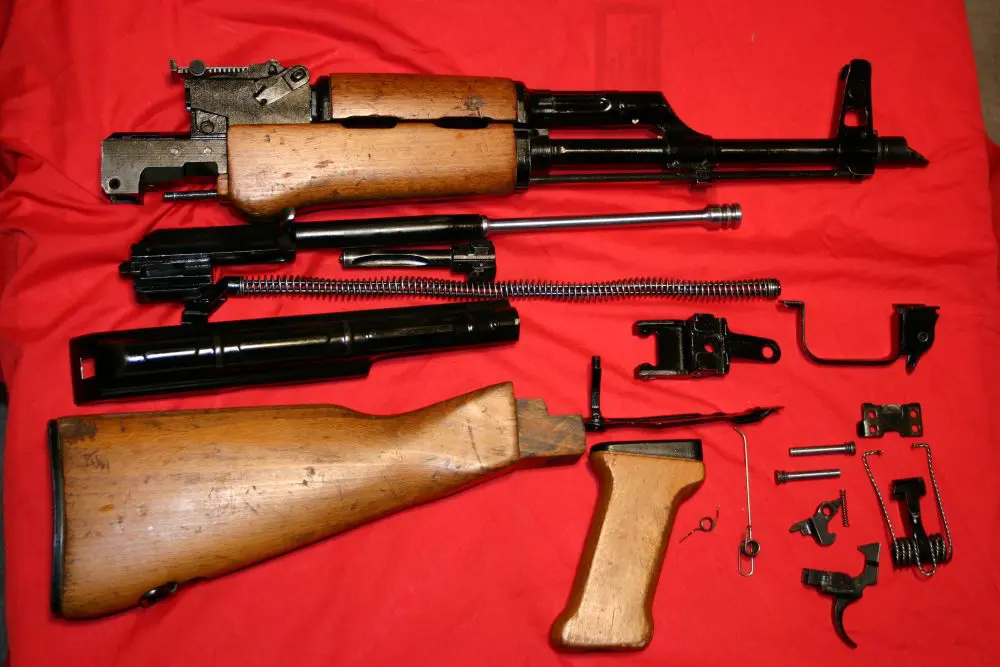
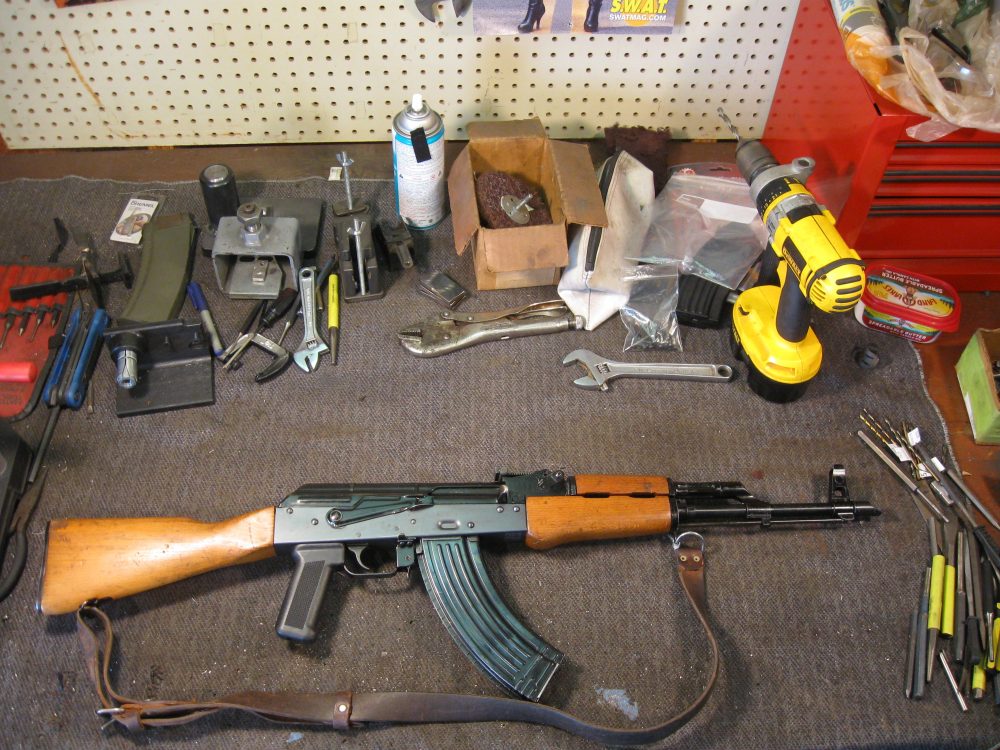
This is how an AK parts kit arrives.
Thus, it’s not surprising that nowadays more people are purchasing AK kits. While these too have experienced increased demand, they are still somewhat reasonable. They do, however, require more attention to detail, and that’s one of the things I’ll be discussing here.
Many varieties of AKs are available in kit form that are not imported any other way, and many of these are high-quality AKs. So building a kit allows you to have an AK that you could not otherwise obtain. These parts kits are typically demilled AKMs that have had their receiver chopped in half.
I need to take a moment to differentiate between an AK-47 and an AKM. The term AK-47 is used to refer to a whole class of long arms that use a Kalashnikov action, but there is a definite difference between a true AK-47 and the AKM, which is a lighter weight follow-on design.
The original AK-47 typically used a milled receiver, giving the gun a weight of about 9.5 lbs. when empty. The AKM, on the other hand, utilizes a stamped receiver and weighs about 7 lbs. empty. The AK-47 is identifiable by a long rectangular groove located above the magazine well, whereas the AKM is identifiable by an oval-shaped longitudinal dimple in the same area. Most parts kits and complete guns we see in the U.S. are based on the AKM design.

U.S.-made receiver and compliance parts.
A complete parts kit should contain everything necessary to build the gun except the receiver. However, you need a minimum of six U.S.-made parts for the gun you build to qualify as a U.S.-made gun under Title 18 of the US Code (18 USC), Chapter 44 Section 922 Paragraph R—commonly referred to simply as “922R.”
In short, this specifies that no more than ten of the imported parts listed in a subsection may be used to assemble a semiautomatic rifle or shotgun. It goes on to list specific parts, and can be found by googling 922R. For more info on Title 18 of the US Code (18 USC), Chapter 44 Section 922 Paragraph R, visit www.tapco.com/section922r.aspx.
Choosing the country where your kit originates is extremely important, since not all AKs are alike. What you ultimately select may depend on how much you are willing to spend as well as what is available. Every AK-producing nation had its own little quirks with regard to what they thought an AK should be.
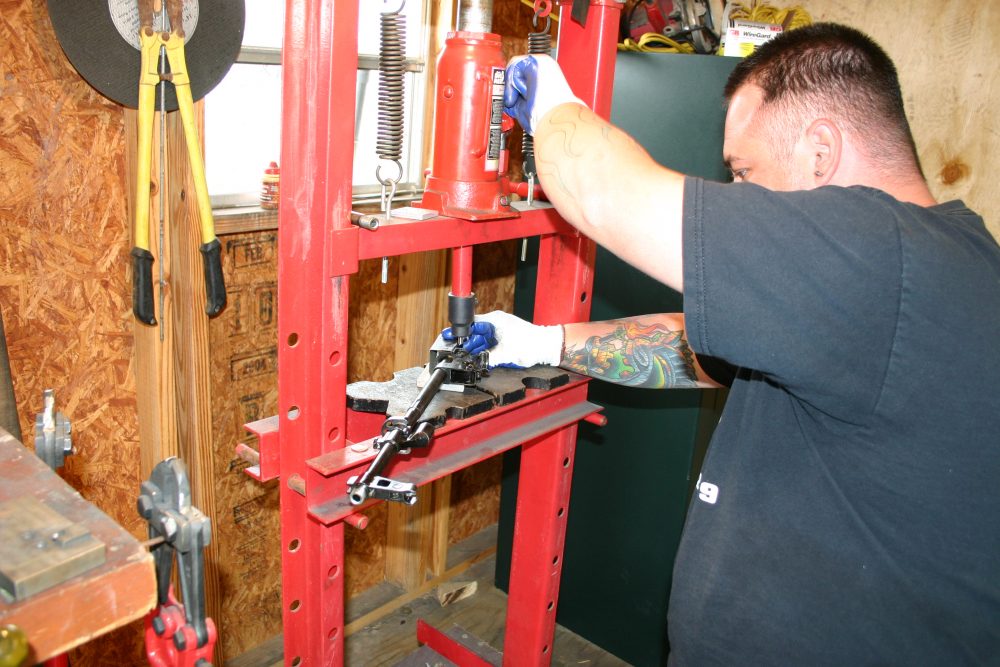
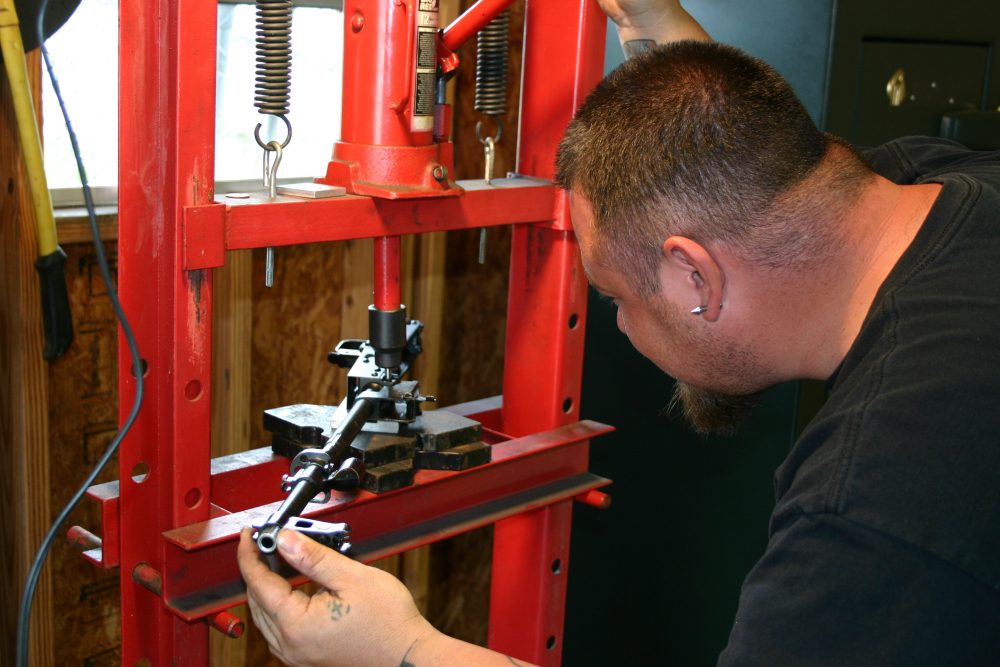
Removing barrel pin with hydraulic press.
Take chrome lining, for instance. Yugoslavians didn’t chrome line the chamber or bore, which could be an issue if the gun was fired with corrosive ammo and not properly cleaned afterwards. So it is important to ask specific questions about the condition of the bore and chamber of any Yugo kit before buying.
Other countries, like Poland, Hungary, Bulgaria, and Romania, chrome lined both the bore and the chamber. To muddy the waters further, some kits now come with U.S.-made barrels, and these barrels are mixed between chrome lined and not chrome lined. It makes sense for the buyer to find out what type of barrel he has and treat it appropriately with ammo selection and cleaning regimen.
Some countries put more into things like finish, others far less. For example, the Hungarians parkerized their SA-85s, then added an oven-baked enamel coating. The Romanians, on the contrary, didn’t seem to care, taking function over form and often unevenly applying a phosphate coating to their AKs.
Another crucial thing to look at is receiver dimensions. Your Polish AKM kit will not work with a U.S.-made NoDak Spud receiver set for a Yugo M70. Nor will a Romanian “G” kit work with your milled Bulgarian receiver. To insure proper fit, it’s best to check with the manufacturer of the receivers.
Barrel pin being reinserted.
Finally, we can’t forget folders. If you have an underfolder kit, you’re going to need a receiver built for it. That is, unless you plan on going with a full stock. Khyber Pass side folders are a popular choice, for good reason, but you will want a receiver set up to accommodate a side folder, unless you want to either spend the extra cash getting an AK smith to make one out of a basic receiver, or you trust yourself to do it.
Since I already had a Hungarian SA-85 kit, I chose a NoDak Spud NDS-1 Premier receiver. This receiver ran me $83 shipped, and is based on the Hungarian AKM receiver. The receiver is laser cut and has proper heat treatment for a stamped receiver. It also has the correct thickness for a basic stamped AKM kit.
This receiver will work with a variety of other AKM kits and is a popular choice among AK kit builders. The U.S.-made receiver counts as one part, and there are a variety of choices in selecting which other parts to use in order to bring the parts count to the required six.
A U.S.-made trigger group counts as three parts: the hammer, disconnector and trigger. Since U.S.-made trigger groups retail in the $30 range, they are a popular option toward meeting the six U.S. parts requirement.
Modifying selector lever to work with new trigger group.
The TAPCO G-2 Trigger Group fit the bill for this. This left me needing two U.S.-made parts, and for this I selected a U.S.-made muzzle device and pistol grip, which probably ran about $30 total. I chose the Ergo-Suregrip since it’s more comfortable for large-handed people like myself.
Determining parts count isn’t always a simple matter. For example the forend, even though it is composed of two parts, the upper and lower, only counts as one part for compliance purposes. Therefore, what you intend the gun to be when finished will influence which U.S. parts you need.
By selecting and purchasing the compliance parts myself, I saved time and money over simply handing the kit over to a gunsmith for assembly and relying on him to provide the parts from his inventory or having him order them. This way I only had to deal with an assembly and refinishing fee, and was able to buy the receiver and the compliance parts a bit at a time, making the whole project more affordable.
Building the kit is a task that some people choose to undertake themselves after they have accumulated a fair amount of experience in the gunsmithing realm. Understand that this is not something for a casual hobbyist, as it requires special tools. If you don’t know someone who has the necessary tools and is competent and experienced, my suggestion is to find yourself an experienced builder or gunsmith.
Assembled AK before receiver was refinished to match paint of original parts.
Since my friend who has built dozens of AK kits is deployed in Iraq, I decided to employ the skills of a gunsmith. As with choosing the kit and the receiver, the same amount of care should go into selecting an AK smith.
Do your homework. Scan the Internet for names, locations, and feedback. Use these criteria for selection. Narrow down your results by asking questions of previous customers or knowledgeable people who may have seen the work of the smith you are considering.
Next, initiate contact with potential smiths and gather information like time, cost, and what work will be done. Assembly prices for an AK kit typically run in the $200 to $250 area, with refinishing the receiver to match the kit an additional $50 or so. Once you have identified some candidates, it is best to make the final decision by phone or in person, since some things are best communicated verbally.
An AK smith may seem intelligent, cordial and knowledgeable via e-mail, but on the phone that same person may reveal himself to be flaky or even unstable. While talent and skill are crucial, proper business practices and ethics are absolutely vital in selecting a builder. This underscores the importance of making inquiries of as many past clients as possible and evaluating overall impressions on the Internet.
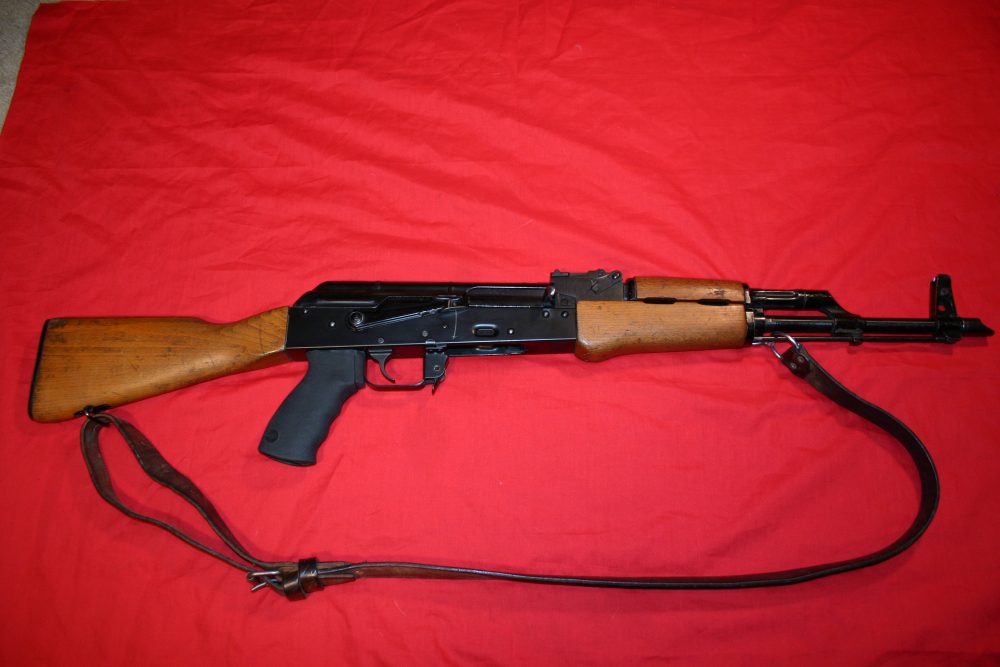
Finished gun after receiver was refinished to match original parts.
I had several choices among smiths, but research quickly weeded out those with a reputation for shoddy work or poor ethics. Other smiths were so backed up that I may not have seen my project completed this decade. After careful research, I selected Dave Trevino of Cold War Classics in Springtown, Texas.
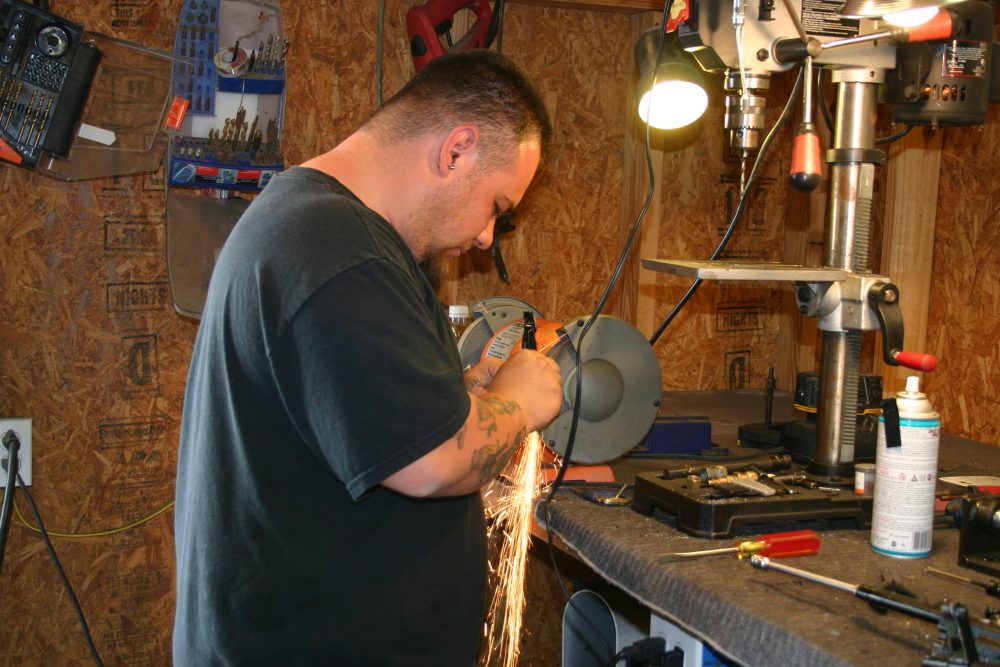
Dave’s first steps were to remove the barrel and remaining rivets from the front and rear trunnions. Removing these rivets was a three-step process. First, Dave removed the head of the rivet and punched down the rivet’s head with a hammer. Then a drill press was used to open the rivet hole up. Finally, he used the drill press to completely remove the rivet.
Next Dave lined up the front and rear trunnions with the NoDak Spud receiver so that all the holes lined up perfectly. The trigger guard and magazine release lock were aligned with their appropriate plates and riveted in place with a bolt cutter/riveting tool.
After the rivets were installed, the barrel was reinstalled using a $100 hydraulic press. Not all that extravagant, but effective nonetheless—just like the Kalashnikov.
From here on, everything was straightforward. The bolt carrier assembly was installed and headspace was checked. Not everyone checks the headspace, but Trevino feels this step is essential for safety.
The TAPCO G2 trigger group was put in next. This trigger group is probably the most popular aftermarket trigger group due to its smooth pull, ruggedness and cost. Finally, the U.S.-made pistol grip and muzzle brake were installed.
At this point the Hungarian SA-85 was a fully functional 922R compliant rifle and ready to fire. However, the last step was for Dave to match the rifle’s finish to the finishless NoDak Spud receiver. For this he used a heavy-duty epoxy resin.
As an afterthought, I added a set of XS Sight Systems AK Big Dot Express sights. For use on an AK, these sights have earned high marks from well-known instructors like Pat Rogers and Paul Gomez. While I did the work myself to replace the original front sight and drum, as well as the rear sight, it was definitely a (compound expletive) experience.
Some might not consider this to be building the kit themselves, and they’d be correct. But I chose to stay within the limits of my skill rather than experiment on an expensive project that could literally blow up in my face.
Hopefully this has given you an idea of what is involved in building an AK from a kit, including the steps and tools involved. Though AKs may be constructed by craftsmen in primitive huts on the Khyber Pass, unless you have those tools, skills, and experience, you will probably want to find someone who does.
The end result will be better, safer, and a hell of a lot less frustrating. After watching Dave build a few guns, I have no doubt that given the right tools, I might eventually be able to build a working model—but I’m not sure I want to be my own test dummy.
SOURCES:
Cold War Classics
Dept. S.W.A.T.
P.O. Box 313
Springtown, TX 76082
(817) 938-2678
www.coldwarclassics.com
Falcon Industries, Inc.
Dept. S.W.A.T.
P.O. Box 1459
Moriarty, NM 87035
(877) 281-3783
www.ergogrips.net
NoDak Spud LLC
Dept. S.W.A.T.
7683 Washington Ave. South
Edina, MN 55439
(952) 942-1909
www.nodakspud.com
TAPCO Inc.
Dept. S.W.A.T.
P.O. Box 2408
Kennesaw, GA 30156-9138
(800) 554-1445
www.tapco.com
XS Sight Systems Inc.
Dept. S.W.A.T.
2401 Ludelle
Fort Worth, TX 76105
(888) 744-4880
www.xssights.com